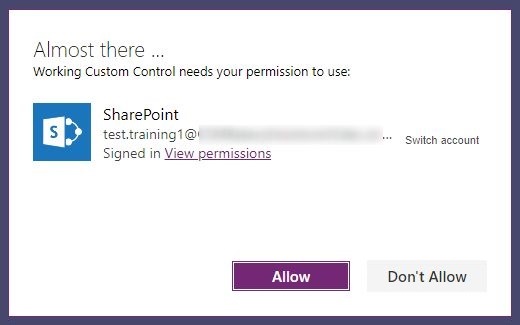
By default when you deploy any PowerApps application which uses connections to various data sources like SharePoint, Azure AD etc, it would show a popup to all the users trying to access the application and ask for their consent to be able to connect to the backend data sources on their behalf.

In general, from security point of view, this might still be acceptable to some organizations. Since also, this appears to be a one time consent granted by end users.
But is it? Everytime, you make any update in the PowerApps application related to those data sources, the consent popup will reappear and users will have to grant to consent again.
This can get annoying easily, as in the cloud world we live today, evergreen applications are the norm.
So, what can be done about that?
Suppress the Consent Popup
Yes, you got it right. As the title of this article suggests, let’s do some quick magic and suppress this message for all users for the selected application(s).
If you do a google search about this issue, you would quickly find out that there is a simple command available to achieve this – Set-AdminPowerAppApisToBypassConsent. Then why this article at all?
Well, this is to ensure you get it right first time. Since I have seen many IT Administrators struggling to run this command when the developers request this during their PowerApps application rollout.
Permission Requirement
- Office 365 Global admins or Azure Active Directory Global admin permission
- These administrators need to sign in to the PowerApps Admin Center at least once before using the PowerShell cmdlets.
- A PowerApp License should be assigned to this admin account
Office 365 Global admins or Azure Active Directory Global admins no longer require a P2 license for administrative access to the PowerApps admin PowerShell cmdlets.
So, in a nutshell, in most production environments, you might need to ask one of the Office 365 Administrator to run this command for your application(s).
Pre-requisites
We need to install the required PowerShell modules before the actual command can be executed. First, let’s get the PowerApps Administration module installed.
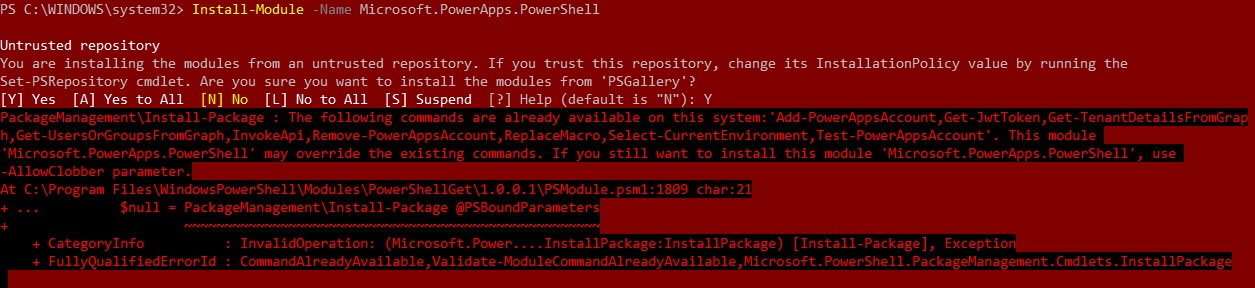
Install-Module -Name Microsoft.PowerApps.Administration.PowerShellThis command may give a nice little warning message about “untrusted repository”. Just go ahead and type “Y” and enter.

Now, we need to install PowerApps PowerShell module
Install-Module -Name Microsoft.PowerApps.PowerShell -AllowClobberEnsure to add the -AllowClobber switch otherwise you might receive an error message similar to this –
Now that both the modules are installed, let’s move to next step.
Find Application ID
If you are a PowerApps developer reading this article, you might already know this, but I will add here just in case you are new to PowerApps.
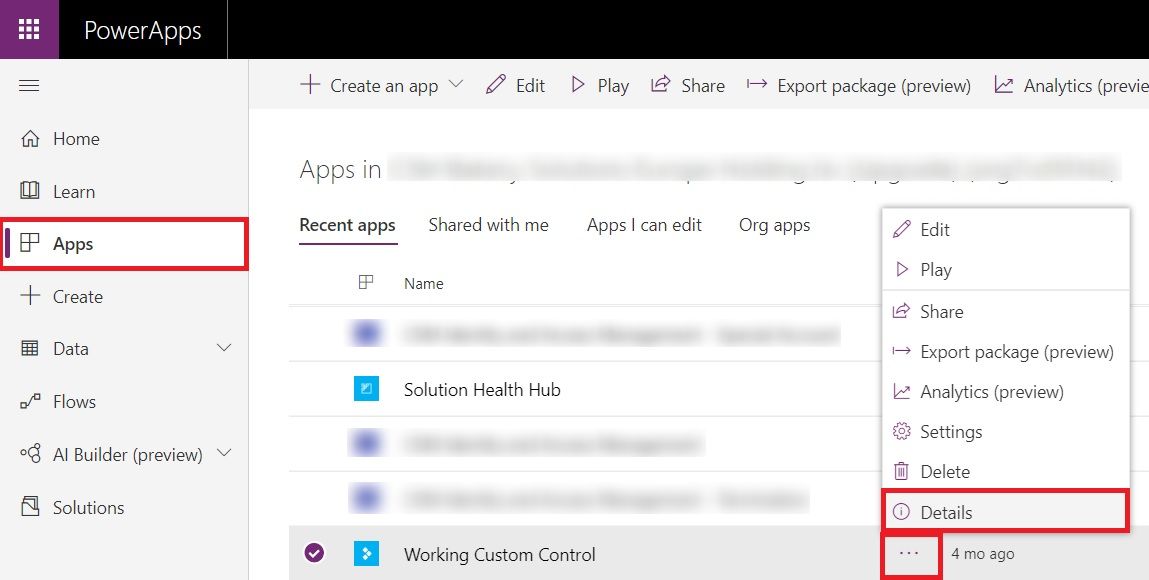
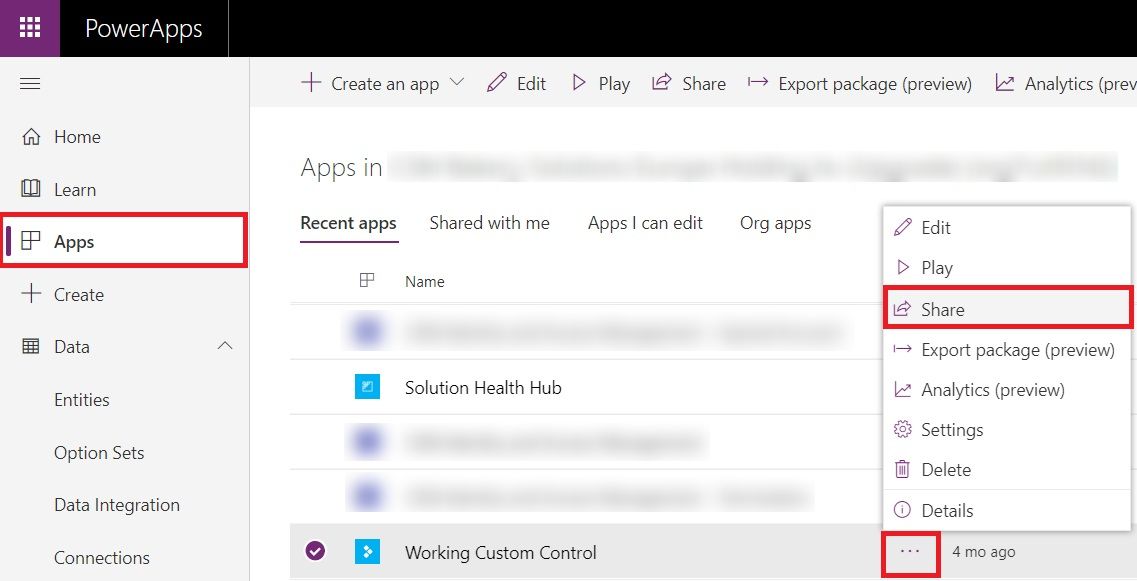
- Go to web.powerapps.com and click on Apps in left navigation
- Click on “…” next to the App of which you need to find the ID
- Click on Details from the context menu
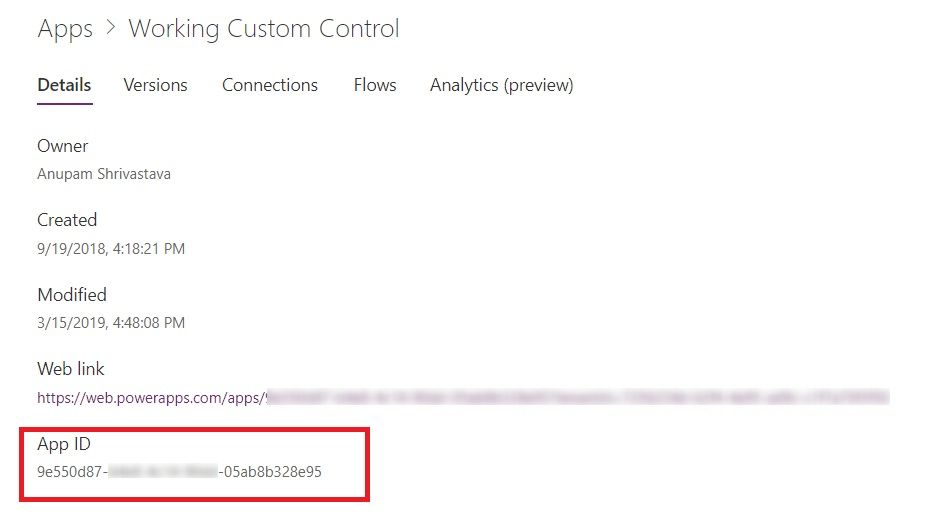
You will see the App ID mentioned at the bottom of the new screen. Copy and note it down to share with the Office 365 Administrator.
Now, we have almost everything ready to go ahead and try to suppress the consent popup for all users.
Create Connection to PowerApps
Essentially, at this stage we just need an one line script
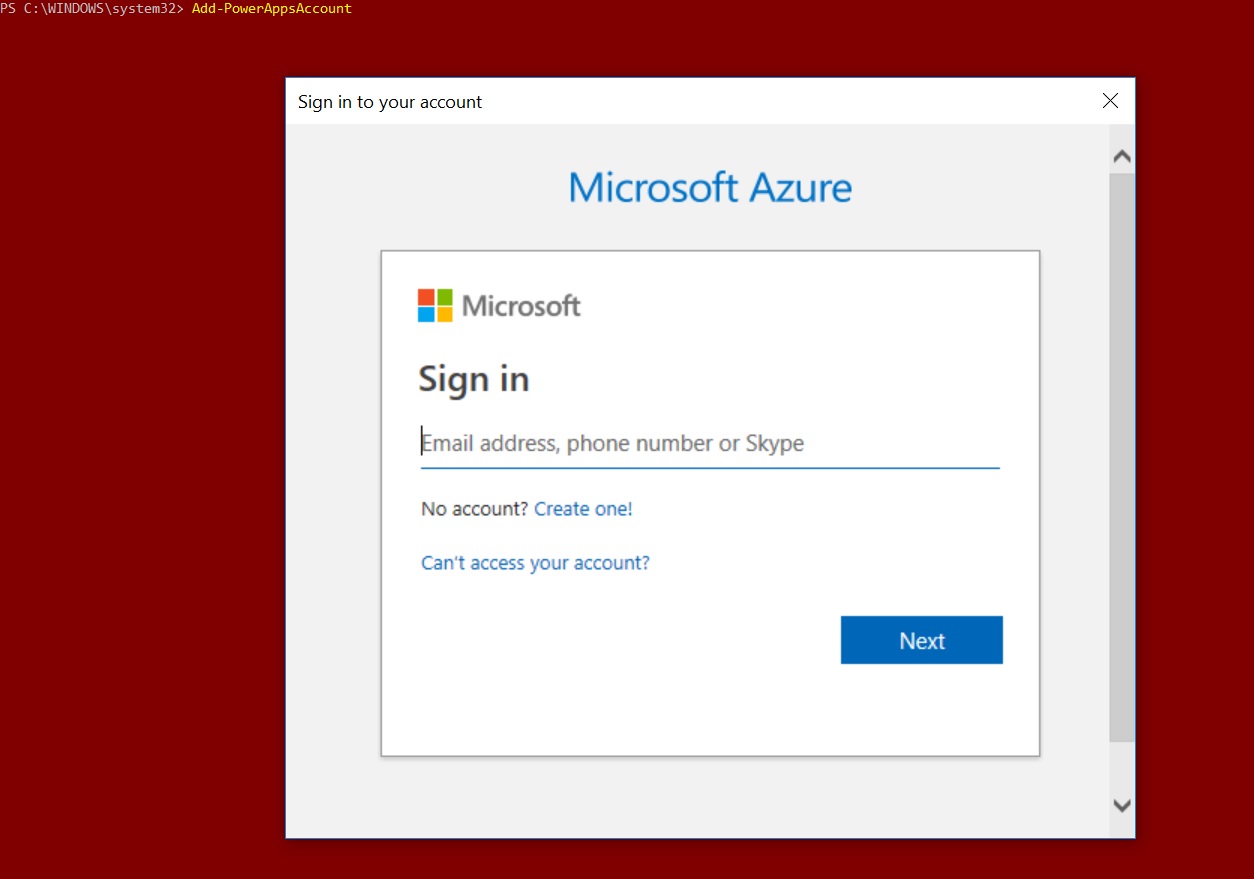
Add-PowerAppsAccountI prefer this one, because this opens up a login screen which can accept users with Multi-factor Authentication (MFA) enabled. Since, for most all organizations, MFA is enabled for their Office 365 Admin accounts, this works like a charm.
If in your organization, that’s not the case, then you can also pass the admin credentials directly in the script
$pass = ConvertTo-SecureString "password" -AsPlainText -Force
Add-PowerAppsAccount -Username [email protected] -Password $pass
Once the connection is successfully established, you are ready to run the Suppress command.
Set-AdminPowerAppApisToBypassConsent
The actual command is one liner
Set-AdminPowerAppApisToBypassConsent -AppName <AppID>But when the Office 365 Administrator executes it, he/she might get this error message

So, what happened?
Well, even though the error message is a bit cryptic about the PowerApp Path, essentially, the Office 365 Administrator doesn’t have permission on your application.
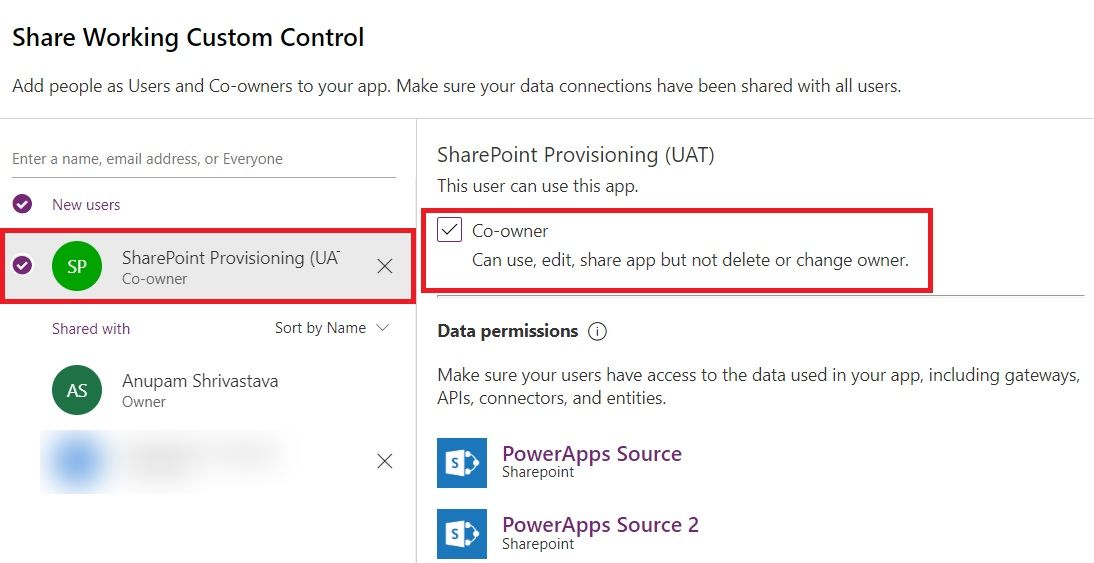
Just go to your app again from web.powerapps.com and share it.
Add your Office 365 Administrator as Co-Owner of the application.
This access is required only to run this command. After the command gets executed successfully, permission can be removed.
Run the script again and Whola… A nice success message appears and all your application users are happy not being prompted again by incremental changes done in the application going forward.

Hope this helps save some of your efforts. You can refer this microsoft article for more details about other PowerApps Administration related commandlets.
Enjoy,
Anupam
13 comments
What is an evertgreen application? Kind of hard to understand what you are saying there…
If you google, you will find something like this – “Evergreen IT refers to running services comprised of components that are always up to date.” Essentially, it’s always getting updated and new features getting added without the need of complete upgrade to a new version… Some examples you can think of is Office 365 suite apps, Windows 10 etc.
Thanks, Anupam.
I am following your instructions however at the step
>>Add-PowerAppsAccount
I get the error:
Add-PowerAppsAccount : Method invocation failed because
[Microsoft.IdentityModel.Clients.ActiveDirectory.AuthenticationContext] does not contain a method named ‘AcquireToken’.
At line:1 char:1
+ Add-PowerAppsAccount
+ ~~~~~~~~~~~~~~~~~~~~
+ CategoryInfo : InvalidOperation: (:) [Add-PowerAppsAccount], RuntimeException
+ FullyQualifiedErrorId : MethodNotFound,Add-PowerAppsAccount
I have Googled for a solution to this but haven’t found anything I can use. Do you know how to move past this issue?
You can try uninstalling and installing PowerApps module again
Install-Module -Name Microsoft.PowerApps.PowerShellAlso, ensure the account is a global admin and also is the owner of the PowerApps Application.
I have integrated flow with PowerApps will this work after hiding this popup?
This solution is about hiding user consent popup which gets normally triggered when underlying data source changes. I am not sure what you meant by “Integrated flow with PowerApps”.
Hey Anupam,
we followed all the instructions and we got this response after running the command.
Code : 200
Description : OK
Headers : {[Strict-Transport-Security, max-age=31536000; includeSubDomains], [x-ms-request-id,
eastus:00000000-0000-0000-0000-000000000000], [Content-Length, 0], [Cache-Control, no-cache,
no-store]…}
Error :
Errors :
Internal :
But the Power BI consent still poping up everytime we start the app. ?
Any idea why this happen?
Thanks
May be you can cross check your application ID?
This does not work. Cmd Add-PowerAppsAccount fails with error that ‘method invocation failed because [Microsoft.IdentityModel.Clients.ActiveDirectory.AuthenticationContext] does not contain a method named ‘AcquireToken’.
I tried your suggestions from your comment to someone else having the same error message and they didn’t work either.
What did work to eliminate that error message was to close PowerShell window and re-open, and start over. Unbelievable!
On the last step when you Set-AdminPowerAppApisToBypassConsent -AppName it asks me for Environment Name which I entered but then gives me error saying ‘The environment ” could not be found in the tenant
Hey Oliver,
I also had to include the environment name. I would double check the environment id. This worked for me:
Set-AdminPowerAppApisToBypassConsent -EnvironmentName [GUID] -AppName [GUID]