Sometime ago, I wrote an article about How to enable Incoming Mails in SharePoint Online. In that article, I talked about how can we use Microsoft Flow to achieve the functionality. But there is another common functionality available in SharePoint on-premise versions which allows us to send meeting invites to SharePoint calendars. This functionality has been widely used to make a SharePoint calendar as Leave Tracker or to track important events. Let’s take a look at how this can be achieved in SharePoint Online.
This solution makes use of Power Automate/Flow. If you want to know about some of the limitations take a look at this article https://anupams.net/power-of-power-automate-and-a-big-limitation/
The Problem
First thing that may come in mind – SharePoint Calendar is also “technically” a list only. So, why not use the steps described in the article above and create an Item in the Calendar when an email is received.
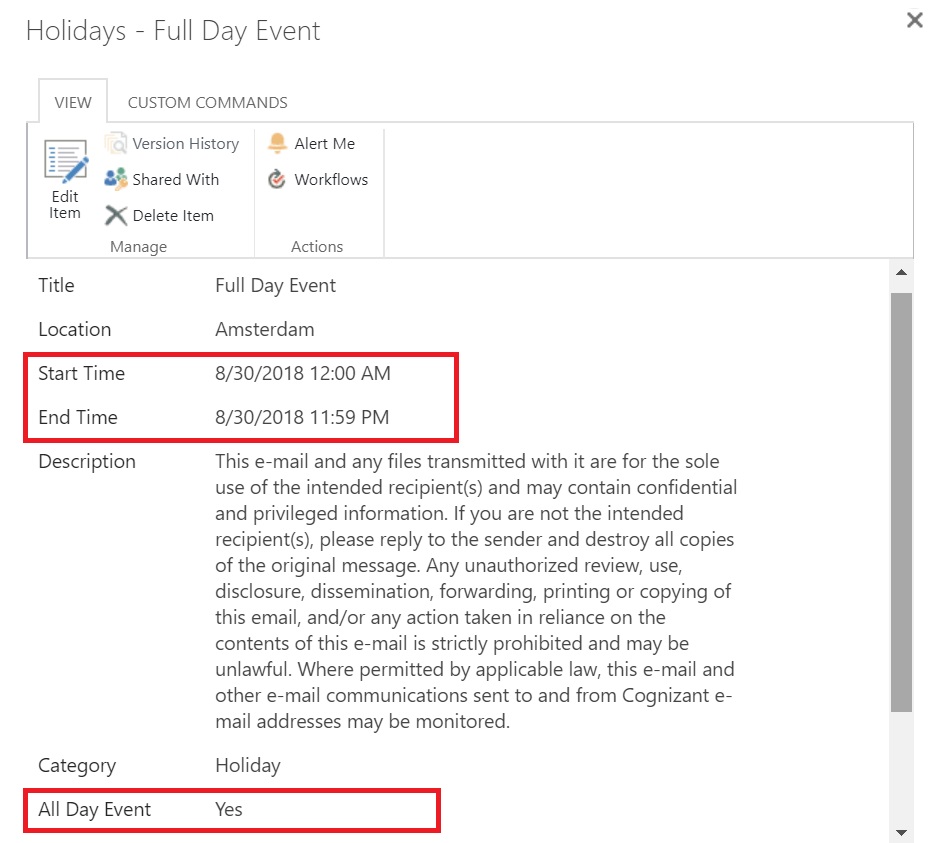
Well, here is the problem. As you can see the Calendar type list has additional mandatory fields “Start Time” and “End Time”. These will be visible the moment you select a Calendar list in the Create Item action. Since, these information are NOT available in the mail, we can’t use the same solution.
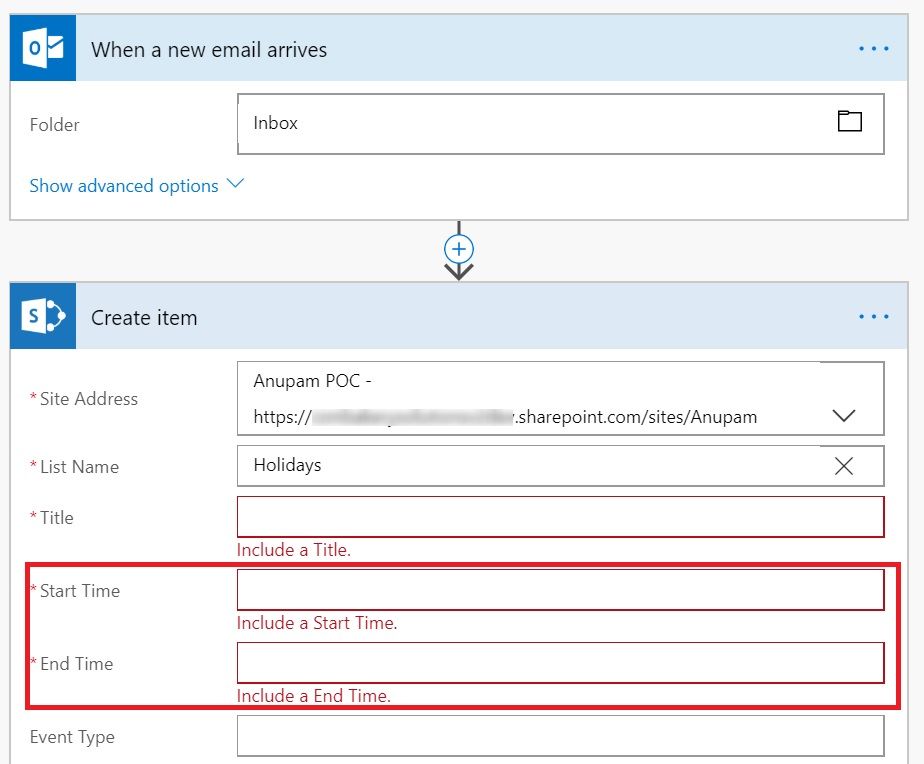
But this doesn’t mean that we can’t find an alternative 🙂
Getting Started
If you have read the article How to enable Incoming Mails in SharePoint Online, you can easily figure out what all we would need.
- A Shared Mailbox
- A Password associated with that Mailbox account
- A Flow created in Microsoft Flow
For #1 and #2 above, just go through the article mentioned above. It has all the details under “Create a Shared Mailbox” and “Reset Password” sections.
For this article, I have created a Shared Mailbox “MailToSPCalendar” and set a password.
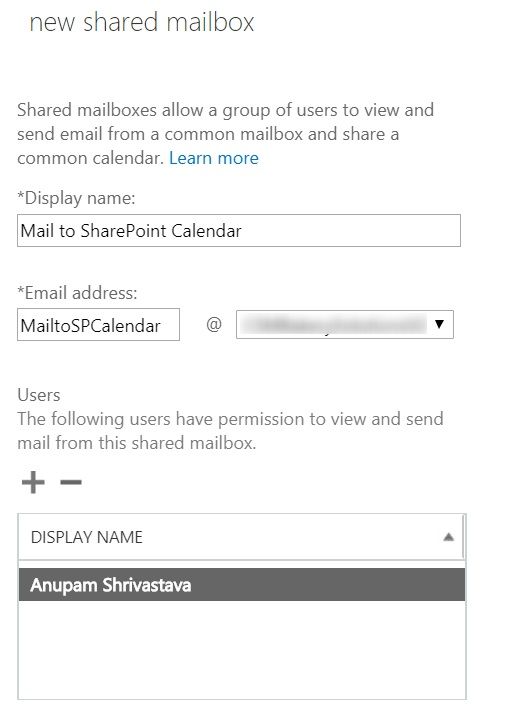
I will focus on what needs to be different in the Flow to make it work with SharePoint Calendars.
Create Flow
Now that we have the required mailbox and it’s password in place, lets go ahead and create our flow.
- Go to Microsoft Flow and login with your Office 365 account. This account need not be the same mailbox account.
- Click on My flows and then on Create from blank

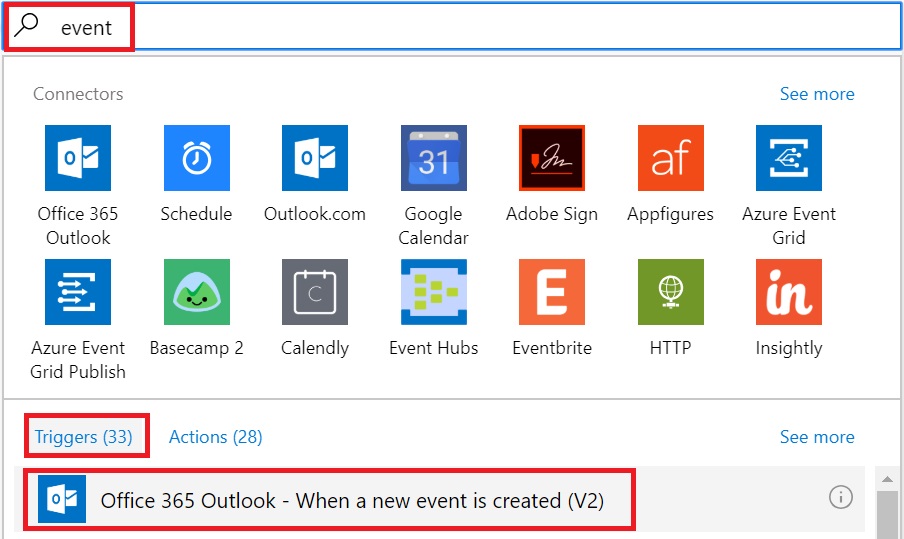
- On the next page click on “Search hundreds of connectors and triggers”
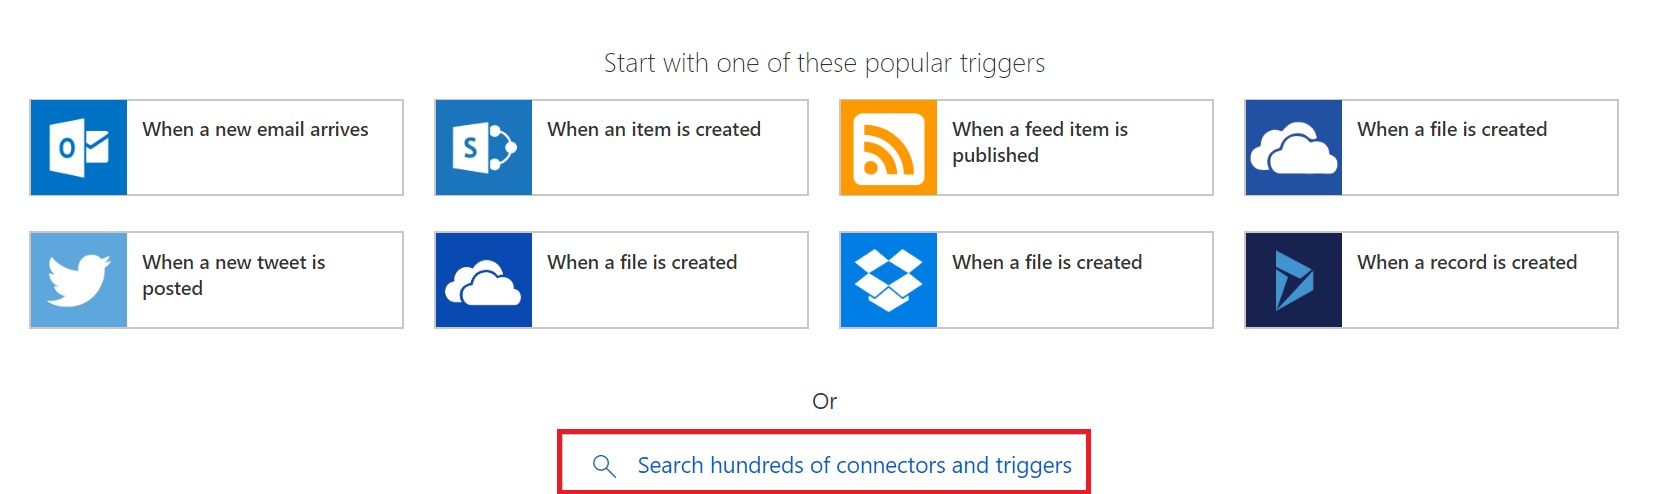
- On the Next screen, search for “Event” and select “Office 365 Outlook – When a new event is created (V2)” as the trigger
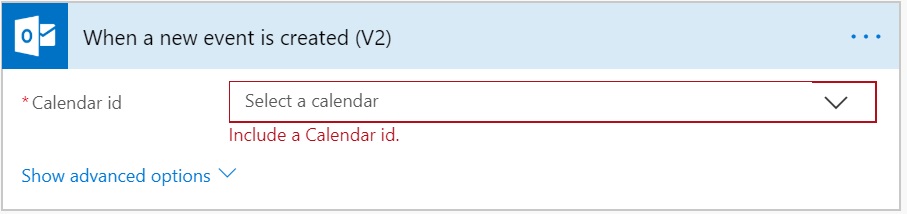
At this time our Flow gets created, but it’s empty, and we now need to configure it for our purpose.
Configure Flow
Now that we have our flow created, we can configure it to read the meeting invites received in the mailbox that we created and create the SharePoint Calendar entry in the Calendar of our choice.
Add Connection to Mailbox
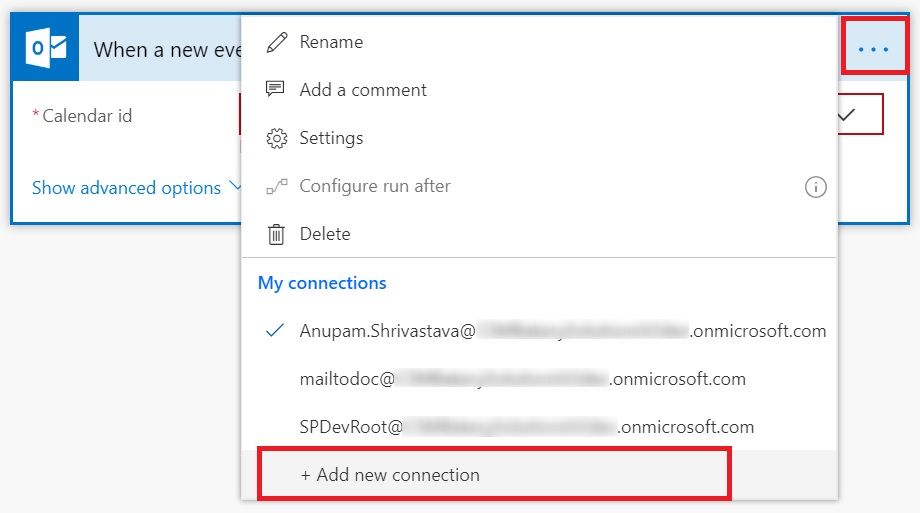
We first need to configure the source which will trigger the flow to start. This mean, when any new meeting invite is received this flow should get triggered. For this we want to monitor the shared mailbox created earlier. So, we need to add that account under my connections. Click on the three dots (…) and click on Add new connection.
It will pop-up a credential login window. Login with the email ID of the shared mailbox and password created earlier.
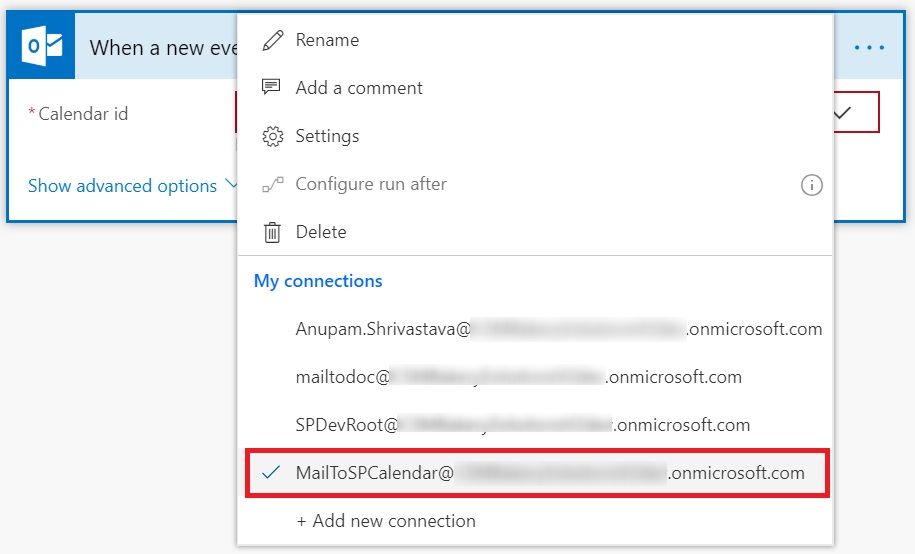
You must login with the email ID and password of the Shared Mailbox. i.e. the Mail ID to which the meeting invites will be sent in order to get those added to SharePoint Calendar.
Once logged in successfully, you can see that added under My connections
Configure Source Location
Once the connection is added, we need to configure which location to read from the mailbox in the incoming mails. So, click on the icon next to the text box of “Calendar id” and select “Calendar” from the drop down menu.
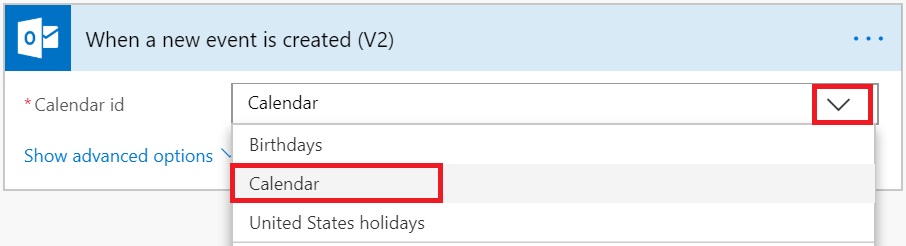
At this stage, our flow is configured to trigger when any meeting invite is received in our Shared Mailbox.
Let’s go ahead and configure rest of the flow to ensure the invite gets added as a valid entry in a SharePoint Calendar.
Convert HTML to Text
This may seem like an unnecessary step, but this is required to fetch the body of the invite from the mail.
- Click on the “+” icon in the arrow and Select “Add an action”.
- Search for the action “HTML to Text”
- Click on “Content Conversion – Html to text”
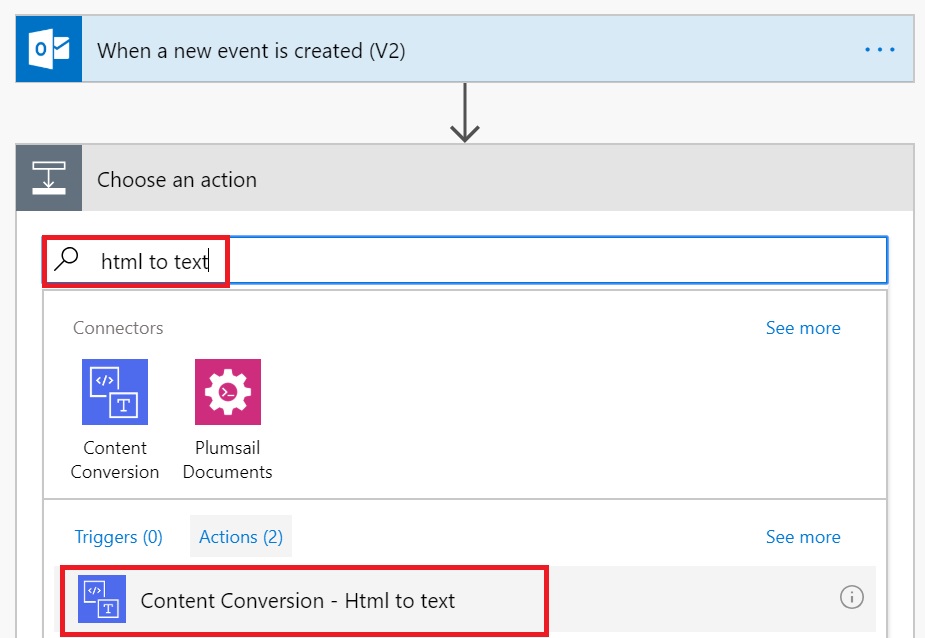
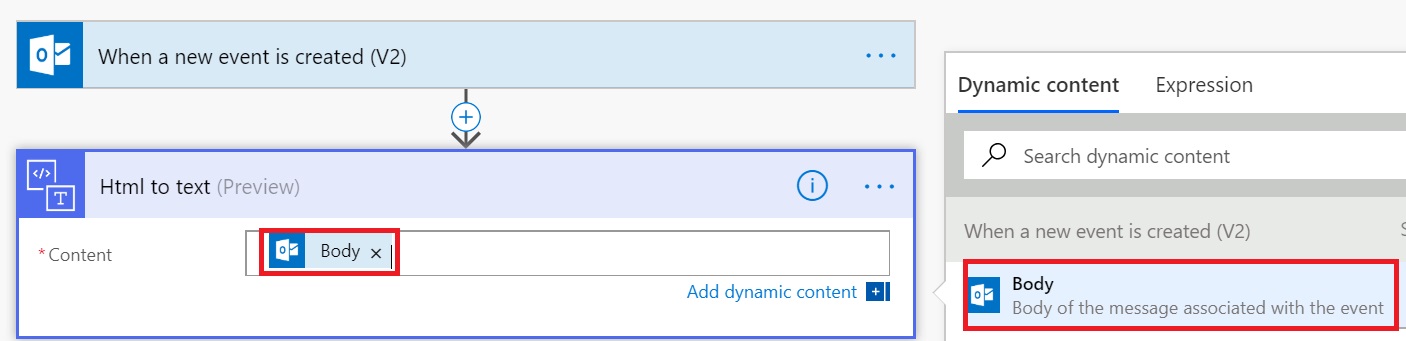
- Once the action is added, select “Body” from under Dynamic contents. This step will convert the Body of the invite from HTML to text, which we’ll later use to add to our SharePoint Calendar.
Create Calendar Entry
Now that we have all the inputs in place, lets pass those to a SharePoint Calendar.
- Add an action “SharePoint – Create item”
- If there is no valid connection available for your SharePoint site, Add a connection with the credentials which has required permission to add an item in the SharePoint Calendar.
- Select the Site URL under “Site Address”
- Select or Type in the Calendar name which exists in that site
I have created a SharePoint Calendar named “Holidays” for this article.
- Under Title, select “Subject” from the Dynamic content. This means the subject of the meeting invite will become the title of the SharePoint Calendar
SharePoint maintains Date and Time entries in UTC, so we need to convert the incoming Start and End date and time to UTC before assigning to corresponding fields in SharePoint Calendar.
- In the Start Time field, you can the formula from under Date and Time functions or just use this readymade one – Type this under expressions and click OK
convertTimeZone(triggerOutputs()?[‘body/start’],triggerOutputs()?[‘body/timeZone’],’UTC’)
- Similarly in the End Time field, you can use this one – Type this under expressions and click OK
convertTimeZone(triggerOutputs()?[‘body/end’],triggerOutputs()?[‘body/timeZone’],’UTC’)
- Under Event Type, select “Number of occurrences” from Dynamic contents
- In the Location field, select “Location” from Dynamic contents
- In the Description field, select “The plain text content” from Dynamic contents under Html to text section
- In the Category Value field, select any desired value, I selected Holiday in this case
- And finally, In Content Type ID field, select Event from the drop down
- Leave all other optional fields empty
This is how our filled action looks like

Does it work?
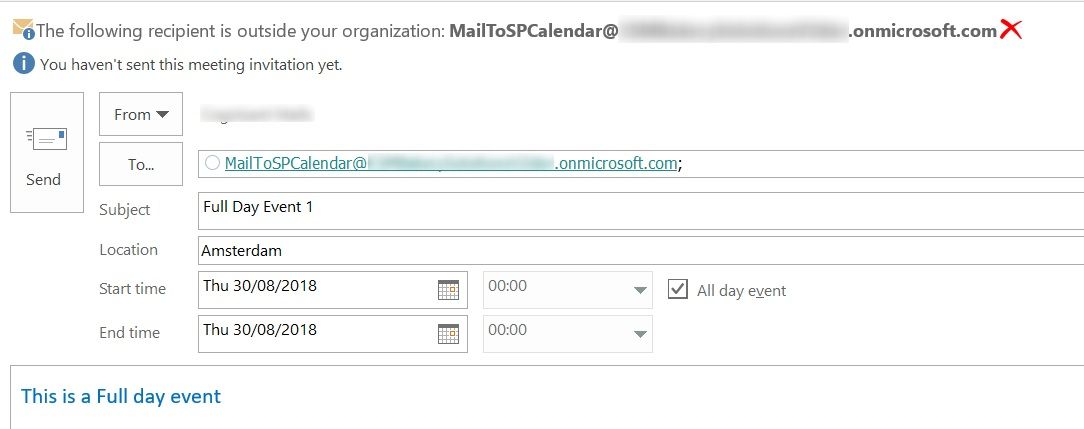
At this stage, our Flow seems complete. We received the input from mail and created a Calendar entry in SharePoint site based on that. But if you try to send a Full day event from your outlook like this, you would see that even though Flow creates an entry in the selected SharePoint Calendar, the date & time shown are NOT exactly a full day.
After the flow is run, you would see something like this in the SharePoint Calendar – Spanning more than a day and not exactly starting at 00:00 hours!
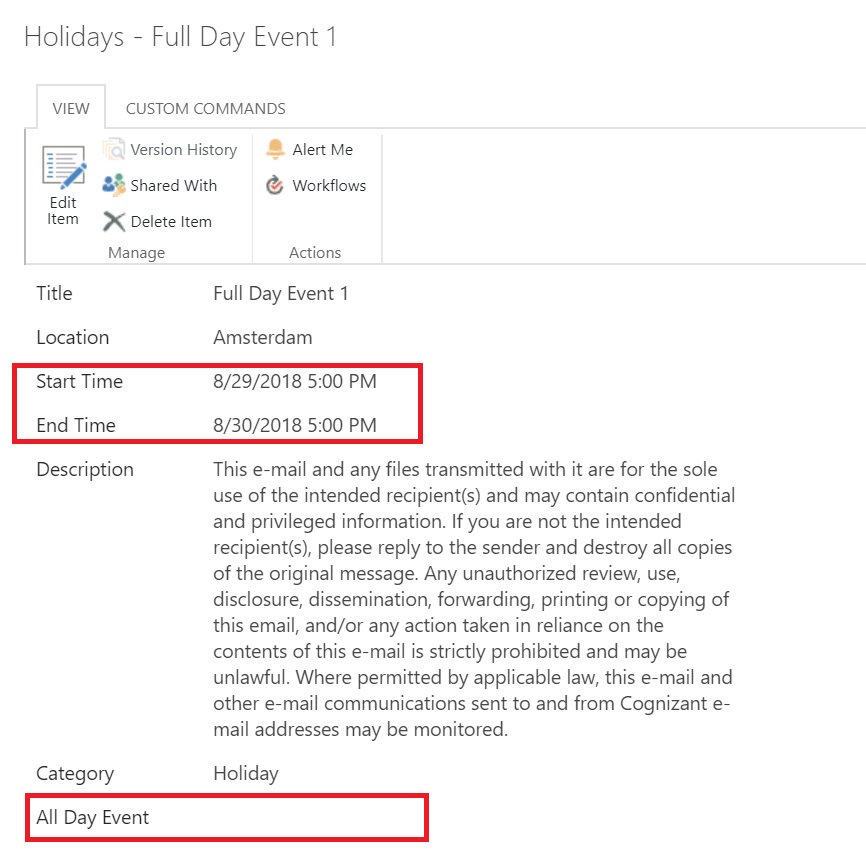
This is because, while creating the calendar item, currently there is no field that can be updated to mark it as an All Day Event.
So, we need to do a little bit more to handle this scenario.
Full Day Events
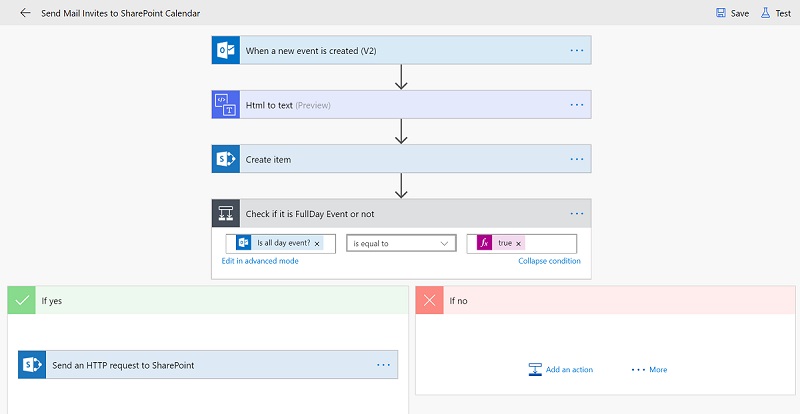
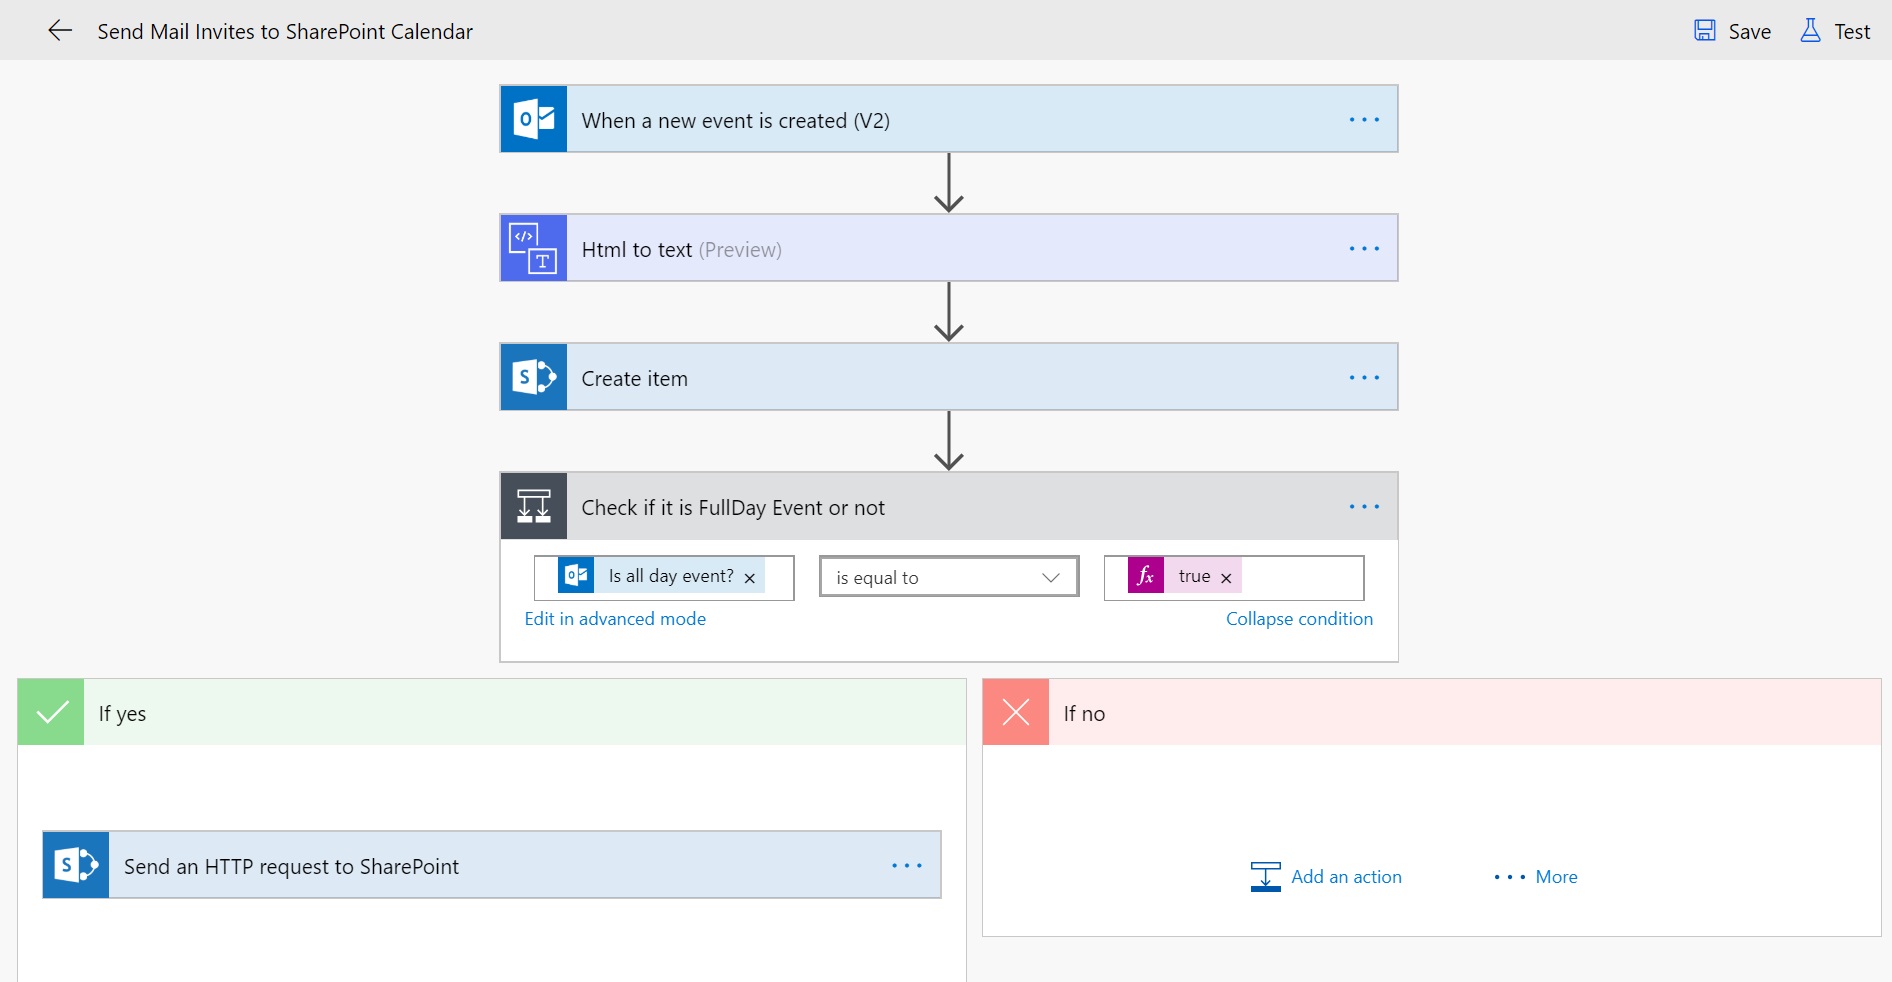
Full day events need to be handled differently than other entries with specific start and end date & time. To take care of this we’ll add an If Condition to check what type of meeting invite has been received.
- Add an If Condition and rename it to “Check if it is FullDay Event of not”
- Select “Is all day event?” from under Dynamic content
- Click on the textbox “Choose a value” and under Expression, type “true” and click OK button.
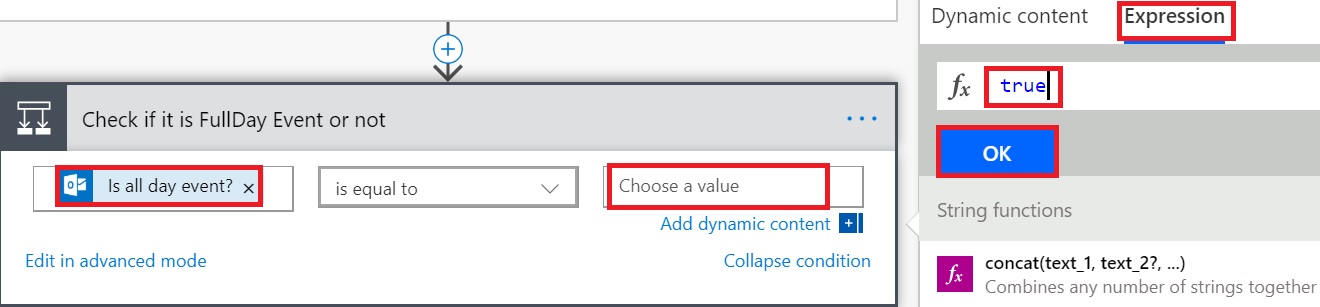
As expected, this if condition will return yes if the incoming invite is a full day event and no, if otherwise.
Mark Invites as Full Day Event
Let’s first take a look at the “No” condition, i.e. if the incoming invite in NOT a full day event. Actually, for No condition, we don’t need to do anything. Since the calendar item has already been created based on specified time. So, we only need to handle Yes condition.
So, what we do? We call a SharePoint REST service to update the value of the field AllDayEvent to true.
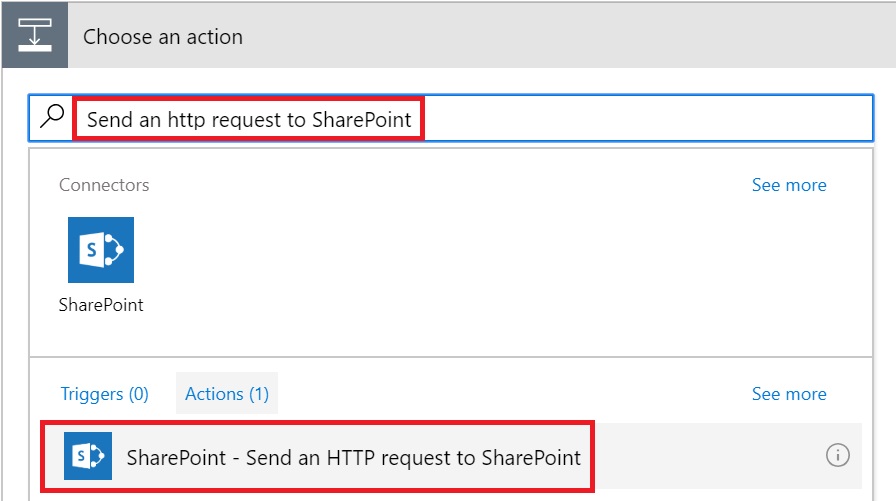
- Inside the Yes condition, add an action “Send an HTTP request to SharePoint”
- Once the Action gets added, Select the Site URL in the Site Address field
- In Method, select POST
- In Uri field, type the REST service url “_api/web/lists/getbytitle(‘Holidays’)/GetItemById(<Select ID field from Dynamic Contents under Create Item>)”. We need ID of the newly created item from the Calendar, NOT from the event.
- In the Headers field, toggle to Text mode
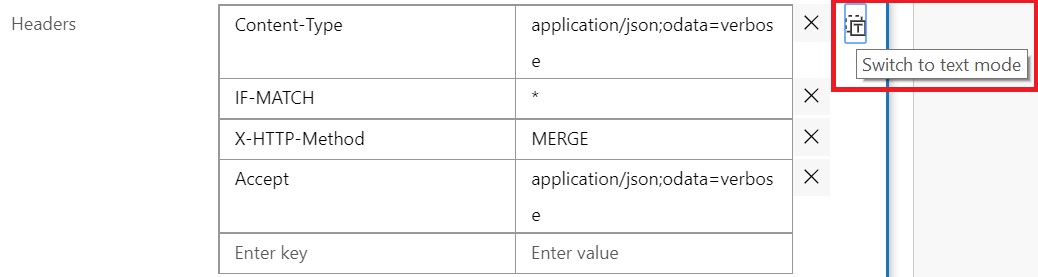
- Paste the following entries in the Headers field including the starting and ending braces
[code]
{
“Content-Type”: “application/json;odata=verbose”,
“IF-MATCH”: “*”,
“X-HTTP-Method”: “MERGE”,
“Accept”: “application/json;odata=verbose”
}
[/code]
- And last update the Body of the action including starting and ending braces
[code]
{
“__metadata”: {
“type” : “SP.Data.HolidaysListItem”},
“fAllDayEvent” : “True”,
“EventDate” :”@{formatDateTime(triggerBody()?[‘Start’],’M/d/yyyy’)}”,
“EndDate” :”@{formatDateTime(subtractFromTime(triggerBody()?[‘End’],1,’Minute’),’M/d/yyyy’)}”
}
[/code]
Note a few points about the body section:
- The type needs to match the title of the Calendar. i.e. in this case since our Calendar title is Holidays that section reads “type” : “SP.Data.HolidaysListItem”. For an OOB SharePoint Calendar, it would be “type” : “SP.Data.CalendarListItem”
- It becomes a bit more complex when you have spaces in your Calendar title, like “Holiday Calendar”. In that case, you can find the type by calling a rest service call, directly in your browser – https://site url/_api/web/lists/getbytitle(‘Holiday%20Calendar’)?$select=ListItemEntityTypeFullName and you can see the type to use under ListItemEntityTypeFullName like this
<d:ListItemEntityTypeFullName>SP.Data.Holiday_x0020_CalendarListItem</d:ListItemEntityTypeFullName>
- All Day Event field is defined as “fAllDayEvent” : “True”, it’s not a typo
- And most interesting one, we need to subtract at least 1 second from the End Date to ensure the full day events date remains within a day. Why this is required? Because by default, Full Day event shows dates spanning 2 calendar days.

See all this work
We are all done now. Save the flow and make sure it’s enabled.
Send a meeting invite to your shared mailbox configured with the flow and after sometime, you could see the invite gets added to the SharePoint Calendar.
And this is how our Final version of Flow looks like
And that’s it for today. Hope this helps.
Enjoy,
Anupam
41 comments
Hello Anupam! Thank you so much for this very thorough and helpful guide. I’ve successfully applied the majority of the flow to my list “2020 Calendar” but I’m running into issues with the FullDay conditional actions.
I’m receiving an error that my URI expression is not valid. My expression is below. I was sure to select the correct ID from the “When a new event is created (V2)” dynamic controls.
I’d appreciate any help you can offer. Thanks!
————————————
_api/web/lists/getbytitle(‘2020 Calendar’)/GetItemById(@{triggerBody()?[‘Id’]})
I have seen this issue, if you copy and paste the URL from some somewhere else, specially the single quotes create issues. Try typing the URL and let me know if that works.
So, the issue was that you were trying to use the ID from the event, whereas you should use the ID of the Create Item action.
Can you do something similar to capture when the meeting host cancels or moves a meeting?
Yes, you can use other available trigger in that case like “When an event is added, updated or deleted” – This operation triggers a flow when an event is added, updated or deleted in a calendar OR “When an event is modified (V2)” – This operation triggers a flow when an event is modified in a calendar.
Thank you for this method, it was really helpful. Do you know how to add or invite attendees using the “Create item” SPO action?
Yes, you just need to loop through the invitees. All attendees come as comma separated string. see if this is what you are looking for https://powerusers.microsoft.com/t5/Building-Flows/Create-event-multiple-attendees-multiple-events/td-p/109208
Anupam Shrivastava – If I decide to use “When an event is added, updated or deleted” the create item action for SharePoint will just create a new item, even if I modify a value like start time in Outlook, correct? If I modify an event in outlook, wouldn’t I need a condition that checks to see if the item has been created, if yes-update item, if no-create item? How would I build this condition?
Hi, For the trigger “When an event is added, updated or deleted”, we have resulting ‘Action Type’ with value as added, updated or deleted.
Tips – if you can’t find your SP.Data.ListItem
In IE put https://yourcompany.sharepoint.com/sites/_api/web/Lists/getbytitle(”)/ListItemEntityTypeFullName
Just make sure you put the _api… piece after the location of where the list is.
___________________________________________________
For the URI I had to modify it:
_api/web/Lists/getbytitle(”)/items/getbyid(ID)
This is great!
I am getting a failed flow when I use the start and end time expressions that you have provided. I know that there have been some changes made to Flow that could be causing this failure. Do you have any suggestions of different expression formulas to use here?
Just ensure you are not doing copy-paste of the formula from the article. I have seen the single quote character from the formula gets converted to something which throws error in flow. Just try to type in the formula.
I am getting an error on the convertTimeZone.
Error – The template function ‘tiggerBody’ is not defined or not valid.’.
convertTimeZone(tiggerBody()?[‘Start’],tiggerBody()?[‘TimeZone’],’UTC’)
convertTimeZone(triggerBody()?[‘Start’],triggerBody()?[‘TimeZone’],’UTC’)
Seems like there is a typo in your syntax of first line: it should be triggerBody(), you are missing ‘r’ in first one…
Thank you for this. This is set for UTC time, is their a way to have the syntax change to read EST time?
Hi, As mentioned in one of the points in the article “SharePoint maintains Date and Time entries in UTC, so we need to convert the incoming Start and End date and time to UTC before assigning to corresponding fields in SharePoint Calendar”. If you want it to change for whatsoever reasons, you can alway use the Convert using convertTimeZone function.
Thanks,
Anupam
Hi, We are using common shared mailbox hence i would like to filter and move the event to another calendar(ex:NorwayCalendar) in our mailbox account. Is this possible on Office 365 outlook or can we send the event to particular calendar using Flow ? Could you please provide your inputs.
Yes, very much possible using Flow. Just use the trigger when an event is created and then you can use the conditions and either forward the event or create a new one in other mailboxes/calendar.
This is an excellent guide, thank you.
I’m still getting an error when I test the flow that I can’t figure out:
“An entry without a type name was found, but no expected type was specified. To allow entries without type information, the expected type must also be specified when the model is specified.”
Have you seen that before?
At which step you get this message?
Sorry – I’m getting this at the ‘Send an HTTP request to Sharepoint step.
Hey Anupam, just following up to see if you had any insight into that error message I noted above at the ‘Send an HTTP request to Sharepoint’ step in the process. Any help you can provide would be most appreciated – I can’t seem to figure out waht I’m doing wrong here. Thanks!!
Take a look at the details under these sections –
Hi, is there anything different that needs to be done for recurring meetings to show up? I tried inviting my shared mailbox to some in progress recurring meetings and it only shows a single instance on my Sharepoint calendar.
This is what I’m trying to find a solution for. My recurrence always says ” “
Hi There, Im trying to do this however the function for the date keeps coming back as “The expression is invalid”I have retyped the function manually as well as copied it,
convertTimeZone(triggerBody()?[‘Start’],triggerBody()?[‘TimeZone’],’UTC’)
Seems like MS recently changed the trigger parameters, I have updated the article, pls. try this out
In the Start Time field, you can the formula from under Date and Time functions or just use this readymade one – Type this under expressions and click OK
convertTimeZone(triggerOutputs()?[‘body/start’],triggerOutputs()?[‘body/timeZone’],’UTC’)
Similarly in the End Time field, you can use this one – Type this under expressions and click OK
convertTimeZone(triggerOutputs()?[‘body/end’],triggerOutputs()?[‘body/timeZone’],’UTC’)
Hey, thank you so much for this write up. I wouldn’t have even known where to start, but your steps got me most of the way there. The first 3 steps (“when a new event is created”, “html to text,” and “create item”) complete successfully. But on the if condition step to deal with setting all day events to run from 12:00am to 11:59pm local time, it’s failing with error 401. on the Sharepoint calendar, all-day events appear to run from 8pm one day to 8pm the next day. This makes sense as I am in the Eastern Time Zone of the USA, which is UTC-4. The error details are:
A potentially dangerous Request.Path value was detected from the client (<).
clientRequestId: 0e719611-5636-4df8-9cc1-bfae903dc3e8
serviceRequestId: bd0a839f-c00f-b000-9117-5f5e1d691192
under “how to fix” it’s showing:
You should be able to fix this by verifying your account with . You may need to re-enter your password.
This is weird because of course I have already entered the password…and it’s unclear exactly which account wants to be verified.
Here’s what I have in the “if yes” condition box:
Uri:
_api/web/lists/getbytitle(‘outlooktest’)/GetItemById()
Headers:
{
“Content-Type”: “application/json;odata=verbose”,
“IF-MATCH”: “*”,
“X-HTTP-Method”: “MERGE”,
“Accept”: “application/json;odata=verbose”
}
Body:
{
“__metadata”: {
“type” : “SP.Data.outlooktestListItem”},
“fAllDayEvent” : “True”,
“EventDate” :”@{formatDateTime(triggerBody()?[‘Start’],’M/d/yyyy’)}”,
“EndDate” :”@[formatDateTime(subtractFromTime(triggerBody()?
[‘End’],1,’Minute’),’M/d/yyyy’)}”
}
The calendar in sharepoint is called outlooktest.
Can you see where my mistake is?
Hi Chris,
I see 2 issues here.
1) The error description says that the issue is with the Connection of the Action. So, either create a New flow or update the SP connection to the action to fix this.
2)Seems there is a recent update on the Flow trigger parameter. Update the Body of the HTTP action within the Yes section as below
Body:
{
“__metadata”: {
“type” : “SP.Data.outlooktestListItem”},
“fAllDayEvent” : “True”,
“EventDate” :”@{formatDateTime(triggerOutputs()?[‘body/start’],’M/d/yyyy’)}”,
“EndDate” :”@{formatDateTime(subtractFromTime(triggerOutputs()?[‘body/end’],1,’Minute’),’M/d/yyyy’)}”
}
What do you mean when you say create a new flow or update the SP connection to fix this? I’m using the same SP connection for this step as I am for the Create Item step immediately before it, so I am confused about how I would update the SP connection…I went into my connectors list and the connection is there but there’s nothing I am able to change about it.
I have completed the steps you recommended in #2.
I mean to try creating a New flow from the scratch and check. It seems you have already have verified the Connections.
Unfortunately I am unable to replicate the issue.
Can you try the troubleshooting steps as in the below article.
https://docs.microsoft.com/en-us/power-automate/fix-flow-failures#authentication-failures
I went ahead and created a new flow from scratch yesterday, but I used the existing connection (which works in the Create Item step). Should I delete the existing connection and create a new one of those as well?
Will try the troubleshooting steps.
Something I have just noticed – I attempted to use the REST API to give me the name of the list (even though it doesn’t have spaces in it) – so when I enter this in the browser:
https://site url/_api/web/lists/getbytitle(‘outlooktest’)?$select=ListItemEntityTypeFullName
It comes back with an error as follows:
-1, Microsoft.SharePoint.Client.InvalidClientQueryException
The expression “web/Lists/getbytitle(‘outlooktest’)” is not valid.
It isn’t giving me a response like you say it should –
I wonder if this means I have my Uri wrong as well as my Body JSON where I reference
“type” : “SP.Data.outlooktestListItem”
any idea how to get it to return an accurate ListItemEntityTypeFullName?
Found the problem. More accurately, a member of my team found the problem (shout out to Quinn!) When I pasted in the Uri from above, it went in like this:
_api/web/lists/getbytitle(‘Outlooktest’)/GetItemById
The problem is barely noticeable, but it’s the quotation marks or inverted commas around the calendar list name. They are the wrong type of quote marks. It should look like this:
_api/web/lists/getbytitle(‘Outlooktest’)/GetItemById
It’s got something to do with the font formatting in this blog post. When I pasted in the JSON code for the header and body in that step, it gave me immediate feedback that it was invalid JSON, so I keyed it manually and it worked…I should have keyed the Uri line as well. Thanks for the efforts to help me, and I hope this helps someone else!
Love the article but I can’t get this to work. Every time I run the Flow (aka PowerAutomate), I get the error:
“An entry without a type name was found, but no expected type was specified. To allow entries without type information, the expected type must also be specified when the model is specified.”
Yes, my calendar has spaces in it and I did what you recommended and went to “/_api/web/[etc…]” and got “SP.Data.Demo_x0020_Scheduling_x0020_CalendarListItem.” I copy and pasted this into the body of the HTTP request in Flow:
{“_metadata”:{“type”:”SP.Data.Demo_x0020_Scheduling_x0020_CalendarListItem”},”fAllDayEvent”:”True”}
But I still get the error. Any suggestions?
Hi, you can try two things
Thanks for the response. I tried again with a new calendar simply named “demo2.” But I still get the same error. I also typed the body by hand as per your request:
{“_metadata”:{“type”:”SP.Data.Demo2ListItem”},”fAllDayEvent”:”True”}
I don’t know much about HTTP requests but are the “EventDate” and “EndDate” required? I didn’t put those in because I had set the AllDayEvent to True.
Hey Anupam, awesome article(s). It gave me an idea of how to get this going in my own work.
I was wondering whether you have heard from anyone having major problems getting this same solution to work in 2022?
I am hitting many roadblocks and wondered whether my lack of experience was the problem or were there some updates that affected some of these steps.
Hi,
The Power Automate actions are still available and supported, so I don’t think there should be any issues. If you are facing any specific issue, you can highlight here, so that I can respond accordingly. Otherwise, just break it down to one action at a time and run your flow, see the outcome and then add next action…
Thanks,
Anupam
Anupam – I just tried this on 3/10/2023 and it seems that PowerAutomate has changed a bit. It works best with “When a new event is created (V3)” (instead of V2).
Thanks for the instruction! It worked perfectly for my needs!