With all the ongoing applications migrations to cloud, specially to SaaS destinations like SharePoint Online (SPO), at times it becomes necessary to provide a period of URL redirections between Old and New applications. For example, in an on-premise environment, we can use any URL like https://companyportal.company.com, but when the same content is migrated to SharePoint Online, we can’t retain the same URL. In SPO, the closest matching URL we can get would be something like https://companyportal.SharePoint.com.
Also, because in the on-premise environment there are numerous site collections/subsites hierarchy, so just redirecting the root site may not be enough. Many business users still work with their sites’ URL saved as browser favourites.
Even though this redirection solution can be applied for any web based application, I would use SharePoint on-premise to SharePoint Online migration scenario for this article.
What’s the Problem
As mentioned briefly above, in most SharePoint on-premise environments, there are hundreds, even thousands of sites/subsites hierarchies. Many users still use their browser favourites to store the direct links of their team sites or even document libraries.
Any migration to SharePoint Online is going to break those favourite links. Even for smaller organizations, there would be hundreds of such users with potentially thousands of such links. We normally send some upfront communications about planned migrations, dates etc. but as we all know such communication mails get lost in the sea of emails all users receive every day. This translates to a number of post-migration issues like “I am unable to access my team site”.
So, wouldn’t it be nice, if we can give at least some time window, say 3 to 6 months, to end users to keep using on-premise URLs even after migrating to SharePoint Online? I would say so, if users can continue to use their existing links, it takes away a major bump of out the migration process.
Use On-Premise Servers for Redirections
The title of the article is about using Azure Web App for redirections. But an innocent question could be, during the whole migration process, on-premise servers are still available, why not use them.
You are right. Any such medium scale migration takes months and we can use on-premise SharePoint servers during that window to avoid additional cost of Azure Web App.
Let’s take a look at how can we go about it.
Plan Migrations Bottoms Up
This is my favourite way of migration planning for individual sites. Even though, this is NOT a prerequisite for this solution, it surely makes the implementation easier. Some organizations, pick up site collections (which are loosely based on their organizational hierarchy) and try to migrate one-by-one. That can become messier if there are multiple levels of subsites.
Let’s just extend this to list down all subsites as well and start with the sites which are bottom most in the hierarchy.
As an example, lets say, we have these sites under IT site collection
- https://mycompany.com/sites/IT
- https://mycompany.com/sites/IT/Apps
- https://mycompany.com/sites/IT/Apps/SAP
- https://mycompany.com/sites/IT/Apps/SAP/SF
- https://mycompany.com/sites/IT/Infra
- https://mycompany.com/sites/IT/Infra/Network
- https://mycompany.com/sites/IT/Infra/Network/Germany
For migration, we can pick the bottom most site(s) of any hierarchy first. In this case, it might be either of these
- https://mycompany.com/sites/IT/Infra/Network/Germany
- https://mycompany.com/sites/IT/Apps/SAP/SF
Once you pick one hierarchy, you can go up in hierarchy until there is a common URL. Like in this case, if we pick https://mycompany.com/sites/IT/Apps/SAP/SF to start with, you can migrate it’s parent site https://mycompany.com/sites/IT/Apps/SAP and then it’s parent https://mycompany.com/sites/IT/Apps. But before you migrate https://mycompany.com/sites/IT, you need to ensure that all sites under the other hierarchy of https://mycompany.com/sites/IT are also migrated.
I hope the above statement is clear because that forms the base of maintaining seamless URL redirections between migrated sites and non-migrated sites with least efforts.
Put Redirects in IIS
Assuming the sites have been planned to be migrated bottoms up, as explained above, we can now plan to put redirects in IIS of our SharePoint on-premise server.
For the sake of simplicity, let’s say we are going to migrate only one site each day. So, once we complete the migration, all we need to do is to put a redirection rule in the IIS web site which serves that SharePoint Web Application.
[code]
<system.webServer>
<rewrite>
<rules>
<rule name="IPAppsSAPSF" stopProcessing="true">
<match url="(.*)" />
<conditions>
<add input="{URL}" pattern="/sites/IT/Apps/SAP/SF(.*)" />
</conditions>
<action type="Redirect" url="https://myteant.sharepoint.com/sites/SC1{C:1}" />
</rule>
</rules>
</rewrite>
</system.webServer>
[/code]
The above redirect assumes, that we would be migrating all subsites to separate site collections in SharePoint Online, as recommended by Microsoft. If that’s not the case in your environment, just change the target URL to point to the desired subsite in SharePoint Online.
When you migrate next site(s), just add another redirect rule in the list of rules
[code]
<system.webServer>
<rewrite>
<rules>
<rule name="IPAppsSAPSF" stopProcessing="true">
<match url="(.*)" />
<conditions>
<add input="{URL}" pattern="/sites/IT/Apps/SAP/SF(.*)" />
</conditions>
<action type="Redirect" url="https://myteant.sharepoint.com/sites/SC1{C:1}" />
</rule>
<rule name="IPAppsSAP" stopProcessing="true">
<match url="(.*)" />
<conditions>
<add input="{URL}" pattern="/sites/IT/Apps/SAP(.*)" />
</conditions>
<action type="Redirect" url="https://myteant.sharepoint.com/sites/SC2{C:1}" />
</rule>
</rules>
</rewrite>
</system.webServer>
[/code]
What if It’s NOT an Ideal World
This solution will work well as long as you don’t migrate a parent site before migrating it’s subsite and hence put a redirect for parent site. If that happens, users won’t be able to access the child site from on-premise environment.
And cherry on the cake, using the above redirect script, takes care of the URL redirections even at list/library levels.
In some cases, you may have a requirement to NOT to migrate one of the subsites but the parent must be migrated, in that case, you can put a “negate” condition, so that the redirection module will skip such URLs.
[code]
<system.webServer>
<rewrite>
<rules>
<rule name="IPAppsSAPSF" stopProcessing="true">
<match url="(.*)" />
<conditions>
<add input="{URL}" pattern="/sites/IT/Apps/SAP/SF(.*)" />
<add input="{URL}" pattern="/sites/IT/Apps/SAP/SF/SomeSite(.*)" negate="true" />
</conditions>
<action type="Redirect" url="https://myteant.sharepoint.com/sites/SC1{C:1}" />
</rule>
</rules>
</rewrite>
</system.webServer>
[/code]
In this case, the parent site and any other site for which a rule is specified will get redirected but the specific site mentioned as “negate=true” will not.
You can include this step at part of your migration runbook to be executed everyday, after planned site migrations get completed that day, and whola, for end users, they can seamlessly go to migrated sites using the existing links and navigations. So, sites which have been migrated automatically point to new URLs.
If you have more than one SharePoint servers in a load-balanced configuration, you need to update IIS web site web.config in all front end servers
Why Azure Web App
So, now that we are able to put redirections in On-Premise SharePoint servers themselves, why even bother about Azure Web App?
Well, that’s for saving cost after the migrations get completed. As mentioned earlier, for best end user experience, it’s wise to keep the redirections at least for 3 to 6 months. And to keep the cost down, it’s wise to shut down and decommission the on-premise SharePoint servers as soon as possible after the migrations. For a medium size farm, these costs could run into thousands of Euros every month!
Using Azure Web App can help reduce that cost into just hundreds.
How to go about it
Now that we have established at least one business case to use Azure Web App, let’s see how to get started.
Create Azure Web App
First of course, we would need an Azure Subscription. Assuming that’s not an issue, go to the Azure admin center, search and create an Azure Web App.
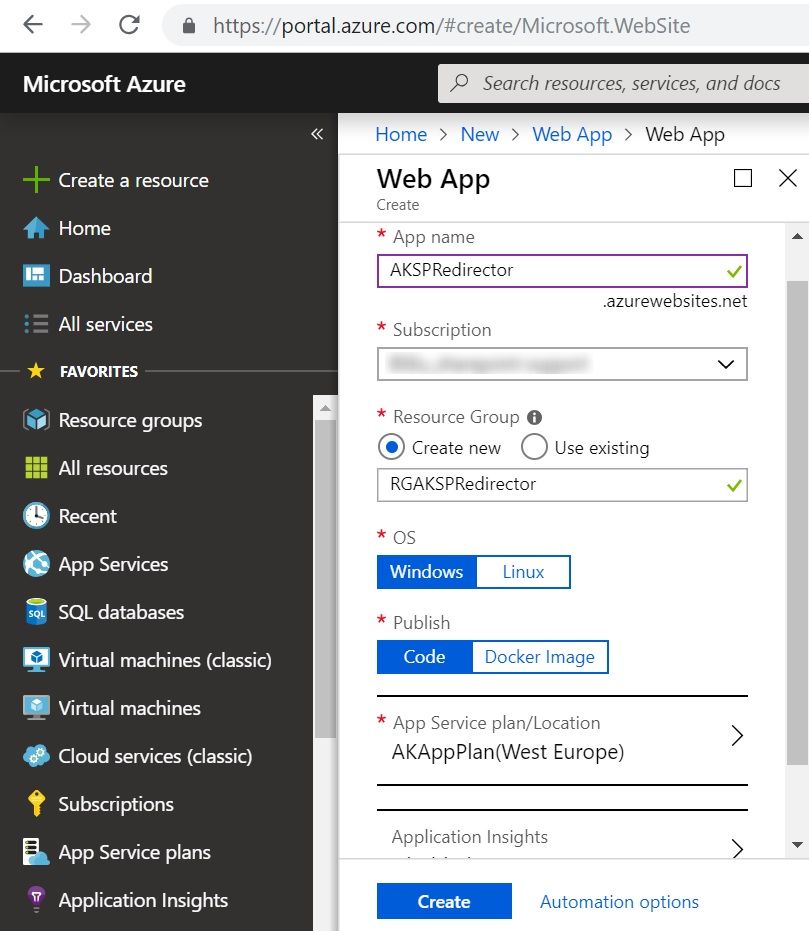
You would need to select at least Standard Plan 1 to be able to use custom domains and SSL certificates.
Add Custom Host Name
This is required so that requests sent to the on-premise host URL point to this Azure Web App. This will be the URL of your on-premise SharePoint web application. You need to update the DNS entries to point to this Azure Web App.
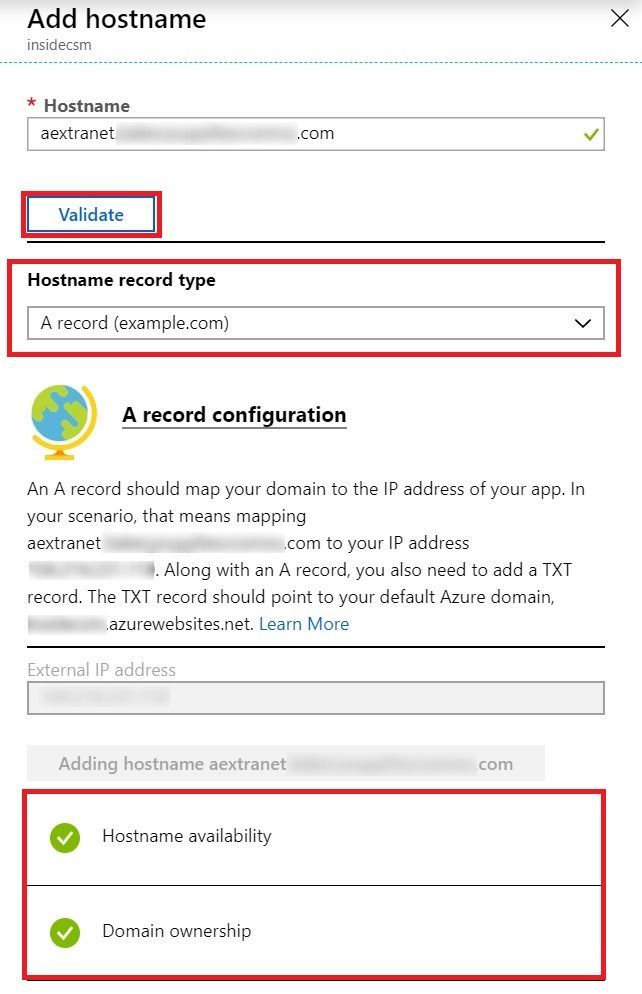
Domain ownership section will appear green only if correct DNS entries have been made and you can proceed only after both Hostname availability and Domain ownership validation checks are in green.
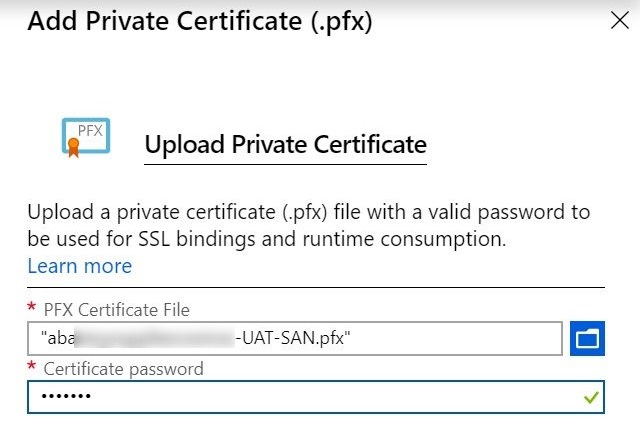
Upload and Bind SSL
Next step is to upload the SSL certificate used in on-premise IIS to the newly created Azure Web Site. Export the certificate with Private key as .pfx file from on-premise SharePoint IIS and upload in Azure Web App.
Once uploaded, it will appear under Private Certificates.
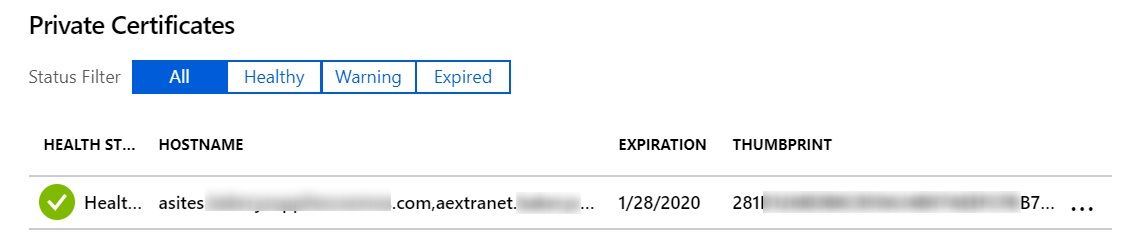
Now, we need to associate the certificate with the host name. Just select the Host name, certificate and SSL Type as SNI. It works with most modern browsers. Also, if you need more than one certificate, the other type IP based certificate, comes with additional cost.
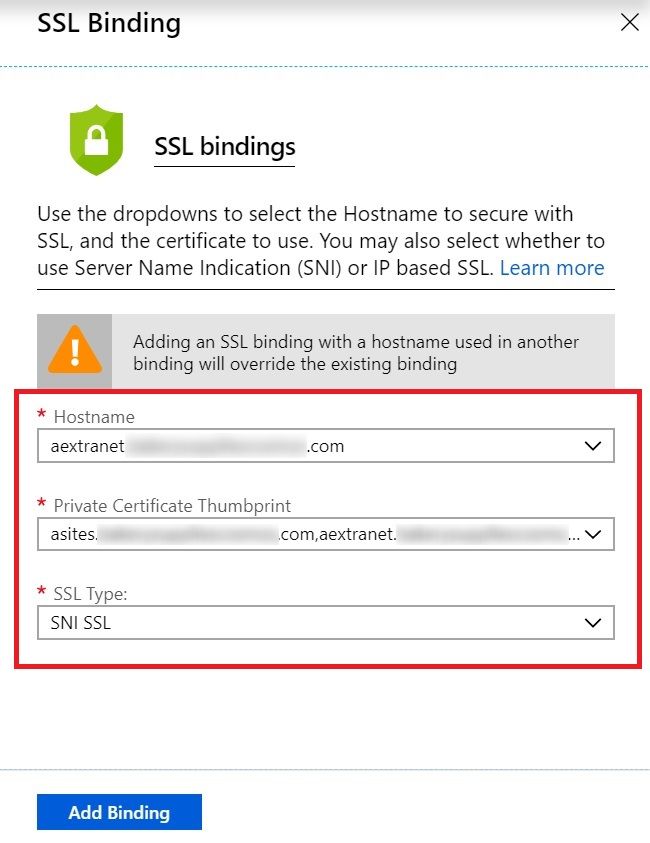
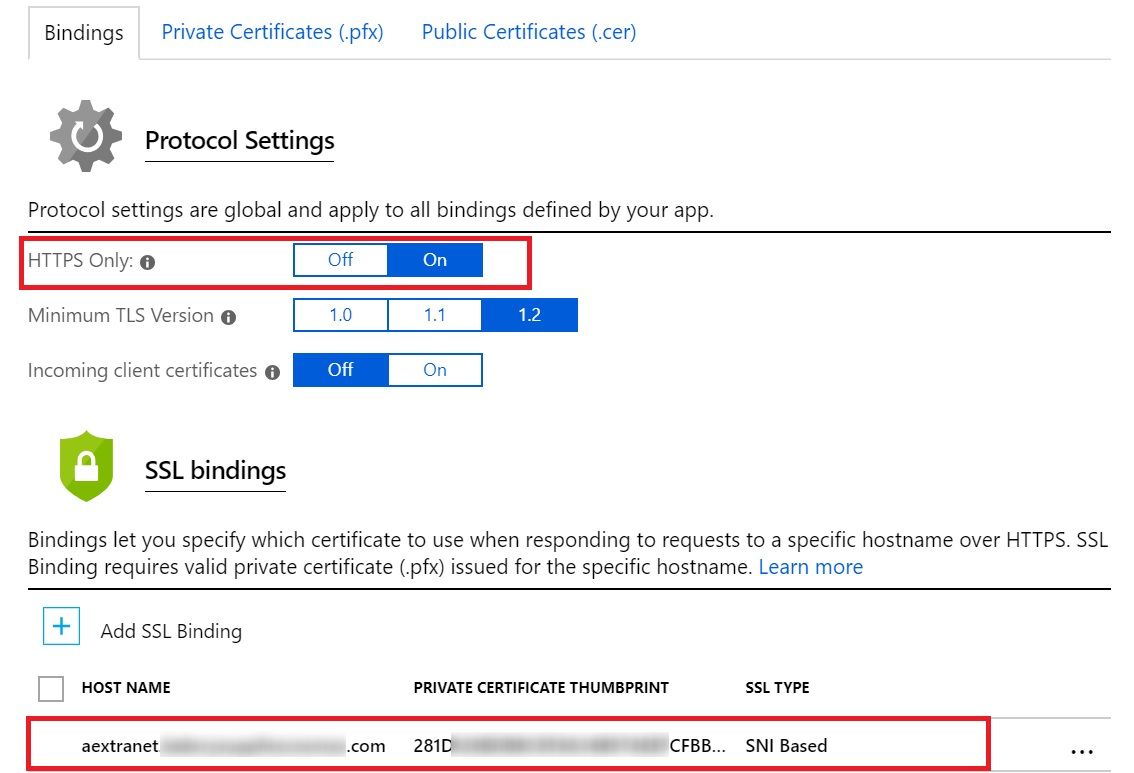
And we are almost done. You can now see the on-premise host name is associated with the certificate.
Ideally, I prefer to enable HTTPS Only flat, so that it automatically takes care of http to https redirection.
Upload the Web.Config File
Now that our Azure Web App is configured as desired, we can just publish the redirection rules in a normal web.config file.
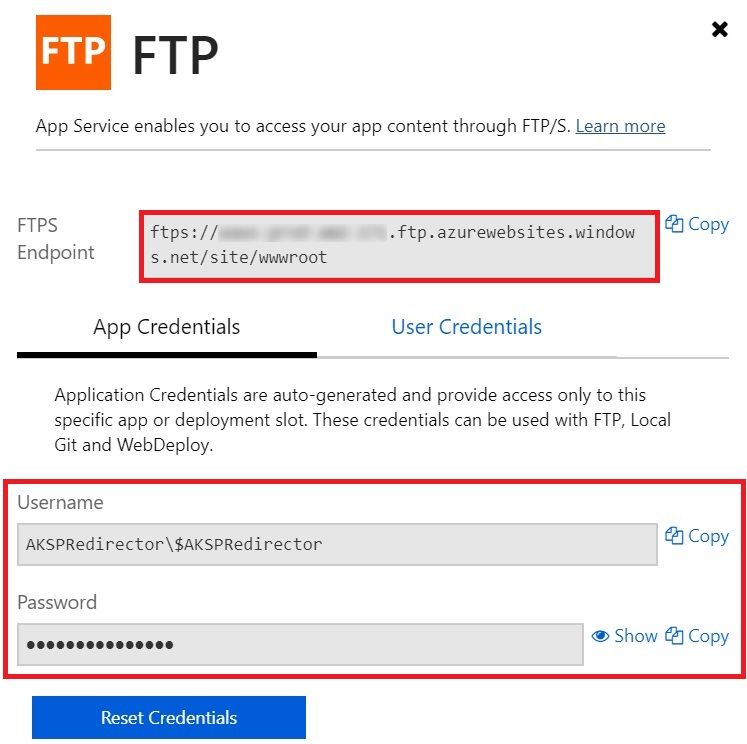
There are various ways to publish the file in Azure web app, but one of the easiest one is to just use good old FTP.
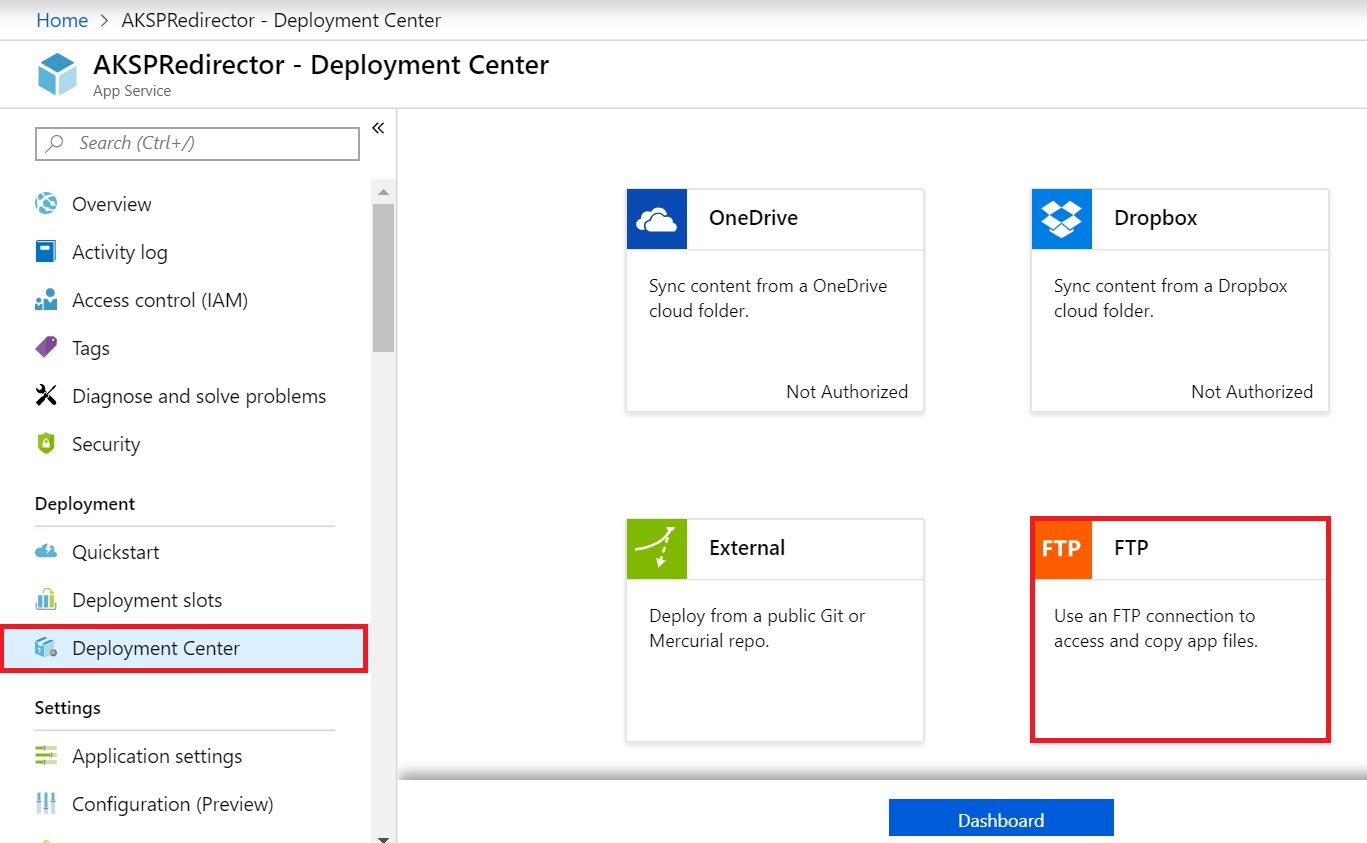
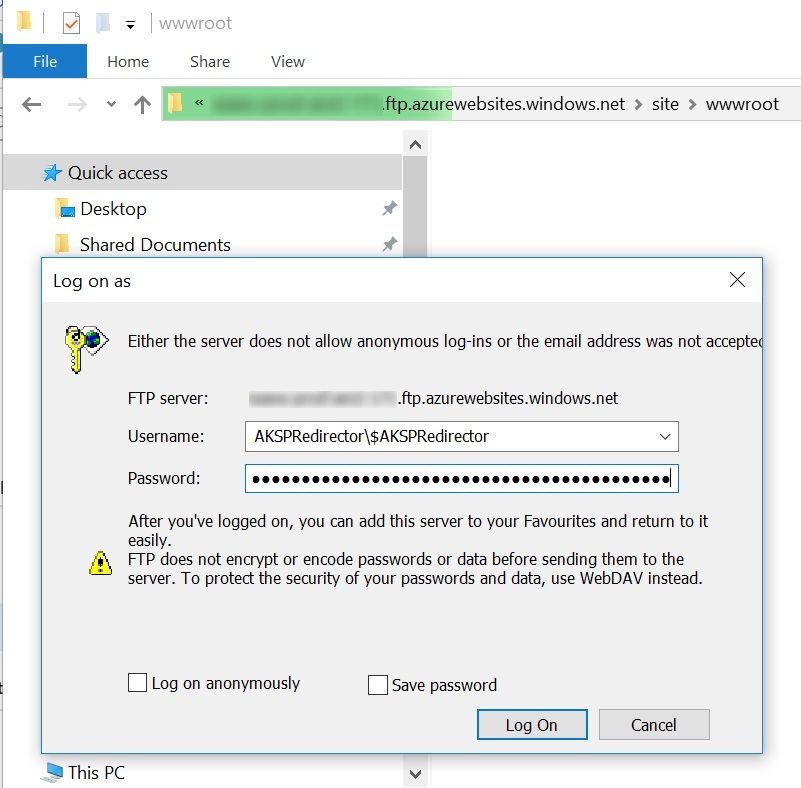
Get the FTP URL and Credentials
Just click on “Deployment Center” in left Nav of your Azure Web App, scroll down the screen and click on FTP and on Dashboard.
It will pop out this window showing the FTP URL and automatically generated App credentials to access. You can also setup your own User Credentials that can be used across multiple Apps. But we are going to go ahead with automatically generated one in this case.
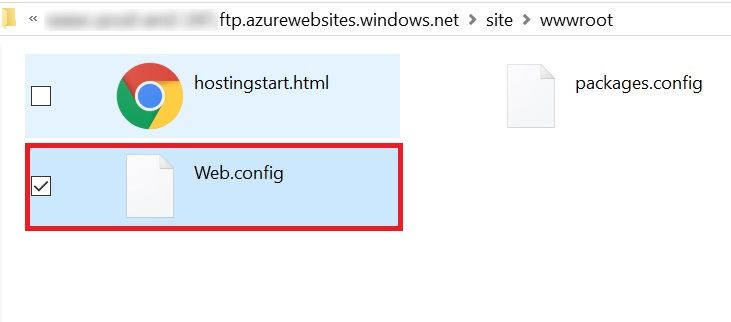
File Explorer
Now, Just open the File Explorer in your Windows and put in the URL and credentials.
You will see the root folder of the Azure Web App, copy the web.config file from your local machine having the Redirection Rules and Paste in the File Explorer.
And We are done!
Now, when you try to access your on-premise SharePoint site URL, it will get routed to this Azure Web App and based on the Redirection Rules defined in the web.config file, users will land directly on the corresponding SharePoint Online site.
Enjoy,
Anupam
2 comments
does this web app method do a rewrite for all url links in the SPO site – or is it just a redirect ?
so all links are http://www.myco.com / content ?
It’s a redirect… You can type in https://myco.com/xxx and it will redirect to https://yourtenant.sharepoint.com/xxx