Article updated on 31st Oct 2020 to use v1 API instead of Beta one to get the list of chats
Recently I came across a requirement about being able to export all the chat messages. The expectation was to get something like the Conversation History in Outlook, we used to have in Skype days. Quick google search made it evident that there is no such feature available as of date. So, it was time to start a fun journey of finding it out and getting it done!
Initial Findings
As it goes, some initial googling led to a few articles like this and this. But neither of these actually provides an acceptable solution to end users.
Since the requirement came from business, I was looking for more like an Click on “Export Chats” somewhere and get an export in easily readable format. So, I kept on exploring.
Some more googling led me to Beta version of these Graph APIs – List Chats and List Messages in a Chat. Well, that made it clear, that I will have to go for some customizations to be able to achieve this.
Limitation
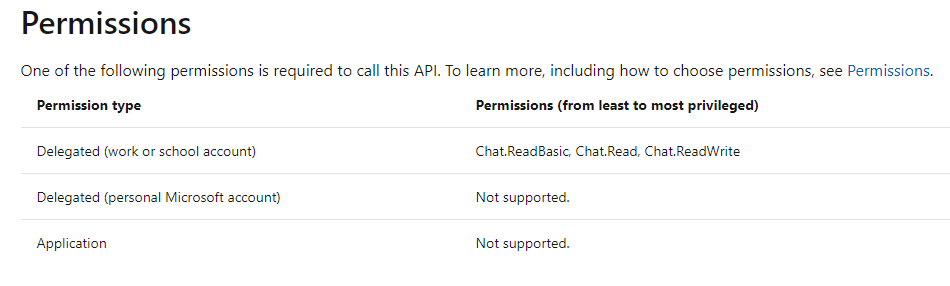
Even before I could jump into using these APIs to try n export some chats, I came across a major limitation. The “List Chats” APIs only supports delegated permissions and Application permissions are not supported (yet). To some extent it makes sense from data privacy point of view, but then “List Messages in a Chat” does support application permission, so it’s kind of weird. But it is what it is.
What this essentially mean, is that the application can only read the chats “on behalf” of the logged in user. So, it won’t have access to all the users chats but only the current logged-in user. With this limitation in mind, I continued my journey to the solution.
Register Azure AD Application
To use the Graph API, we first need to register an app in Azure AD and grant it permissions to be able to read chats. Just go to Azure AD – App Registrations and Click on New registration.
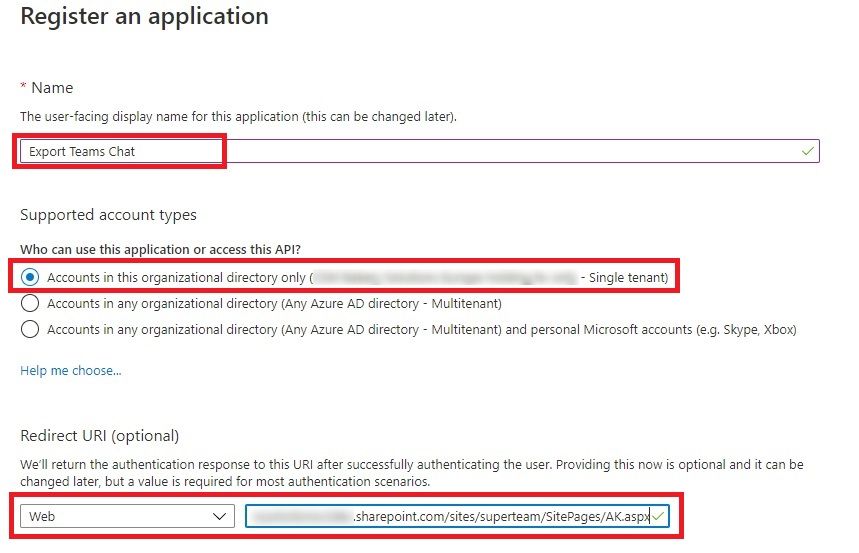
Fill in the Application Name and account type. Redirect URI is optional, but I filled in a url like of one of my existing SharePoint page. This will come handy later, so I recommend to do it this way. Just create a new page in any SharePoint site and provide the URL here.
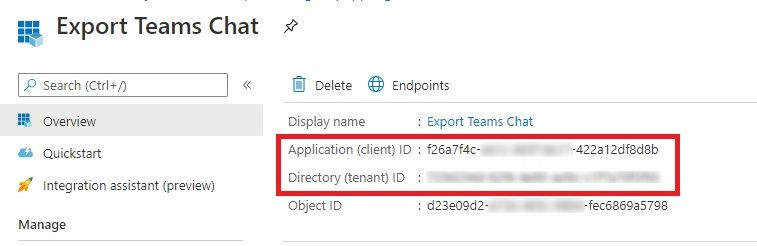
Once registered, go to the Overview and copy the Application (client) ID and Tenant ID to a notepad. We’ll need those later.
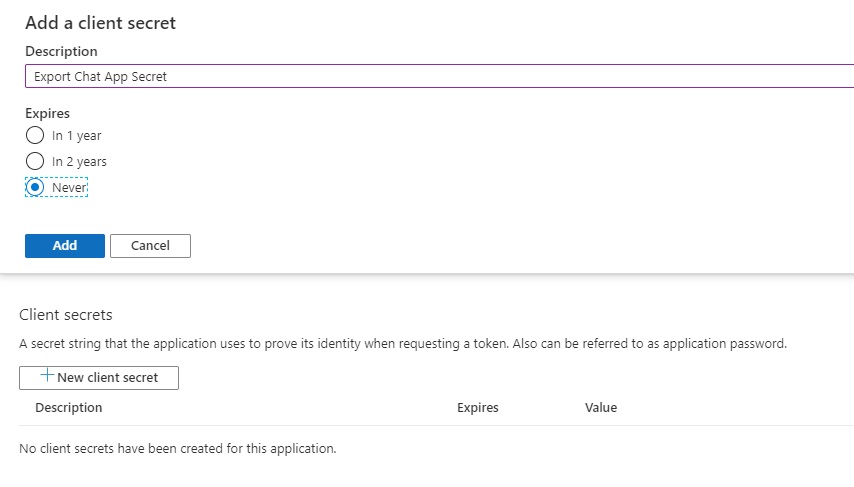
Now let’s generate the Client Secret. Click on Certificates and secrets in the left navigation and then click on New client secret. Type in a Description, select Expires as Never and Click Add. Copy the generated Client Secret to a notepad.
Now, we need to assign appropriate permission to this app to be able to read Chats and Messages. Click on API Permissions in the left navigation and Click Add Permission. In the new window, click on Microsoft Graph and select the permissions listed in the screenshot. Note that all the permissions provided are of type “delegated”.
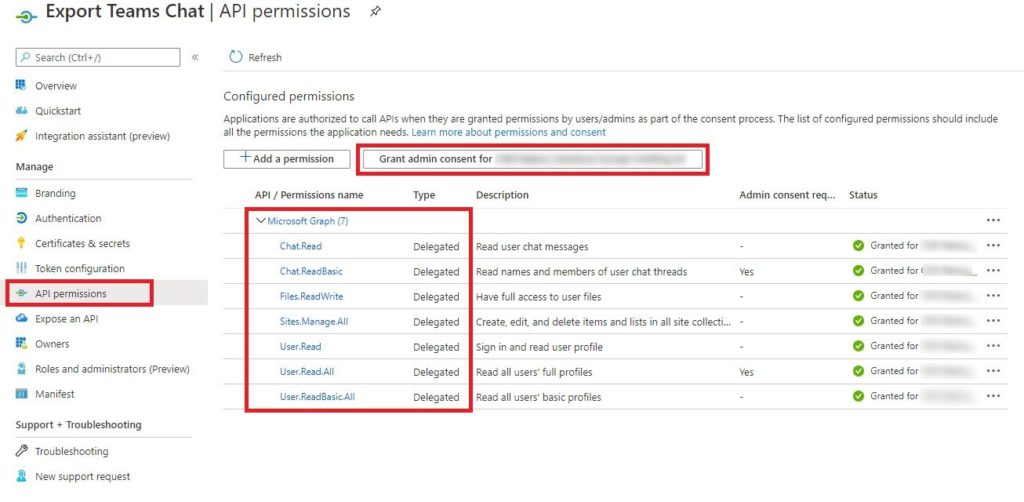
You can chose to Grant Admin Consent to add these permissions. If you have tenant admin credentials, you can just click on the button “Grant Admin Consent for xxx”, otherwise send the link of the app to your tenant admin to do so.
Otherwise, you need to get the consent from the user by constructing a consent URL like this:
https://login.microsoftonline.com/<tenant ID>/oauth2/v2.0/authorize?client_id=<client ID of your Azure AD Ap>&response_type=code&redirect_uri=<sharepoint page url added as redirect URI while registering the app>&response_mode=query&scope=Chat.Read%20Chat.ReadBasic%20User.Read%20User.ReadBasic.All%20Sites.Manage.All&state=12345"
Essentially here:
- client_id= Provide Client ID of the Azure AD App
- response_type=code, this means a authentication code will be returned after successful cosent
- redirect_uri=The URL of the page where you will be redirected to after successful consent. In this case, Use the SharePoint page url added as redirect URl in the app
- response_mode=query, means the code will be returned in the query string
- scope= Add add the permissions requested by the app.
- state=Provide any value
Once the URI is constructed, the user who is supposed to export his/her chat messages, should open this in browser and provide the consent to the app to connect and fetch the Chats and Messages on his/her behalf. Providing consent is a one time activity.
First Stop PowerShell
Even though, we can’t provide this solution to business users, it was just to see what to expect as an outcome.
What is being done here is simple:
- Get the Access Token by passing in the Tenant ID, Client ID, Client Secret, UPN and Password of the user whose Chats need to be exported
- Call the API https://graph.microsoft.com/beta/users/$Username to get the User ID, which is required to call the ListChat API
- Call the API https://graph.microsoft.com/beta/users/$UserID/chats to get a list of all Chats. These are like group of chats messages.
- For each chat, call the API https://graph.microsoft.com/beta/chats/$ChatID/messages to get the messages
- Since the API returns only 20 messages and a link to next page, follow the next page URL and keep on calling the API till there are no more pages
- Write the output in a CSV file
#Function to get the access token with delegated permissions
Function GetBearerTokenForDelegatedAccess($TenantID, $ClientID, $ClientSecret, $Username, $Password)
{
$ReqTokenBody = @{
Grant_Type = "Password"
client_Id = $ClientID
Client_Secret = $ClientSecret
Username = $Username
Password = $Password
Scope = "https://graph.microsoft.com/.default"
}
$TokenResponse = Invoke-RestMethod -Uri "https://login.microsoftonline.com/$TenantID/oauth2/v2.0/token" -Method POST -Body $ReqTokenBody
return $TokenResponse.access_token
}
#Find User ID from UPN
Function ListUserIDforCurrentUser($AccessToken, $Username)
{
#Prepare header for Graph API call
$Headers = @{
'Content-Type' = 'application/json'
'Authorization' = 'Bearer ' + $AccessToken
}
#Endpoint URI to get User ID of the given user
$Uri = "https://graph.microsoft.com/beta/users/$Username"
$Responses = (Invoke-RestMethod -Uri $uri -Headers $Headers -Method Get).id
return $Responses
}
#List all the Chats. It's just a list of chats, we need to call another API to get messages within these chats
Function ListChats($AccessToken, $UserID)
{
#Prepare header for Graph API call
$Headers = @{
'Content-Type' = 'application/json'
'Authorization' = 'Bearer ' + $AccessToken
}
#Endpoint URI to get List of Chats for the given user old way
#$Uri = "https://graph.microsoft.com/beta/users/$UserID/chats"
#Endpoint URI to get List of Chats for the given user NEW way with v1 API, you don't need to pass $UserID to this function anymore
$Uri = "https://graph.microsoft.com/v1.0/chats"
$Responses = (Invoke-RestMethod -Uri $uri -Headers $Headers - Method Get).Value
return $Responses
}
Function ListMessagesInAChat($AccessToken, $ChatID)
{
#Prepare header for Graph API call
$Headers = @{
'Content-Type' = 'application/json'
'Authorization' = 'Bearer ' + $AccessToken
}
#Endpoint URI to get List of Chats for the given user
$Uri = "https://graph.microsoft.com/beta/chats/$ChatID/messages"
$Responses = Invoke-RestMethod -Uri $uri -Headers $Headers -Method Get
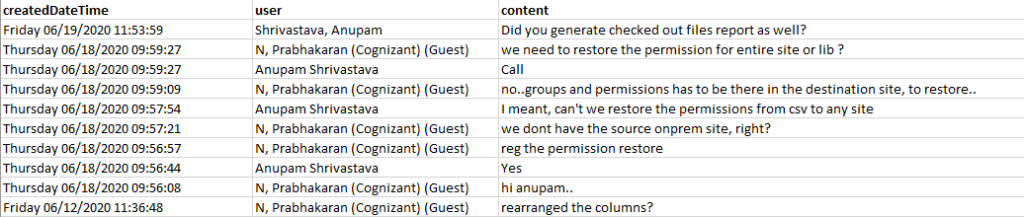
$Responses.value | Select-Object @{Name="createdDateTime"; Expression={Get-Date $_.createdDateTime -Format "dddd MM/dd/yyyy HH:mm:ss "}}, @{Name="user"; Expression={ $_.from.user.displayName }}, @{Name="content"; Expression={$_.body.content}} | Export-Csv "D:\Anupam\ExportedChats.csv" -Append
#Messages are pages across multiple pages, so need to call the API again till we don't get any more pages. @odata.nextLink contains the URI to call
if($Responses.'@odata.count' -gt 0)
{
ListMessagesInChatPages $AccessToken $Responses.'@odata.nextLink'
}
}
#Get the messages from within the pages
Function ListMessagesInChatPages($AccessToken, $Uri)
{
#Prepare header for Graph API call
$Headers = @{
'Content-Type' = 'application/json'
'Authorization' = 'Bearer ' + $AccessToken
}
#Endpoint URI to get List of Chats for the given user
$Responses = Invoke-RestMethod -Uri $uri -Headers $Headers -Method Get
$Responses.value | Select-Object @{Name="createdDateTime"; Expression={Get-Date $_.createdDateTime -Format "dddd MM/dd/yyyy HH:mm:ss "}}, @{Name="user"; Expression={ $_.from.user.displayName }}, @{Name="content"; Expression={$_.body.content}} | Export-Csv "D:\Anupam\ExportedChats.csv" -Append
if($Responses.'@odata.count' -gt 0)
{
ListMessagesInChatPages $AccessToken $Responses.'@odata.nextLink'
}
}
#Declate the variables, update these for your tenant and app
$ClientID = "7f38fa85-xxxx-xxxx-xxxx-fb695f87864c"
$TenantID = "xxxx-d6e1-xxxx-801f-xxxx"
$ClientSecret = "_1.xxxx-xxxx~vvaXZIefw-xxx"
$Username = "[email protected]"
$Password = "xx@xx"
$AccessTokenDelegated = GetBearerTokenForDelegatedAccess $TenantID $ClientID $ClientSecret $Username $Password
$userID = ListUserIDforCurrentUser $AccessTokenDelegated $Username
$AllChats = ListChats $AccessTokenDelegated $userID
foreach($chatID in $AllChats)
{
ListMessagesInAChat $AccessTokenDelegated $chatID.ID
}
I guess the script is self explanatory and we get a csv file containing the time, user and the content of the chat. You can include additional fields returned by the APIs, but I have trimmed those for clarity.
This PowerShell boosted the confidence about the possibilities. It is indeed possible to extract all the messages and put them in a format of our linking. But as discussed earlier, since we need the credentials of the user for whom we need to extract the Chats, it’s not a practical end user solution.
Power Platform
As a natural progressive choice, I started to look at a combination of PowerApps and Power Automate to develop something quickly to achieve the same. The idea was simple, provide a simple PowerApps form to the end users, where they can just click on a button like Export Chat and we will trigger a Power Automate Flow to do the heavy work.
Take a look at the article, https://anupams.net/power-of-power-automate-and-a-big-limitation about PowerApps licensing limits, which may impact your PowerApps based implementation.
PowerApps
Even though it seemed super easy to get started, it became quickly evident that to call flow from PowerApps, a custom connector is required which is part of premium plans, so it was a no go! Will get back to alternative later.
Power Automate
Then I decided to focus my attention to getting the chats using Power Automate first. The steps required are almost similar as noted down under PowerShell section, with a little change. In PowerShell, I used the Grant_Type = “Password”, which requires us to pass the user id and password to get the access token. That we can’t expect (and shouldn’t) from end users.
So, I decided to use the Grant_Type = “authorization_code”. What this expects, is the code generated by the consent URL. So, when users access the consent URL (explained under Register Azure AD section), if successful, it returns a code. We need to pass this code to Power Automate to get the access token.
Trigger
Create your Power Automated Flow and add the trigger as “When a HTTP request is received”
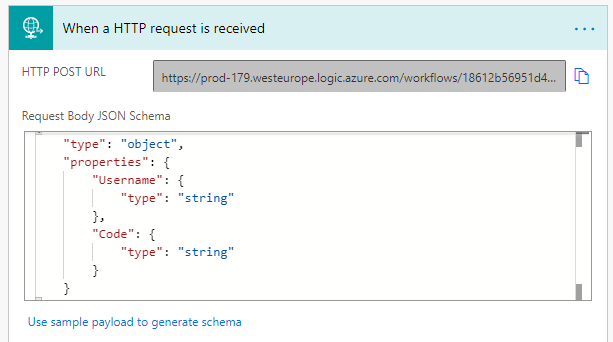
Under Request Body JSON Schema, we are going to pass the Username and the code, so the paste these JSON in the schema. The idea is to pass these value from a application which end users will use and trigger the Flow by calling this HTTP endpoint.
{
    "type": "object",
    "properties": {
        "Username": {
            "type": "string"
        },
        "Code": {
            "type": "string"
        }
    }
}
I am not doing anything to secure the HTTP call in this case, but you should implement some trigger checks to ensure it gets trigger only by your application.
Get Access Token
We already have Client ID and Client Secret. But in cases where the client secret contains any special characters we need to URL Encode it. I just use https://www.urlencoder.org/ to get the encoded client secret or just use encodeURIComponent expression in Power Automate/Flow. If you don’t do this, you may get an error like “Invalid Client Secret” when the step is executed. So, if your generated client secret came up like BhW/rsym7yD6we8XOGB91DvtqK/NowARtJ4KH/YZ+wo= the value that you should be using as client secret in this step would be BhW%2Frsym7yD6we8XOGB91DvtqK%2FNowARtJ4KH%2FYZ%2Bwo%3D
Now that we have all the inputs lets go ahead and fill the values in the Flow Action. Search and add an HTTP action in the Power Automate/Flow and configure it with following values
- Method: POST
- Uri: https://login.microsoftonline.com/<tenant ID>/oauth2/token
- Headers: Content-Type as Key and application/x-www-form-urlencoded as Value
- Body: client_id=<ClientID>&scope=https://graph.microsoft.com/.default&client_secret=<Encoded Client Secret> grant_type=authorization_code&code=<Code received in HTTP Trigger body from calling app>&redirect_uri=<SharePoint page URL added as redirect URI while registering the Azure AD App>
As you can see, the HTTP call body looks a bit different than normal, in which we normally use grant_type=client_credentials. This is because this way we get the token with delegated access.

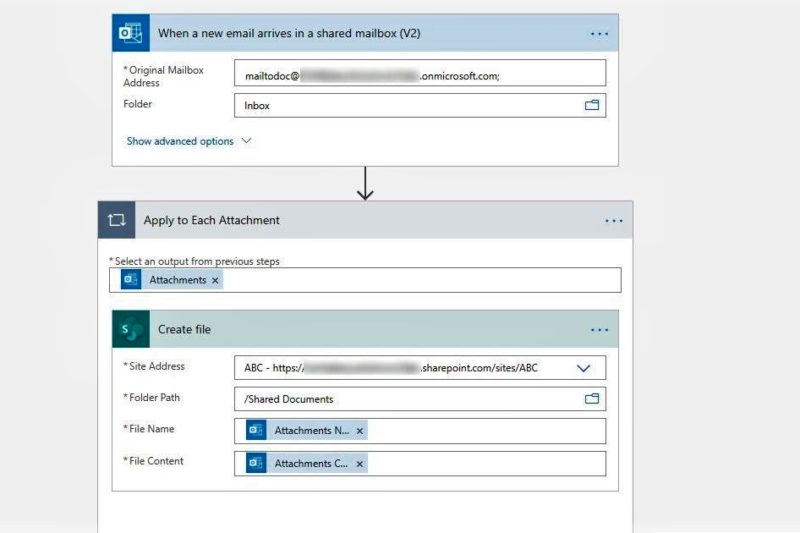
Find OneDrive URL
As discussed at the beginning, the idea is that the Power Automate Flow gets all the Chat Messages and stores in a list in the logged in User’s OneDrive. So, we’ll have to first find the URL of the OneDrive.
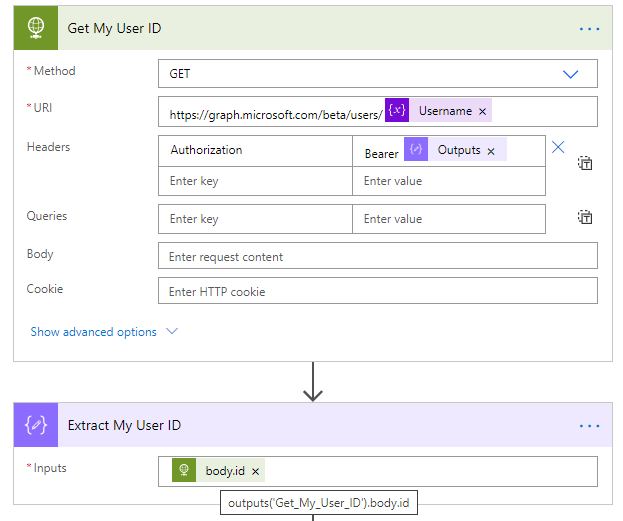
We first need to find the User ID from the user name. That’s easy enough – Just do a Get operation to https://graph.microsoft.com/beta/users/<Username> and read the Id from output body.
Now we need to perform another HTTP call to get the OneDrive details and extract the URL out of it. Again do a Get HTTP call to https://graph.microsoft.com/beta/users/<user id>/drive and perform some string manipulation to get the URL. IN my case, I did something like this.
replace(replace(replace(outputs('Get_OneDrive_Details').body.webUrl, variables('TenantNameWithHTTPS'),''),'-my.sharepoint.com/personal/',''),'/Documents','')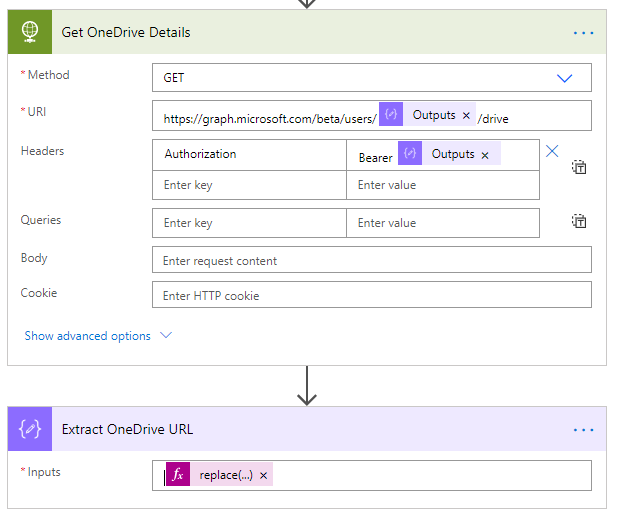
Check and Create List in OneDrive
Everytime this Flow runs, it will check whether the list in which we are going to put the exported chat messages already exists, if not, it will create one.
The below screenshot is self explanatory, call the graph API to connect to the list, if it throws 404 error, the list doesn’t exist.
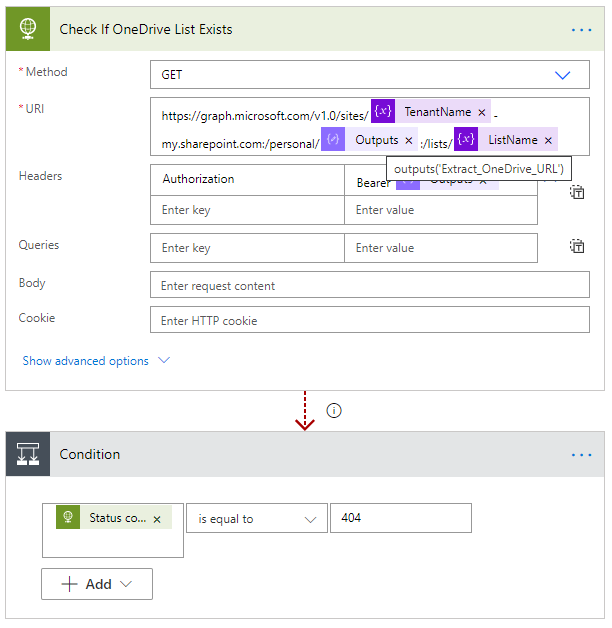
If that’s the case, create the list
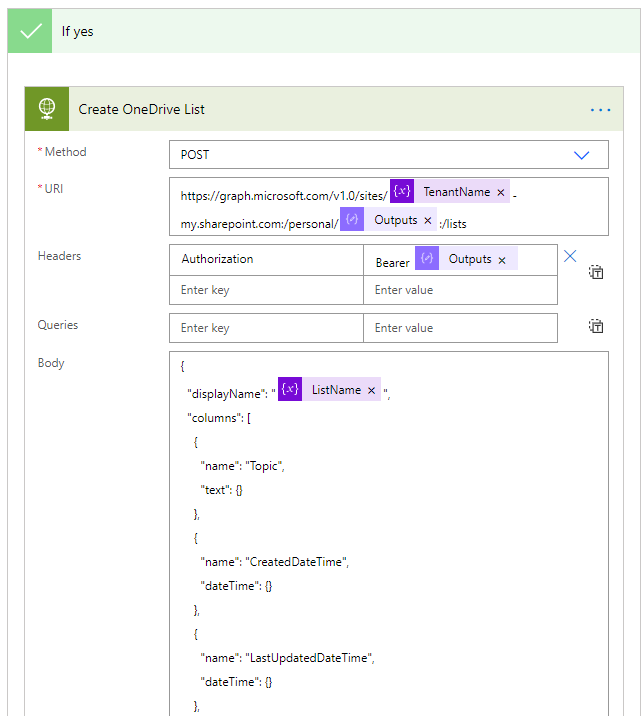
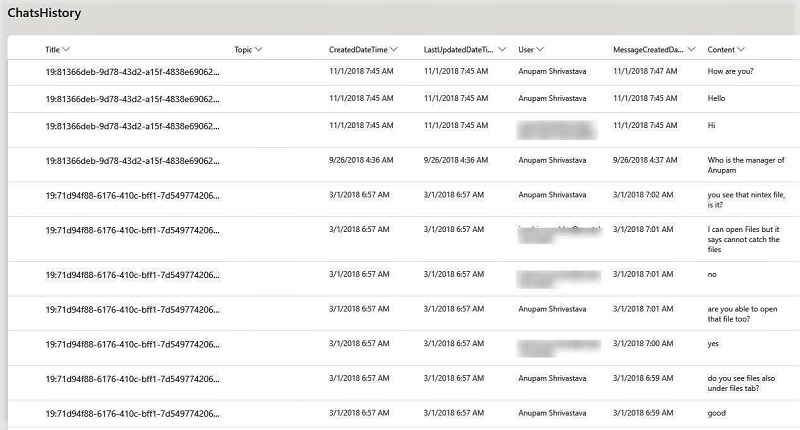
I have added Topic, CreatedDateTime, LastUpdatedDateTime, User, MessageCreatedDateTime and Content as list columns.
Get All Chats
As discussed under PowerShell section above, the way Teams maintains the history is by Chats and under each Chat we have messages. So, first we need to get the list of chats for the logged in user. Then we’ll loop through each chat to get the messages and add those to the OneDrive list.
To get the list of chats, call the graph API endpoint https://graph.microsoft.com/v1.0//chats. The below screenshot is using old beta API for this, but you can use the v1.0 API now.
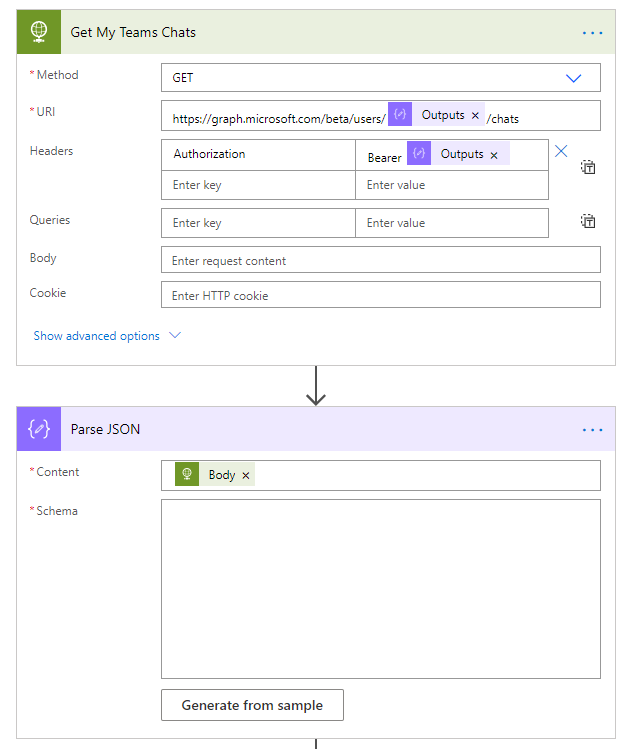
Get Messages in Chats
Now, we need to loop through all Chats, get messages and add to OneDrive list. Perform an HTTP Get call to https://graph.microsoft.com/beta/chats/<Chat ID>/messages
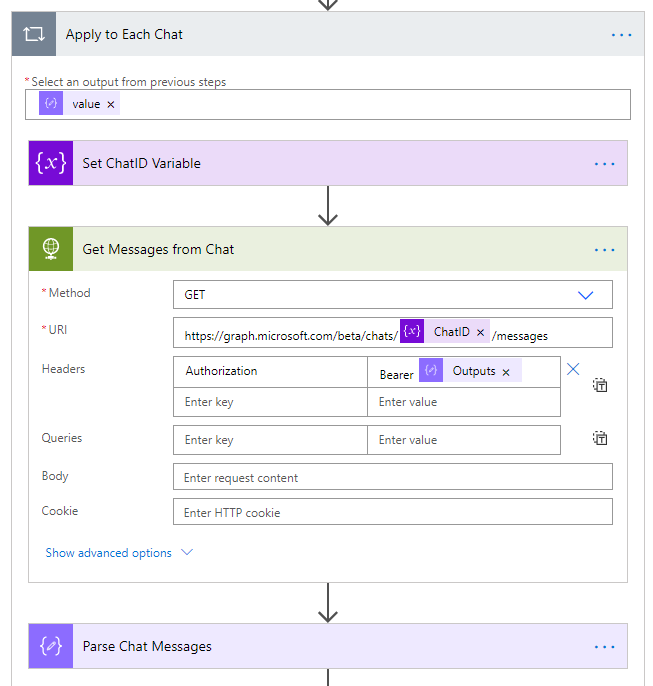
Loop through all messages received and add into OneDrive list. I am not extending the “For Each Message in a Chat” step, but essentially, it’s just checking if user display name received in the output in not null then add the message to OneDrive list.
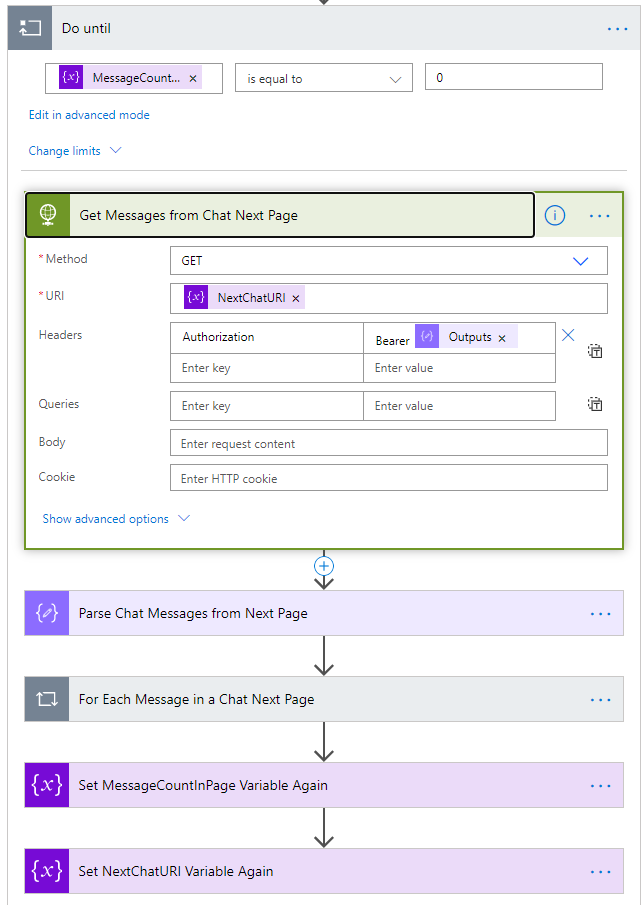
Since the API returns the results as paged. The first call would have only 20 messages. So, set some variables to store @odata.count, which contains the number of messages current output contains and @odata.nextLink, which contains the next page URL to call to get additional messages.
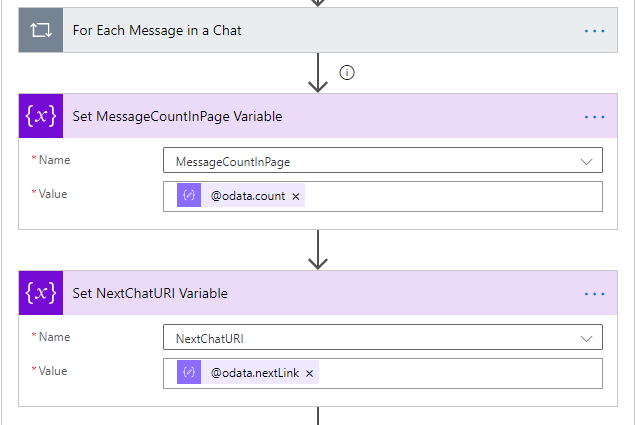
So, you got it right, we need to now perform the HTTP Get calls in a do-until loop till @odata.count becomes 0. It performs exactly the same thing as last call, reads the messages, checks if user is not null and then adds them to OneDrive List.
One this flow gets completed, the user will have a list created in his/her OneDrive.
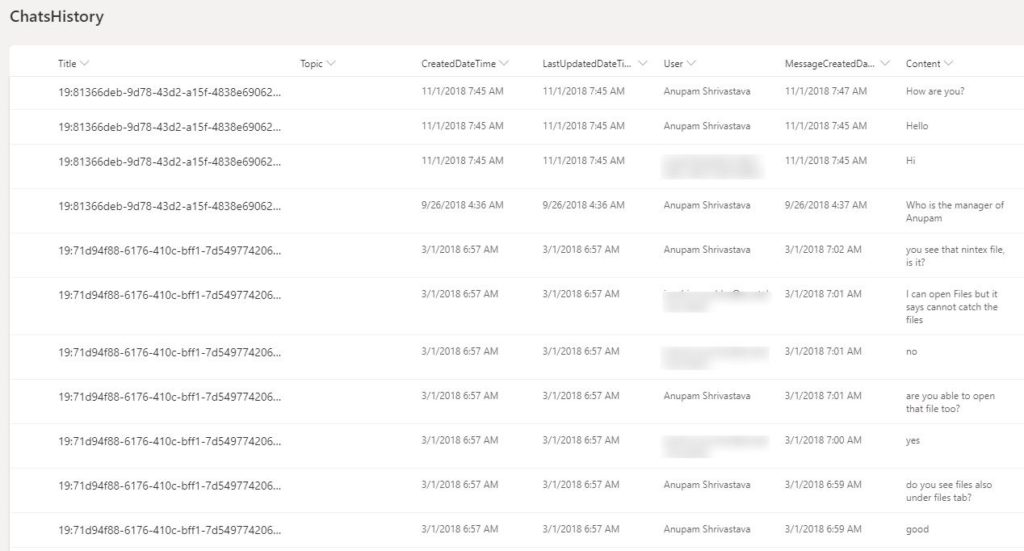
The Tile column contains the Chat ID, which is not very nice see, but is useful if you want to see messages under specific Chats. You can simply group by Title and you get a better view.
You should implement additional logic to ensure this flow can run multiple times without duplicating entries in the list
SPFx
Now back to the calling app which end users will use. As discussed earlier, preferred way to go was with PowerApps, so if your organization has the required licenses (needs premium plans), then go with that. I had to go for a small SPFx web part.
All it does it to Authenticate the user and gets his/her consent (if not already provided) and then calls the Power Automate Flow using HTTP call.
Just create a web part and add this to the load event – essentially redirect to the “Consent URL”.
 private AuthenticateMe(): void {
    window.location.href =
      "https://login.microsoftonline.com/<tenant ID>/oauth2/v2.0/authorize?client_id=<client ID>&response_type=code&redirect_uri=https://tenantname.sharepoint.com/sites/superteam/SitePages/AK.aspx&response_mode=query&scope=Chat.Read%20Chat.ReadBasic%20User.Read%20User.ReadBasic.All%20Sites.Manage.All&state=12345";
  }
Once the user gets authenticated, it will return the Auth code in the query string. Just capture that and send it in the body of the http call along with the user id.
private ExportChatButtonClicked(): Promise<HttpClientResponse> {
    let code: string = this.GetCodefromURL();
    if (code != null) {
      let upn: string = this.GetUPN();
      let authCode: string = code;

      const postURL =
        "<MS Flow HTTP Trigger URL>";
      const body: string = JSON.stringify({
        Username: upn,
        Code: authCode,
      });

      const requestHeaders: Headers = new Headers();
      requestHeaders.append("Content-type", "application/json");

      const httpClientOptions: IHttpClientOptions = {
        body: body,
        headers: requestHeaders,
      };

      return this.context.httpClient
        .post(postURL, HttpClient.configurations.v1, httpClientOptions)
        .then(
          (response: HttpClientResponse): Promise<HttpClientResponse> => {
            console.log("Flow Called...");
            return response.json();
          }
        );
    }
  }


  private GetUPN(): string {
    var email = this.context.pageContext.user.email;
    var upn = null;
    sp.web.ensureUser(email).then((result) => {
      upn = result.data.LoginName;
    });
    return upn;
  }
This is the basic version of that app looks like, of course you can add all your bells and whistles in your app.
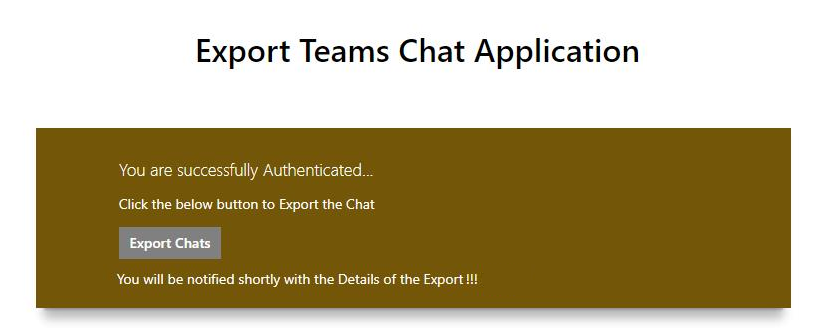
We can also add another SharePoint list to track the status of Flow and show the message accordingly to the user on this screen.
Final Thoughts
If you want you can even go a bit further.
- You can also choose to create CSV file(s) and upload them to respective user’s OneDrive
- You can develop a PowerApps based simple application to show the data from the OneDrive list/CSV file in a Conversation format like Outlook used to show with Skype for business
And that’s it. It’s up to you now to play around.
Hope this helps!
Thanks,
Anupam
14 comments
Excellent Anupam! I am going to try this soon.
Hello Anupam!
Excellent and interesting solutions.
Would you mind to share the PowerAutomate and the SPFx files with me ?
I would like to implement it
Thanks Martin, unfortunately since the solutions contain some customer specific data/connections, I won’t be able to share those. However, if you look at the article, I have specified all the details with screenshots. It may take a bit longer to implement this way, but that would be worth it as you would know if you have to make some tweaks for your environment.
Great resource!
I’m trying to follow along but I’m pretty new to Power Automate..
Above you state ‘Search and add an HTTP action in the Power Automate/Flow’ but the screenshot you provide shows a different action as ‘Get and Extract Bearer Token’ with Get Bearer Token and Extract Bearer Token. I can’t tell how you went from HTTP action to the Get and Extract Bearer Token actions… am I missing something obvious?
Also, it would be really swell if you provided a summary screenshot showing the full flow to give the whole picture!
Still though, this is great and gets the creative juices flowing… Microsoft has just totally dropped the ball on teams chat export functionality.
Regards,
DC
This is a normal HTTP action only, it’s just renamed to show the actual task this step does.
Hi
what is the response code. I consent the application but there is no response code
Planning to Try this option.,
Anupam
I think you have pointed redirect web url. what should be the redirect URl whether it is one drive site URL
It’s the URL of the site where the web part will be hosted.
Thank you Anupam, I have some questions related to Body.id and Body.access token. How we can get the value. I just selected Body then typed .id whether it is ok
some of the things not able to follow for me , what we need to pass the vaule in parse jason
related to two outputs, which outputs we need to include first and which is next
How about the response code where we wil get that
How to get the code is explained in “Register Azure AD Application section” under “Otherwise, you need to get the consent from the user by constructing a consent URL like this…”
Tenantwithhttps shows does not have variable name with this but there is no variable defined in the flow. even i updated the tenant name it is looking for that variable
we have tried the flow and it is failed on when a http received request and the flow failed on the timed out on the inputs. any idea how we can overcome this
@anupam Authorize code expires very 5 minutes do you have any option to remediate this.