Office 365 users seem to have love and hate relationship with Delve. Some love it for ease of access to content which would otherwise be difficult to find and others hate it for the very same reason, that it opens up the fault lines in their SharePoint setup where sites permissions are not kept updates when users move around various teams.
Problem Statement
The best way to define it would be – The “fear of unknown”, like “I don’t know which of my files will start appearing to everyone else”, is common among senior management and some users working in departements like HR and Finance. Again, it’s not about that Delve will not respect the security boundaries configured by the SharePoint site admins, it’s just that over a period of time, it might become difficult to be 100% sure that all sites permissions are always up to date.
So, end results, when you decide to enable Delve for the entire organization, some users may want to be excluded, so that their documents do not appear in other users’ delve.
Solutions
There are a few approaches available currently which we can use to achieve the same.
Self Service
The easiest way seem to be just ask those users to disable delve for themselves. Delve provides an easy way out. All such users need to do is to go to their Delve settings
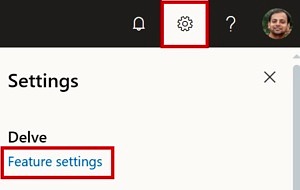
Uncheck the option “Documents” from under Delve Features and click OK.
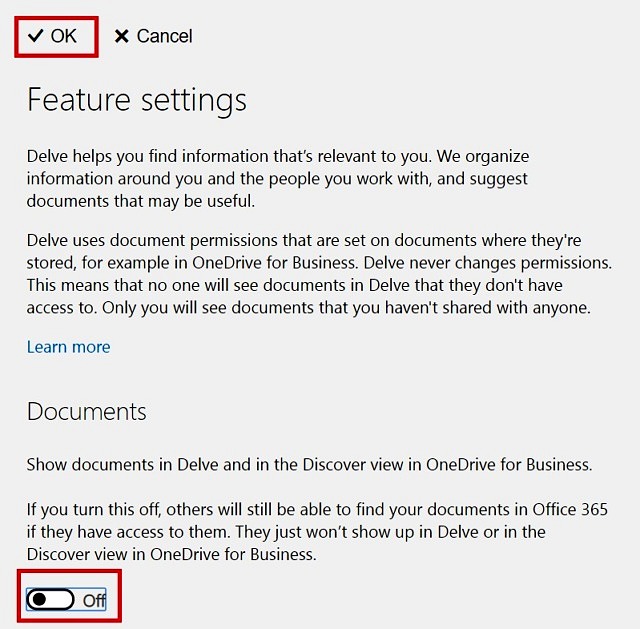
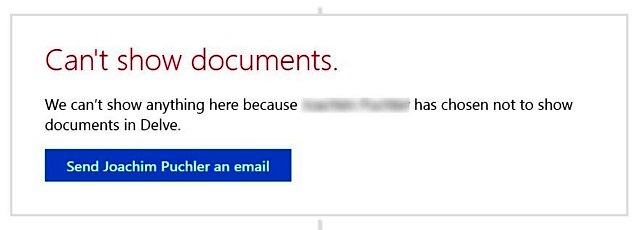
This setting makes their documents disappear immediately
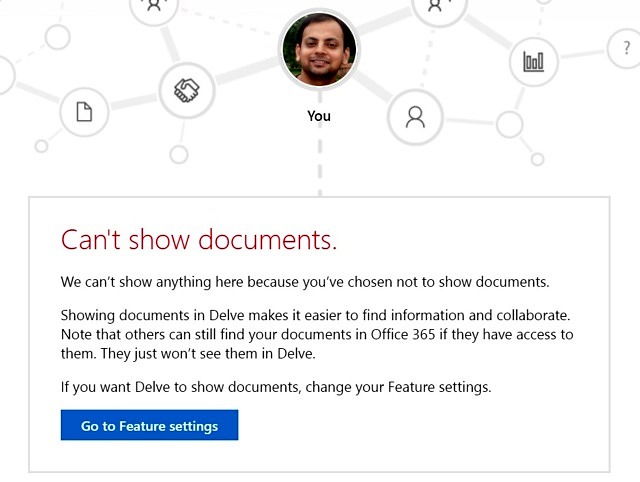
And a similar message will appear when someone else goes to such users’ Delve who have disabled Documents.
So, that’s it, but is it?
Even though it is as simple as clicking a button, making it practically work for most organizations might be challenging. Simply because it relies this action to be executed by end users.
A better solution would be that an admin can do this setting for all such users who don’t want their documents to be shown in Delve.
Unfortunately, at the time of writing this article, there is NO interface to do so. So, what are the options?
PowerShell
Obviously, that comes first in mind. After quite a few attempts, I came across this article, which mentions that if we update Users’ profile properties “DelveFlags” and “OfficeGraphEnabled” to null, it would disable the Delve for those users. But seems like MS has changed the implementation since then and the solution provided in that article doesn’t work anymore.
After a lot of googling, I came across this MS article, about a boolean property called “contributionToContentDiscoveryDisabled” of Micsosoft Graph API. We can Set it to true to disable delegate access to the Trending API and to disable access to documents in Office Delve for the user. Setting to true also affects the relevance of the content displayed in Office 365 – for example, Suggested sites in SharePoint Home and the Discover view in OneDrive for Business show less relevant results. This setting reflects the control state in Office Delve.
Wow, looks like we are getting somewhere now.
So, how to get about that.
Register App in Azure AD
First step is to register an app in Azure AD to get the Client ID and Client Secret to be used in our Graph API call.
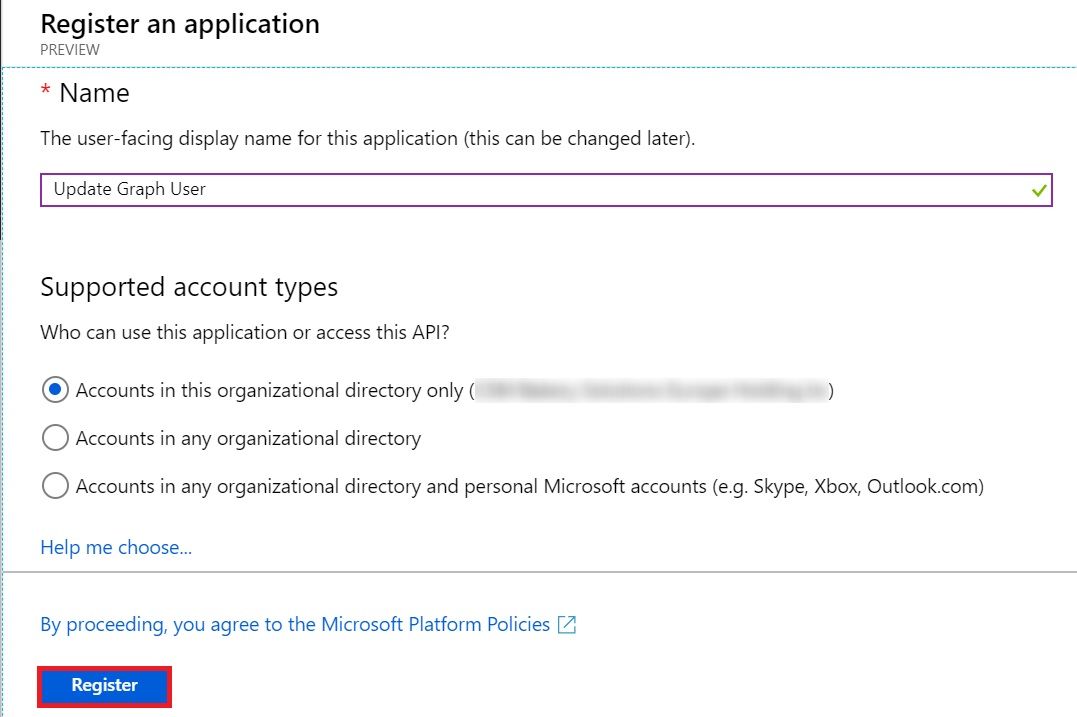
Go to Azure AD –> App Registrations (Preview) and click on New registration

Provide a name, select the option “Accounts in this organizational directory only” and click Register.
It would register the newly created app. Now, we need to give required permission to this app to be able to call the Graph API. For this API to work, this app needs User.ReadWrite.All permission.
Click on API Permissions on left navigation and click on Add a permission button.
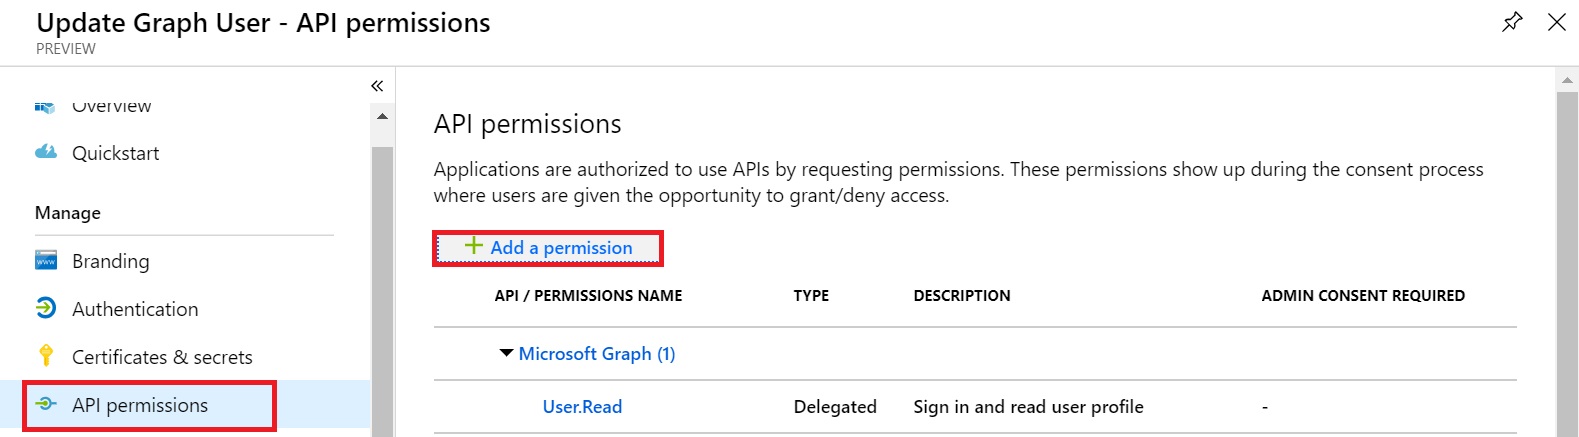
Search for the permission User.ReadWrite.All under Microsoft Graph and select it. Once added, click on the the button “Grant Admin consent for…”. You may also remove the default permission User.Read, because that’s already included in the new permission.
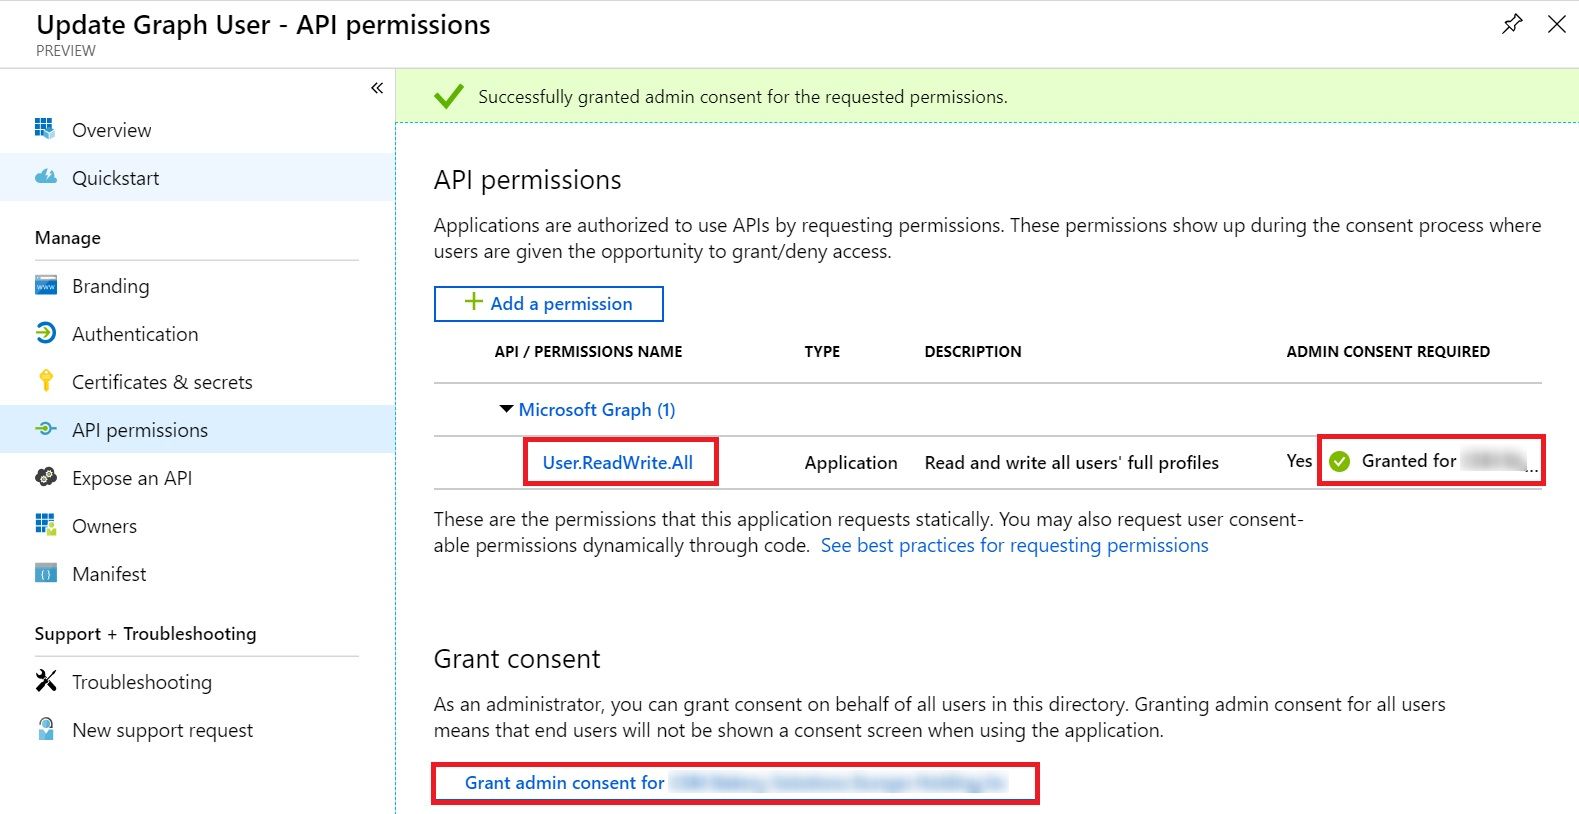
Once the consent is granted the Admin Content Required field will show a green icon.
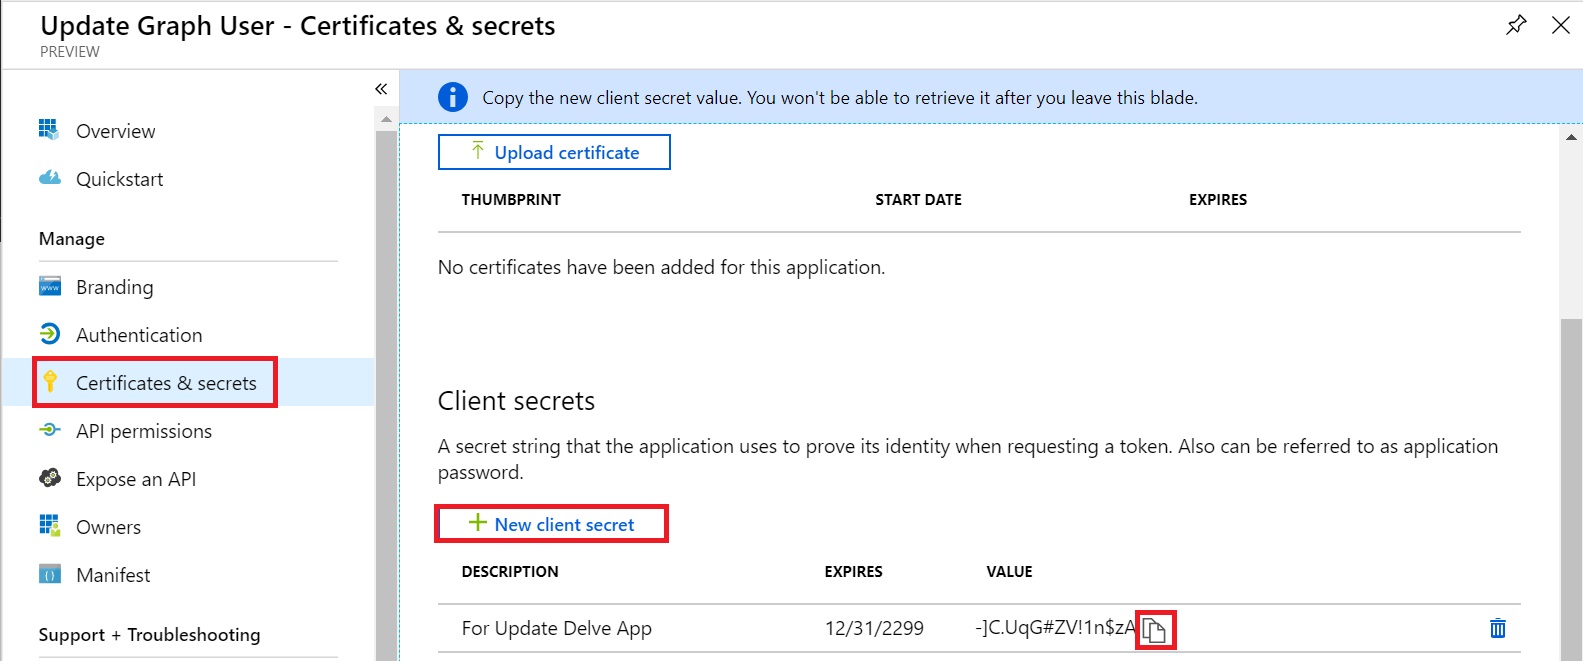
Now, we need to generate a Client Secret. Click on Certificates & secrets in left navigation and click on New client secret. Type in a name and expiry date and click Add.
It would get added as below. Copy the generated secret to a notepad by clicking the copy icon.
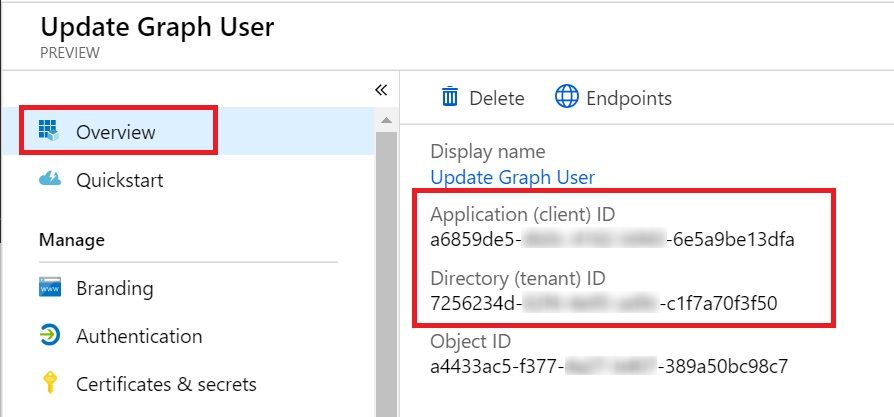
Last step about this is to gather the Tenant ID and Client ID. Click on Overview in the left navigation. It would show the Client ID under Application (client) ID and Tenant ID under Directory (tenant) ID. Copy these values to a notepad as well. We’ll need these to make the Graph API call from PowerShell.
Create a CSV File
In most cases, you would have more than one user for whom Delve needs to be disabled. Even though, you can type in those names directly in PowerShell as well, it might be a better idea to keep those names in a separate CSV file.
This is how my CSV file looks like – list of Users’ UPN

Our PowerShell will read through this CSV and Disable Delve for these users.
Script
And Finally the PowerShell script itself
[code]
#Set some variables, Ensure to change them as per your environment
$tenantId = "Tenant ID copied from the registered App"
$clientId = "Client ID copied from the registered App"
#Very important to notice, if there are any $ characters in the generated client secret, those must be pre-fixed with a escape (`) character
$clientSecret = "Client Secret copied from the registered app"
#No need to change these
$scope = "https://graph.microsoft.com/.default"
$tokenURI = "https://login.microsoftonline.com/$tenantId/oauth2/v2.0/token"
$tokenHeader = @{
‘Content-Type’ = ‘application/x-www-form-urlencoded’
}
#Notice, body should NOT be converted to JSON format
$tokenBody = @{
‘client_id’=$clientId
‘scope’=$scope
‘client_secret’= $clientSecret
‘grant_type’=’client_credentials’
}
#Call the API to get the beaerer token in response
$response = Invoke-RestMethod -Uri $tokenURI -Headers $tokenHeader -Body $tokenBody -Method Post
#Extract the bearer token from response
$AccessToken = $response.access_token
#Prepare header for Graph API call
$headers = @{
‘Content-Type’ = ‘application/json’
‘Authorization’ = ‘Bearer ‘ + $AccessToken
}
#Prepare body for Graph API Call, Essentially this will update the contributionToContentDiscoveryDisabled property to true, disabling Delve
$body = @{
"contributionToContentDiscoveryDisabled" = $true
} | ConvertTo-Json
#Get the users from CSV. Note that the CSV path in this case will be the directory from where PowerShell is being run
$allUsers = Import-Csv -Path DisabledDelveUsers.csv
#Call the Graph API for each user in CSV
foreach($user in $allUsers)
{
#Read the UPN Field from CSV
$UPN = $user.UPN
#Prepare the URI for selected user
$uri = "https://graph.microsoft.com/v1.0/users/$UPN/settings"
#Call the API to Update the property
Invoke-RestMethod -Uri $uri -Headers $headers -Body $body -Method Patch
}
[/code]
And that’s it. If everything goes well, you can verify from Delve that you can’t see documents from those users anymore from within Delve.
MS Flow
I am a big fan of PowerShell but Flow has grown on me over a period of time. And interestingly, the same can be achieved by using MS Flow as well, without writing a single line of PowerShell script.
You will still need to Register an App in Azure AD, as explain in this article, to get the Client ID and Client Secret.
SharePoint List
In this case, we can maintain a SharePoint list with users and corresponding Delve Flag (so that we can enable Delve using the same Flow later, if required).
So, just create a custom list with two fields, say UserName as People picker & DisableDelve as Yes/No type and Fill it with the users for whom you need to disable Delve.
Create Flow
Now, let’s create our Flow.
Go to https://flow.microsoft.com and Create a flow based on blank template.
Add Trigger
You can choose any event to trigger the flow, but for this article, I would go for Manual trigger, for which you can chose “Flow button for mobile” and select Manually trigger a flow.

Declare Variables
Now, Add some string variables to store the values to be used later. Initialize the TenantID, ClientID and ClientSecret variables with the values copied from the registered app in Azure AD and leave UserClaim and UPN blank for now.
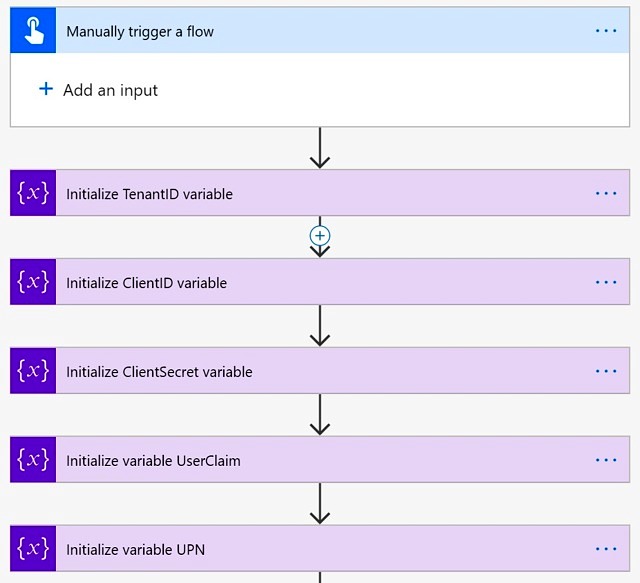
We are maintaining UserClaim and UPN separately to handle the scenario, if in your organization users’ UPN is different than their Email ID. If both are same, then you can directly use Email only.
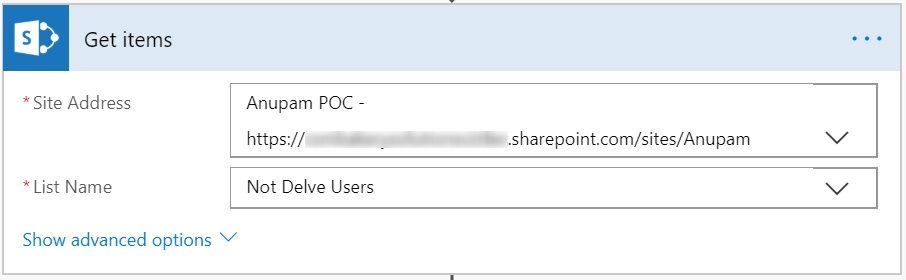
Get Users from SharePoint List
Next, read the users from SharePoint list using Get Items action.
Now, if you want, you can put an if condition to check if there are any items in the list before continuing to next step. But for this article, I would just assume that this list contains some values.
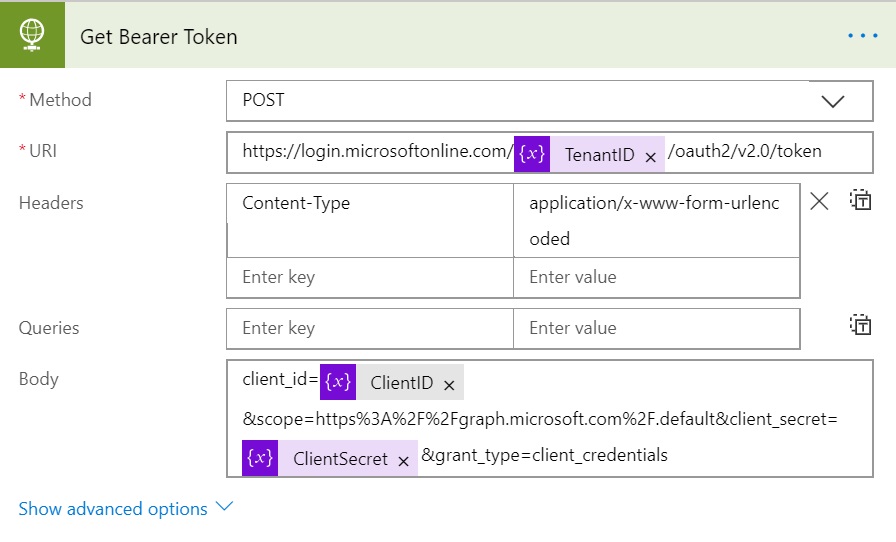
Get the Bearer Token
Now add an action and search for HTTP and select HTTP from the results. If you want, you can change the name of the action, by clicking “…” in right side of the screen and selecting Rename to make this step better identifiable later.
We already have all the inputs lets go ahead and fill the values in the Flow Action.
- Method: POST
- Uri: https://login.microsoftonline.com/<tenant ID variable>/oauth2/v2.0/token
- Headers: Content-Type as Key and application/x-www-form-urlencoded as Value
- Body: client_id=<Client ID variable>&scope=https%3A%2F%2Fgraph.microsoft.com%2F.default&client_secret=<Client Secret variable>&grant_type=client_credentials
So, now that we have that bearer token, we need to extract it from the output and pass it on to the next step which will call the Microsoft Graph API.
Let’s go ahead and edit the Flow again and add another action after Get Bearer Token step and search for “Compose” and add “Data Operations” from results.
Type “@outputs(‘Get_Bearer_Token’).body.access_token” in the input box, including the double quotes.

Here Get_Bearer_Token is the name of the previous action with spaces replaced with underscore (_) character. If you have named your previous action something else, use that name here. Also, always Type this, don’t copy-paste from here otherwise, you might get http 400, bad request error.
At this stage, we have extracted the access token which can be passed to the next action which will make Microsoft Graph API call.
For Each User
Now, we need to loop through all the users in SharePoint list and extract the UPN from claims and call the Graph API for each user. In this case, assign the “User Name Claims” from Get Items output to UserClaim variable and then to extract the UPN from the incoming claim, just remove the claim related prefix using the formula replace(variables(‘UserClaim’),’i:0#.f|membership|’,”) for UPN variable.
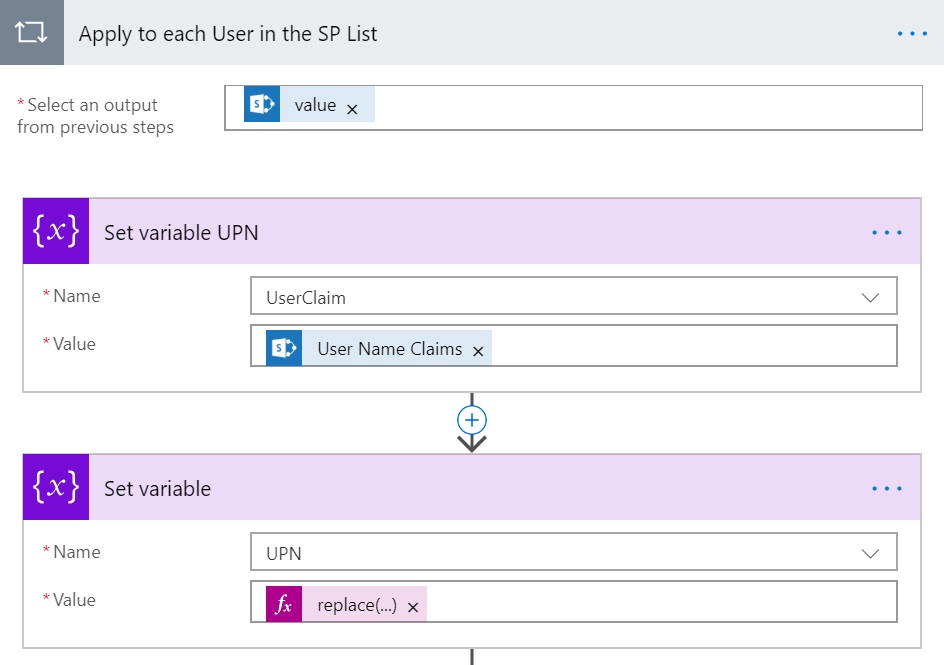
The output of this step would be extracted UPN for each user from that SharePoint list. Now, from within the loop, call the Graph API for each user.
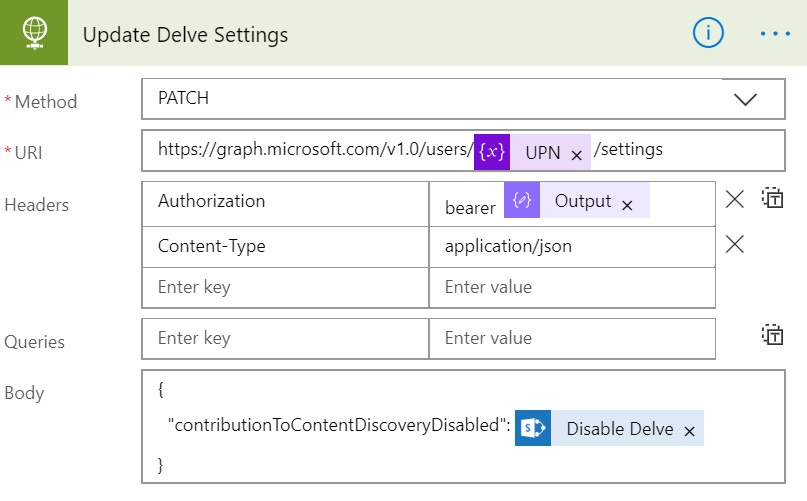
Call Microsoft Graph API
Add another Action after Compose and select HTTP like the previous step of Get Bearer Token. It will add another HTTP action and we need to prepare for the values to be passed to it.
- Method: PATCH
- Uri: https://graph.microsoft.com/v1.0/users/<Pass UPN variable>/settings
- Headers:
- Content-Type as Key and application/json as Value
- Authorization as Key and Bearer<space><select output from previous step>
- Queries: <Leave Empty>
- Body: { “contributionToContentDiscoveryDisabled”: <value of DisableDelve field from SP List>}
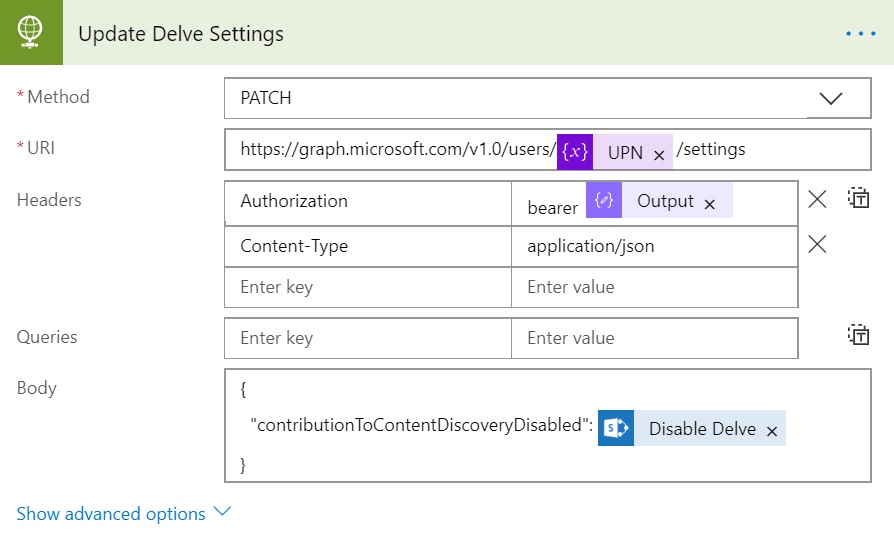
All done now. Save and Run the Flow and if everything is configured as expected it would update the Delve setting for all those users in SP list.
Note that we are assigning the boolean value (DisableDelve) read directly from the list. So, if you need to disable Delve for some users later, just enable that flag in the SP List and run this flow again.
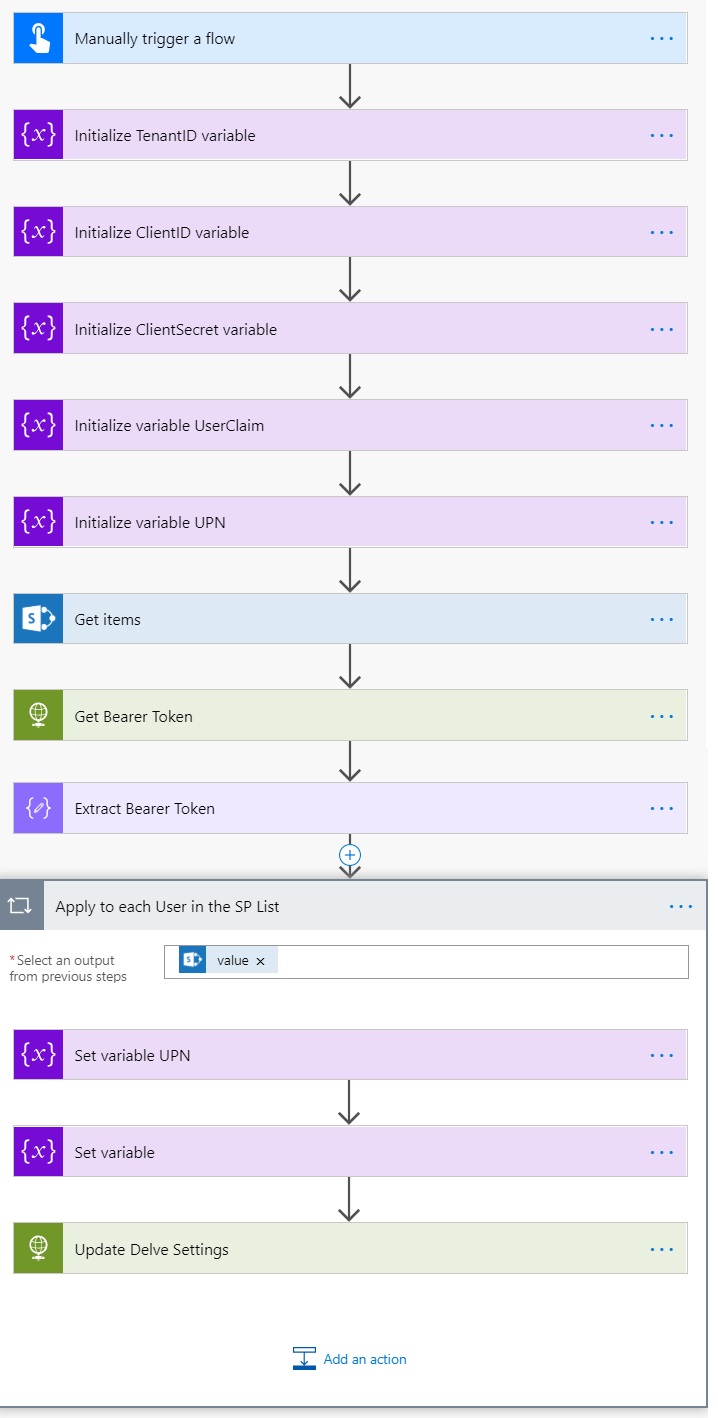
This is how the Final Flow looks like
Hope this Helps…
Enjoy,
Anupam

12 comments
Worked like a charm! Thank you for sharing 🙂
Be sure to double check the API permission : select Application permission not Delegated as shown on the first image or you will end up with a 403 😉
As it’s a user setting, users can just re-enable in Delve / Feature settings.
An alternative. You can create a Conditional Access Policy and select the group of users, who you don’t want using Delve to find information. The app to block is Office Delve. Just another option… Also stops the need to disable Delve org-wide. 🙂
Being able to enable delve for myself, I see this as a feature. This essentially means that I am allowing other users to be able to find the documents, on which I have given them access, directly from within Delve. This doesn’t expose any other users’ documents.
Just disabling the access of Delve won’t help as it will mean that users can’t even see each others profile information and as long as Office graph and delve feature remains enabled, all the content as always be accessible (and prioritized) like via search.
The PowerShell version works. GREAT!
The Flow-version keeps throwing a 401 Error in the “Get Bearer Token” function: (“error”:”invalid_client”,”error_description”:”AADSTS7000215: Invalid client secret is provided)
Same secret as in the PowerShell version.
Check if your generated client secret contains characters like ‘%’ or ‘?’. Try to HTTP Encode your client secret and then use that in Flow. This is a known issue which I had explained in this article – https://anupams.net/sharepoint-rest-service-microsoft-flow/ under Get Bearer Token section.
That did the trick!
Many thanks.
Getting error as : Invoke-RestMethod : The remote server returned an error: (403) Forbidden
Be sure to double check the API permission : select Application permission.
Sorry for the earlier post, Actually I’m getting Getting error as : Invoke-RestMethod : The remote server returned an error: (404) Not Found. Checked the permissions and it looks good. Do I run it just in my normal powershell window?
Yes Normal PowerShell window. 404 error means, the URL might be wrong.
Just check if you tenantID is correct and Client secret doesn’t contain characters like $ or %.
Nice Work. very helpful!.
Hi, thanks a lot, that’s very helpful!
I have an issue though, For some users, I got this error message “Mailbox info is stale”. Oddly enough, they all have an UPN that contains a single quote in it, something like user.A’[email protected].
Any ideas on where this could come from?