This article is outdated now since Microsoft retired the Service Communication API in Dec 2021. Please look at this article instead, which uses Microsoft Graph API to achieve the same.
I wrote an article on the same topic a couple of weeks ago that explains how to monitor Office 365 Health Status with PowerShell. I know, like me, there are a lot of other Power Automate/Flow enthusiasts who would prefer to achieve the same without writing any lines of scripts. So, here is it.
Before you get started, ensure that the account you are using with Power Automate/Flow at least has a “Flow per user” license assigned, since we’ll be using HTTP Action, which is a premium connector now. If you don’t have a Per User license of Power Automate/Flow, you can achieve the same using PowerShell as well by following this article.
Problem
I will skip the into part about why need need it, that’s well covered in my previous article, but just to set up some context about what we are trying to achieve here.
Whenever there is any issue identified by Microsoft in any of the office 365 applications, they post the status in the Office 365 Health Center under Service Health and continue posting updates in regular intervals till it’s resolved. That’s the first place to look into if your tenant is facing any issues. Microsoft exposes the messages related to such incidents using a set Office 365 Communication APIs. In this article, we are going to explore how can be use Power Automate/Flow to receive similar email alerts as we did using PowerShell in my previous article.
How to go about it
Now that we have established, that it’s just the solution which is going to be different, I encourage you to take a look at the previous article to understand the problem and context better.
Register App in Azure AD
This section is well explained in the previous article, so I will skip it here. Just follow the steps detailed under the heading “Register App in Azure AD” in my previous article and note down the Tenant ID, Client ID and Client Secret in a notepad.
Solution Outline
Lets first outline what we are trying to achieve here.
- Get the List of Incidents published in the Office 365 Health Center for specific applications since the last run of Power Automate/Flow
- Find out the latest message for each such incident as one Incident may have multiple status messages
- Construct the mail and send to Admins
- Save the last run time to enable Incremental query during next run
And what will it take to achieve the above
- A Custom List in SharePoint to store last run time of the Power Automate/Flow
- Getting an Access Token to call the Office 365 Service Communication API
- A lot of JSON and string manipulations and Filtering Arrays
- Some final tricks to construct the mail output as desired
SharePoint
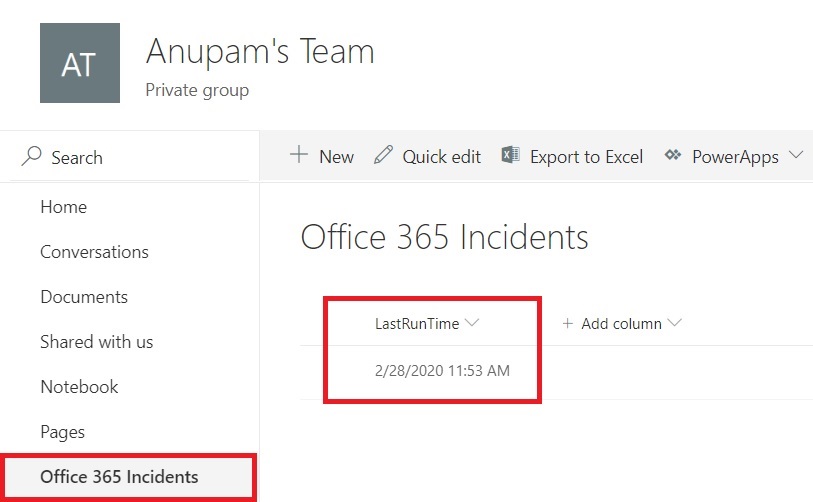
As mentioned in previous section, we need to maintain the last run time of the Power Automate/Flow to be able to incrementally query the communication API. For that, we’ll use a custom SharePoint list with just one date time column.
Just go ahead and create a list in a SharePoint site and add a date time type column named “LastRunTime”. Enable the column setting to show the time as well. Also, add one item in the list like a date from last week.
This helps in two ways, frist, we don’t need to put a separate logic in Power Automate/Flow to insert a record only first time and second, during tests, you can actually see the incidents published during last week.
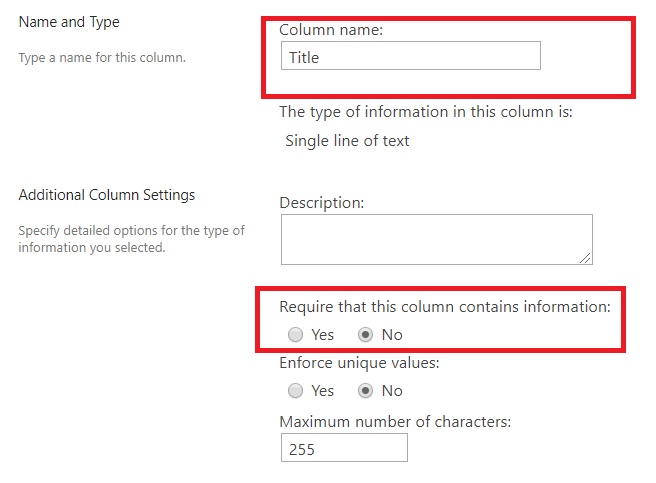
Since we don’t want to store any Title in this case, I would just go ahead and make that non-required. This will help when we try to update the last runtime from flow. We’ll just keep on updating the LastRunTime column.
And last optional configuration, change the regional setting of your site in which this list has been created to UTC time zone. Since, SharePoint and Office 365 Heath Center both store datetime as UTC.
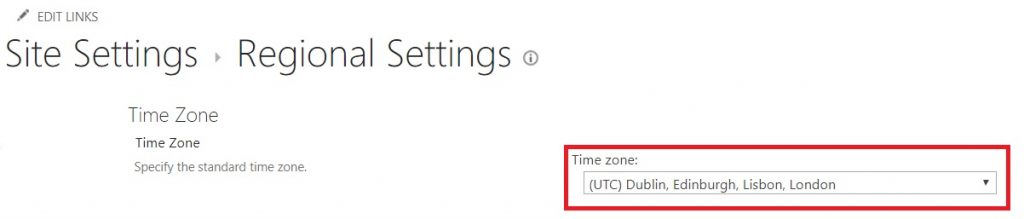
If you don’t do so, the solution will still work, but in the list you may see a different time, based on the regional setting of the site.
Power Automate/Flow
Now that our Azure AD App and SharePoint list are ready, we can jump into the core business.
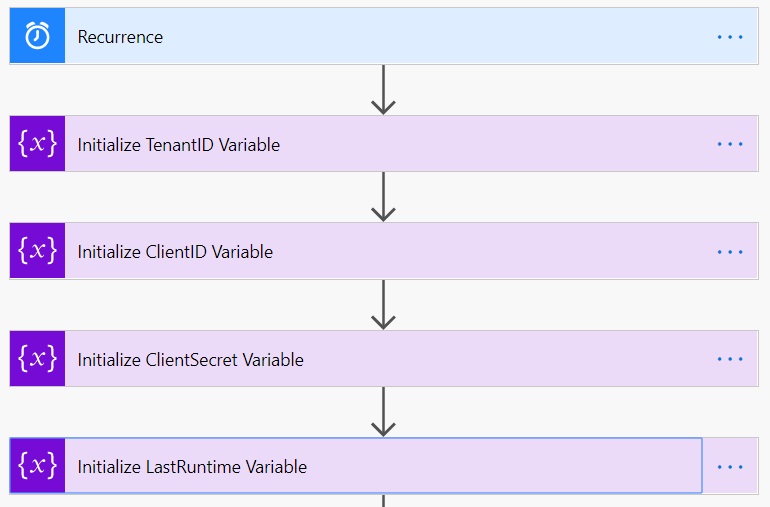
Variables
Let’s start with the basics. Add a trigger as Recurrence, since we’ll schedule it to trigger every 30 mins and we need some variables to store values which we need later in other actions. The variable names are self-explanatory and all of these are of string type.
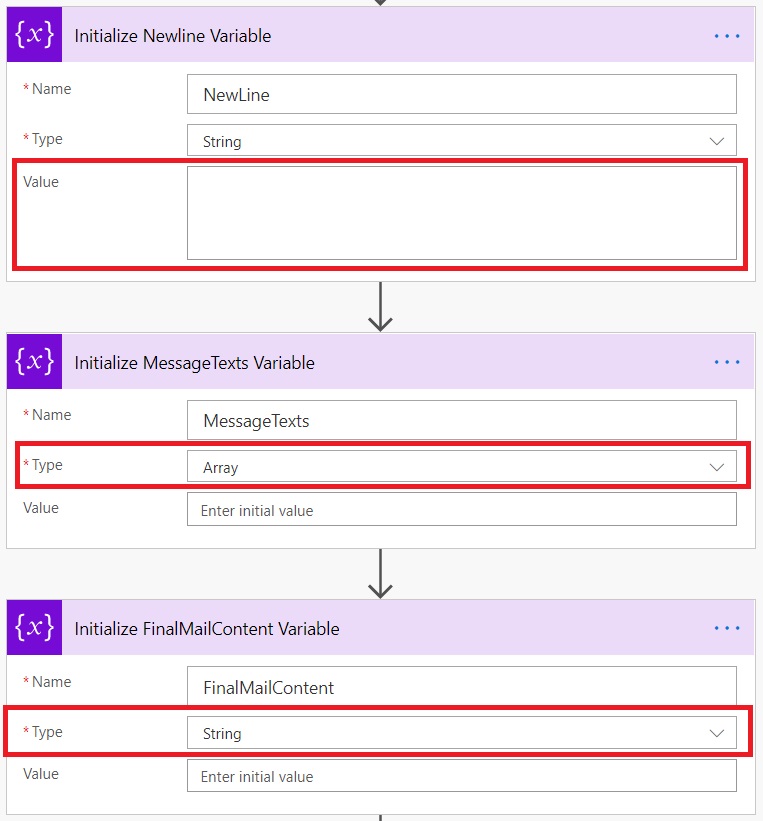
Next, we still need some more variables, but of different types now.
- A string type variable named “NewLine” with value as two new line characters. You just press enter button twice in the value field. You would see the height of the text field will change. I will explain later why it’s required.
- An array type variable named “MessageTexts” with no initial value. This will be required later to format our mail properly.
- And another string type variable named “FinalMailContent” which will hold our final formatted text to be sent over email.
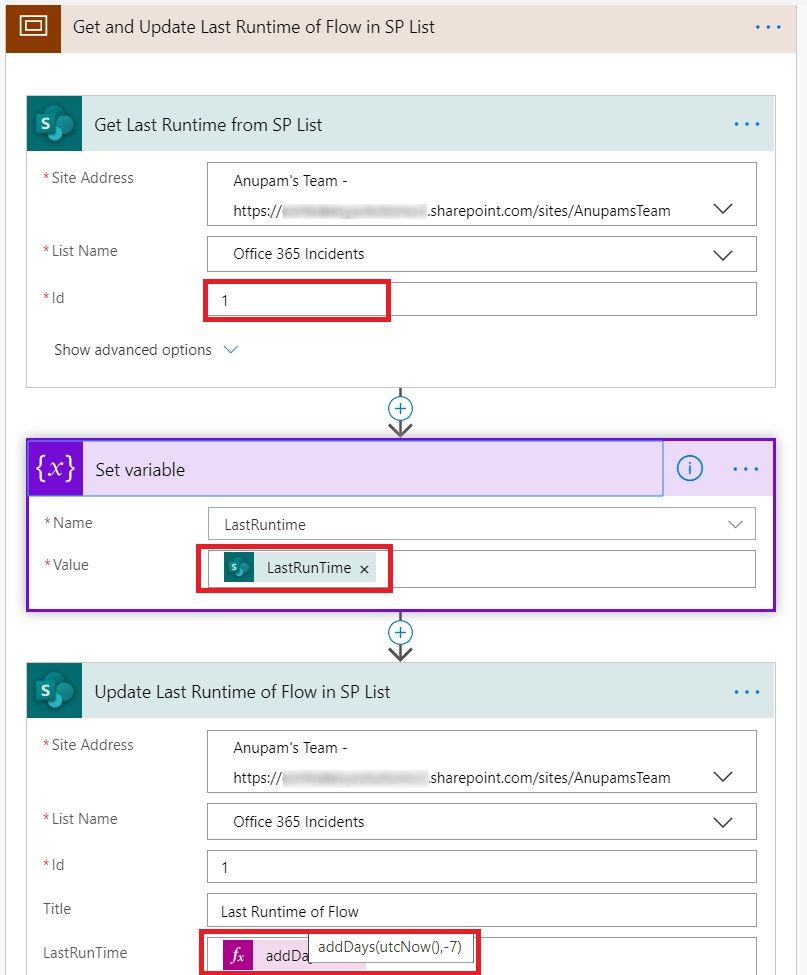
Get and Set Last Run Time from/in SharePoint
Remember the SharePoint list we created in one of the previous steps? It’s time to get the time stored in that list and update it with the current time, so that next time, our Power Automate/Flow will fetch only the incidents happened after it’s last run.
It’s a set of three actions, which I have put in a separate scope for ease of maintenance.
- Get List Item (SharePoint)
- Provide the Site URL in which the list has been created
- Select the List from the drop down
- Provide the list item ID. This is the OOB ID field value from your list. Since our list contains only one value, it will be “1” by default, unless you delete any item. You can add ID field in the view of your SP List to see the exact value.
- Set LastRunTime Variable
- Select LastRunTime variable
- Select the field value “LastRunTime” from under Dynamic Content of “Get Last Runtime from SP List” source
- Update List Item (SharePoint): Now that we have stored last run time value from the SP List in a variable, we can update the list with current date.
- Provide the Site URL in which the list has been created
- Select the List from the drop down
- Provide the same list item ID
- Title, we made non mandatory, so you can skip, but I provided some value
- LastRunTime: You need to provide utcNow(). But for testing purposes I have provided an expression addDays(utcNow(),-7) which gives a date of 7 days before today, so that it returns results during testing
Get Access Token
Office 365 Communication API needs OAuth2 Authentication token. So, lets use our Tenant ID, Client ID and Client Secret noted during Azure AD App configuration.
If you have worked with SharePoint REST Services using .Net/PowerShell, you know that we need to get a bearer token first before we can call any APIs. This is received by passing the Tenant ID, Client ID and Client Secret that we registered earlier in a specific format to a specific endpoint.
We already have Client ID and Client Secret. But in cases where the client secret contains any special characters we need to URL Encode it. I just use https://www.urlencoder.org/ to get the encoded client secret or just use encodeURIComponent expression in Power Automate/Flow. If you don’t do this, you may get an error like “Invalid Client Secret” when the step is executed. So, if your generated client secret came up like BhW/rsym7yD6we8XOGB91DvtqK/NowARtJ4KH/YZ+wo= the value that you should be using as client secret in this step would be BhW%2Frsym7yD6we8XOGB91DvtqK%2FNowARtJ4KH%2FYZ%2Bwo%3D
Now that we have all the inputs lets go ahead and fill the values in the Flow Action. Search and add an HTTP action in the Power Automate/Flow and configure it with following values
- Method: POST
- Uri: https://login.microsoftonline.com/<tenant ID>/oauth2/token?api-version=1.0
- Headers: Content-Type as Key and application/x-www-form-urlencoded as Value
- Body: client_id=<ClientID>&scope=https://graph.microsoft.com/.default&client_secret=<Encoded Client Secret> grant_type=client_credentials&resource=https://manage.office.com
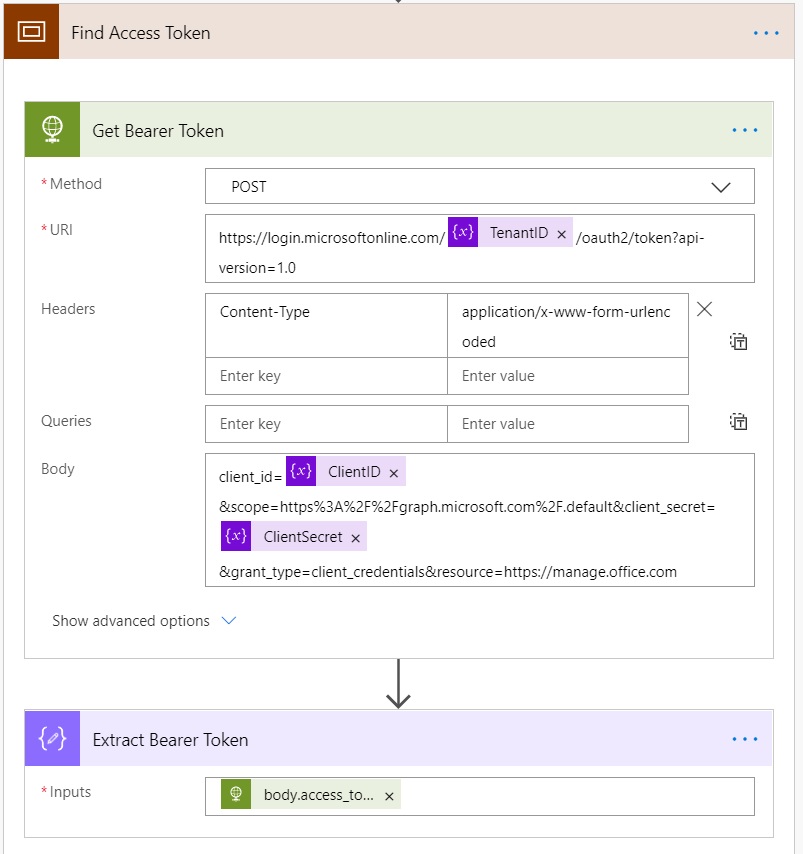
To extract the Access token from the output, add another step by selecting “Data Operations – Compose” from under Actions. It will add another Action and will ask for Input.
Type “@outputs(‘Get_Bearer_Token’).body.access_token” in the input box, including the double quotes.
Here Get_Bearer_Token is the name of the previous action with spaces replaced with underscore (_) character. If you have named your previous action something else, use that name here. Also, always Type this, don’t copy-paste from here otherwise, you might get http 400, bad request error.
At this stage, we have extracted the access token which can be passed to the next action which will make Office 365 Communication Services API call.
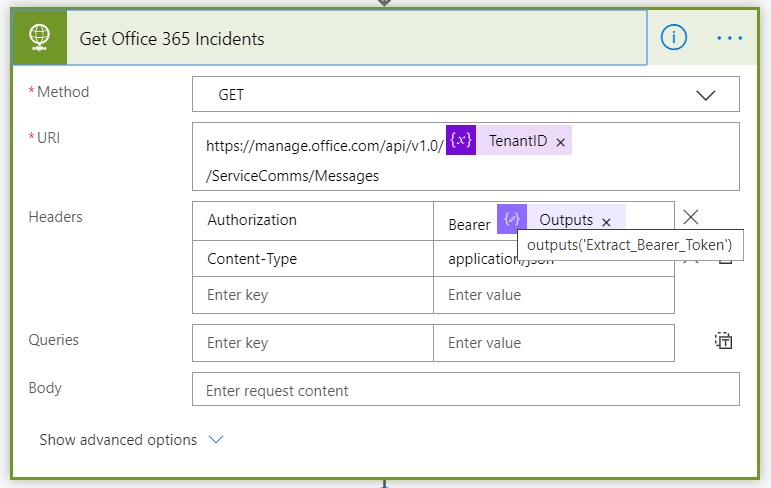
Call Office 365 Communication Services API
Add another Action after Compose and select HTTP like the previous step of Get Bearer Token. It will add another HTTP action and we need to prepare for the values to be passed to it.
- Method: GET
- Uri: https://manage.office.com/api/1.0/<Tenant ID>/ServiceComms/Messages
- Headers:
- Accept as Key and application/json as Value
- Authorization as Key and Bearer<space><select output from previous step>
- Body: <Leave Empty>
Once this API call succeeds, it will give us the list of all incidents occurred in last 7 days.
Even though as per the official documentation of the Office 365 Service Communication API supports filters, I could not make that work. Regardless of what syntax I use, it always returned unfiltered data. So, we’ll filter the data after getting result from the API.
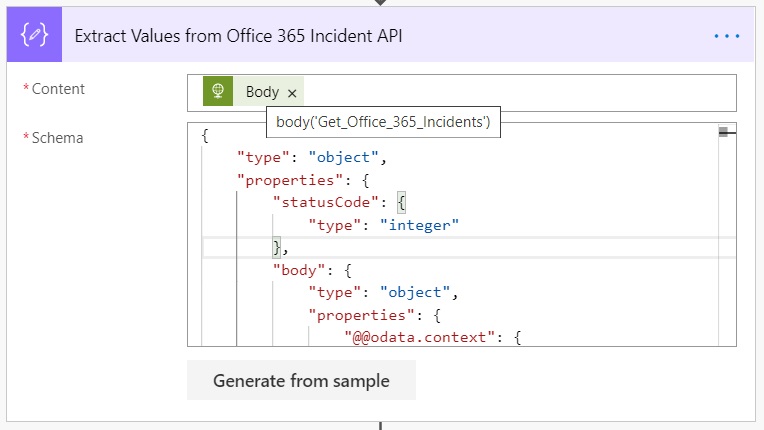
Now, to be able to work with the output of the API call, we need to parse the output in a JSON format removing unnecessary properties. It will also generate the list of those properties and show up under the dynamic content in Power Automate/Flow to be reused easily in next steps.
To do so, just add an Action – Parse JSON. In the newly added action under Content, select Body from the Dynamic content of “Get Office 365 Incidents” and paste the following schema. I have removed many properties already from here, you can remove some more based on your requirements.
{
    "type": "object",
    "properties": {
        "statusCode": {
            "type": "integer"
        },
        "body": {
            "type": "object",
            "properties": {
                "@@odata.context": {
                    "type": "string"
                },
                "value": {
                    "type": "array",
                    "items": {
                        "type": "object",
                        "properties": {
                            "AffectedWorkloadDisplayNames": {
                                "type": "array"
                            },
                            "AffectedWorkloadNames": {
                                "type": "array"
                            },
                            "Status": {
                                "type": "string"
                            },
                            "Workload": {
                                "type": "string"
                            },
                            "WorkloadDisplayName": {
                                "type": "string"
                            },

                            "EndTime": {
                                "type": "string"
                            },
                            "Feature": {
                                "type": "string"
                            },
                            "FeatureDisplayName": {
                                "type": "string"
                            },
                            "Id": {
                                "type": "string"
                            },
                            "ImpactDescription": {
                                "type": "string"
                            },
                            "LastUpdatedTime": {
                                "type": "string"
                            },
                            "MessageType": {
                                "type": "string"
                            },
                            "Messages": {
                                "type": "array",
                                "items": {
                                    "type": "object",
                                    "properties": {
                                        "MessageText": {
                                            "type": "string"
                                        },
                                        "PublishedTime": {
                                            "type": "string"
                                        }
                                    },
                                    "required": [
                                        "MessageText",
                                        "PublishedTime"
                                    ]
                                }
                            },
                            "Severity": {
                                "type": "string"
                            },
                            "StartTime": {
                                "type": "string"
                            },
                            "Title": {
                                "type": "string"
                            },

                            "FeatureName": {}
                        },
                        "required": [
                            "Id",
                            "Title"
                        ]
                    }
                }
            }
        }
    }
}
Filter the output
Now comes the important part. Remember the note about not being able to filter the results from the API using $filter keyword? So, we take this alternate approach. This is not as optimal as being able to use $filter with the API URI itself, but it works 🙂
To do so, let’s add an action “Filter Array” in our solution and provide it the input by typing in body(‘Extract_Values_from_Office_365_Incident_API’)?[‘value’] in the Expression and clicking on Update button.
This is important to add the input like this, otherwise you may receive an error like “The value must be of type array” or “The from property value in the query action inputs is of type Null”
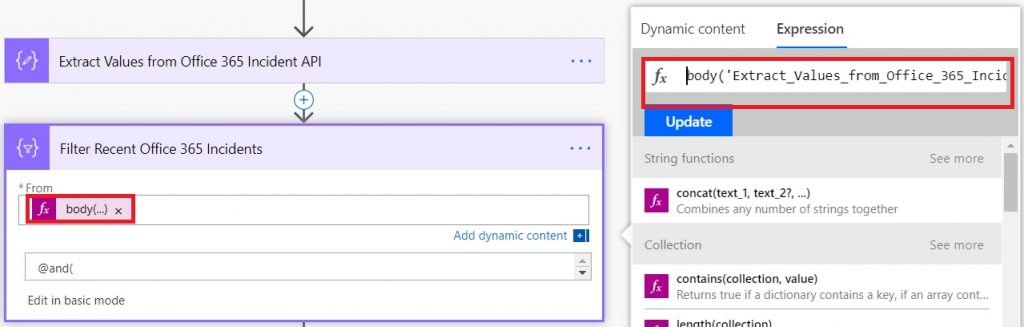
And now comes even more important part, is the syntax to filter. Switch to advanced mode and put the query as below
@and(
	or(
		equals(item()?['Workload'],'SharePoint'),
		equals(item()?['Workload'],'Lync')
	),
	equals(item()?['MessageType'], 'Incident'),
        equals(item()?['Classification'],'Incident'),
	greaterOrEquals(item()?['LastUpdatedTime'], variables('LastRuntime'))
)
Take a relook at the query format above to understand the structure. You will have to make changes here in case you want to add any other application in the filter. Valid values for applications are like Exchange, Planner, microsoftteams, Form, OneDriveForBusiness, yammer, OSDPPlatform etc.
Parse Filtered Incident
Let’s parse the filters outcome again using Parse JSON action. Select the Content as body of “Filter Recent Office 365 Incidents” from under dynamic content and add the following under schema.
{
    "type": "array",
    "items": {
        "type": "object",
        "properties": {
            "Status": {
                "type": "string"
            },
            "Workload": {
                "type": "string"
            },
            "WorkloadDisplayName": {
                "type": "string"
            },

            "EndTime": {},
            "Feature": {
                "type": "string"
            },
            "FeatureDisplayName": {
                "type": "string"
            },
            "Id": {
                "type": "string"
            },
            "ImpactDescription": {
                "type": "string"
            },
            "LastUpdatedTime": {
                "type": "string"
            },
            "MessageType": {
                "type": "string"
            },
            "Messages": {
                "type": "array",
                "items": {
                    "type": "object",
                    "properties": {
                        "MessageText": {
                            "type": "string"
                        },
                        "PublishedTime": {
                            "type": "string"
                        }
                    },
                    "required": [
                        "MessageText",
                        "PublishedTime"
                    ]
                }
            },

            "StartTime": {
                "type": "string"
            },
            "Title": {
                "type": "string"
            }
        },
        "required": [
            "Title"
        ]
    }
}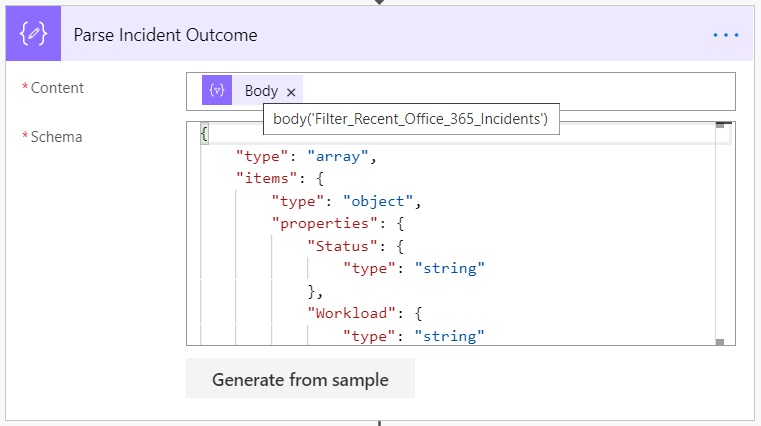
At this stage, we have filtered incidents based on our query which we can send over email. But remember, one such API call gives us all the Incidents occurred during that duration.
Loop and Find Latest Messages
So, we need to loop through each Incident and then send separate mail for each one. Also, each incident may contain multiple status messages published, so we need to find out the latest message to send over email. You guessed correctly, let’s go ahead and add a for each loop action in our solution.
- Loop through the list of incidents
- Find messages for each incident
- Find latest message for each incident
- Extract the message
- Send the extracted message over email
Let’s put a loop on all the filtered Incidents and put the output body of the previous step “Parse Incident Outcome”.
Next, add a Set Variable action and select FinalMailContent variable which we had initialize at the start and put a new line character (by pressing enter button on you machine) as value. I will explain later why this is required.
Now, we need to find out the latest message of the current incident. Messages appear as an array inside the Incident. To do so, we’ll first find out the length of the message (i.e. count)
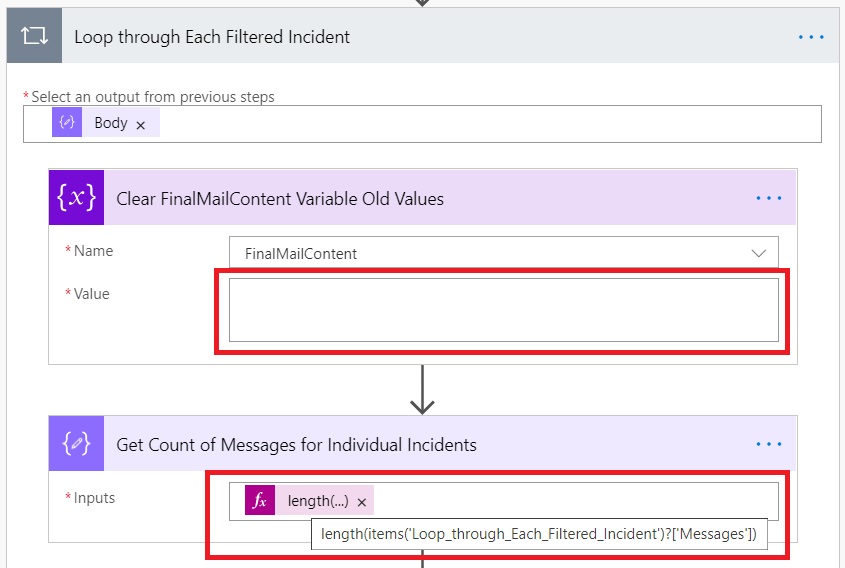
Drop a Compose Action from under Data Operations and provide the input as in the screenshot above – length(items(‘Loop_through_Each_Filtered_Incident’)?[‘Messages’]) by adding this under Expression and clicking OK.
This step will provide us a count of how many messages that particular incident has. Now to extract the latest message drop another Compose Action from under Data Operations and provide this as an input items(‘Loop_through_Each_Filtered_Incident’)?[‘Messages’][sub(outputs(‘Get_Count_of_Messages_for_Individual_Incidents’),1)] , again by adding this under Expression and clicking OK.
What essentially we are doing here, is finding out the item at the end of the Array.

Just add another Parse JSON action to extract the message. Provide Outputs of the step “Find Latest Message” under Content and the below as schema
{
"type": "object",
"properties": {
"MessageText": {
"type": "string"
}
}
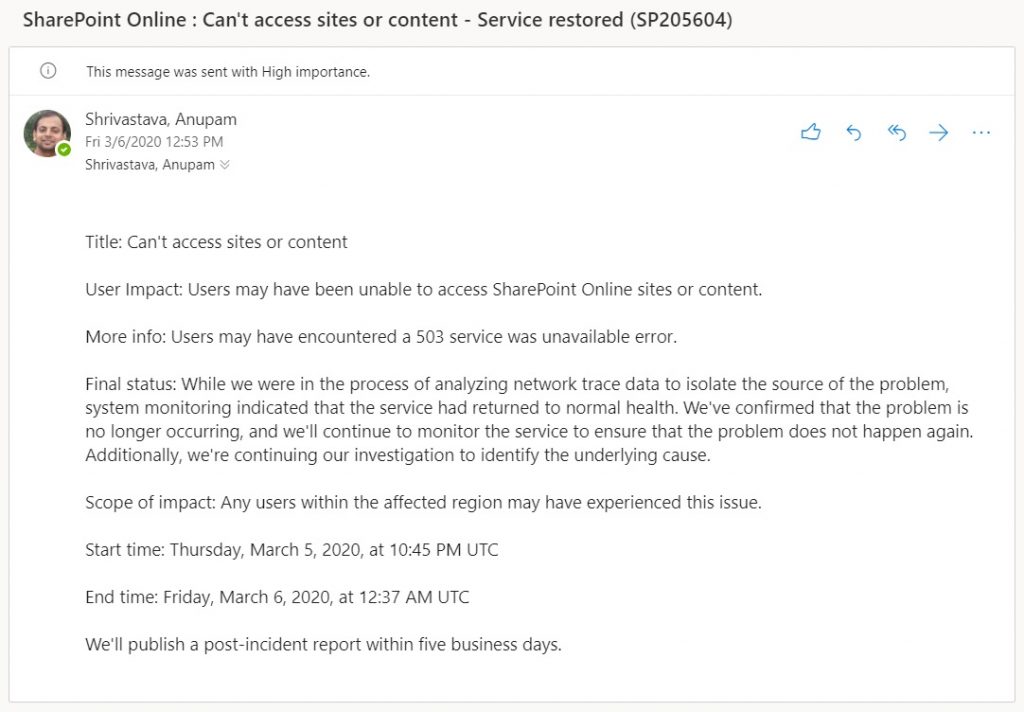
}If everything goes as planned, the outcome of this step would be something like this
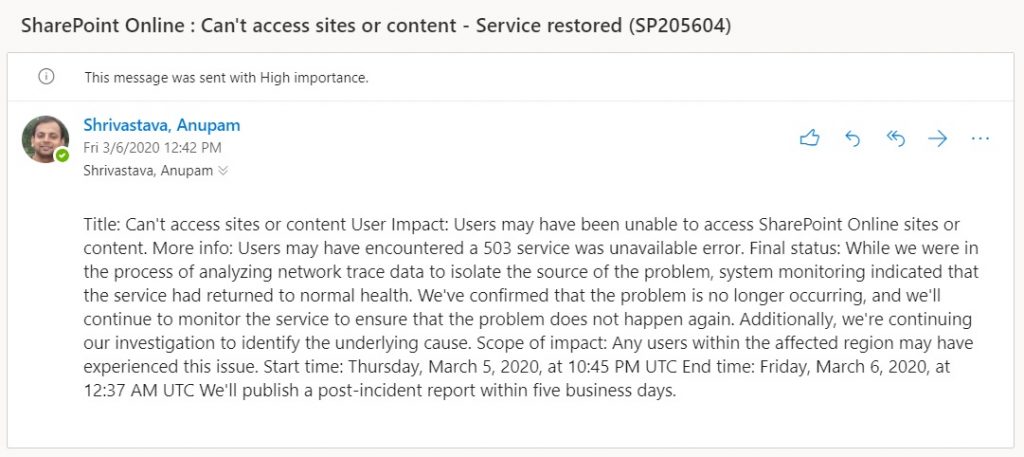
{
  "MessageText": "Title: New and changed query rules used within search queries are slow to take effect\n\nUser Impact: Users may not see best bets or promoted content for up to 24 hours after a query rules change is made.\n\nMore info: Previously defined query rules do work as expected during the 24 hour propagation delay. There is no effect on freshness of document.\n\nCurrent status: We've validated that the short term fix, which reduces the refresh time to one hour, provides the intended relief within our test environment. We're preparing to deploy this fix to the affected infrastructure and expect that the deployment will take approximately one week to complete. Users may begin to experience relief as the fix propagates throughout the environment. Additionally, we're continuing to investigate the root cause and establish a fix to remediate impact fully.\n\nScope of impact: This issue may affect any user utilizing SharePoint Online search.\n\nNext update by: Wednesday, February 26, 2020, at 2:00 PM UTC",
  "PublishedTime": "2020-02-21T12:23:56.657Z"
}
As you can see, this is a single message containing all required information with two new line characters (“\n\n”) at end of each section like Message Text, User Impact etc.
So, you might be inclined (as I was) to just add a Send Mail V2 action and send the message over email. However, even after multiple tries, I could not make the Send Mail V2 action to respect these new line characters and mails would arrive like this.
Not so neat, huh!
So, I had to improvise. Remember the MessageText Array variable that we declared at the start? Let’s make use of it.
What we are going to do
- Split the messages into different items in array whenever “\n\n” is encountered
- Add those items in the MessageText Array
- Loop through the Array and construct the whole message again, putting some html code like <br> in between.
- Send the final constructed html message over email
Let’s get started then.
Add a set variable action and select “MessageText” variable. In the value, provide the following formula split(body(‘Extract_Latest_Message’)?[‘MessageText’],variables(‘NewLine’))
Where the variables(‘NewLine’) contains the two new line characters which we declared at the beginning.
Now that we have the Message as different items in the MessageText array, let’s put a for each loop and iterate on it.
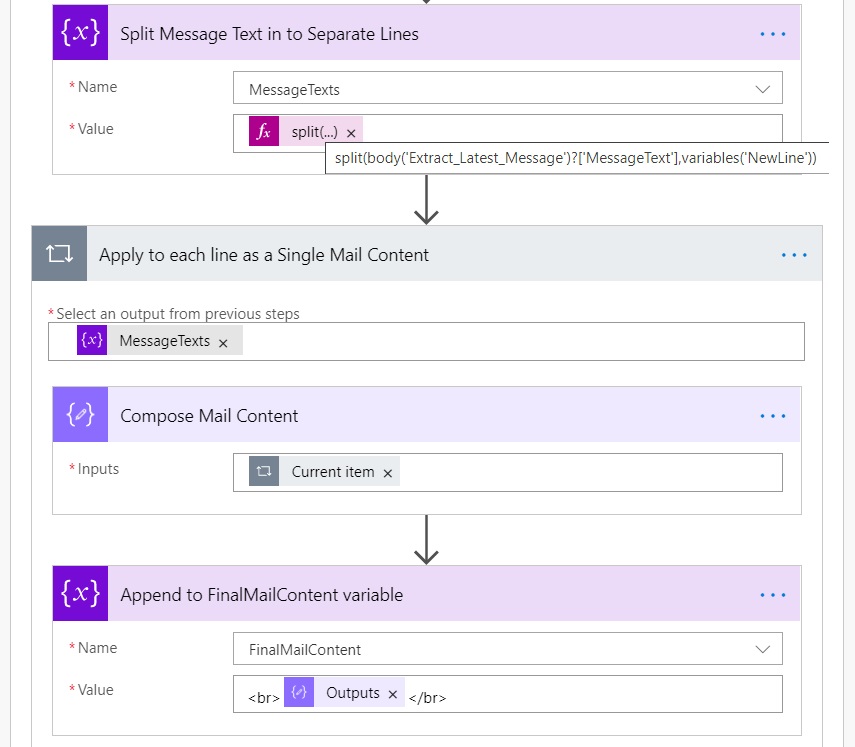
I also dropped in another Compose action for each of use to get the current item. And then add an “Append to string Variable” action and select “FinalMailContent” under name and put <br>output of previous step</br> under value.
This will ensure that a html line break in inserted where the new line characters were there earlier. So, this loop on one message prepares one complete message to be sent over email with proper line breaks. You can ofcourse add any other html tags to highlight any specific lines if you want.
Now, you can co-relate the action “Clear FinalMailContent Variable Old Values”. We need to clear the values from this variable when the outer loop starts for a different incident.
And now we have the final mail which can be sent over.
Just add your favorite Send mail V2 action and provide the mail IDs. Under subject, you can select WorkloadDisplayName : Title – Status (Id). To do so, you can just add the
@{items('Loop_through_Each_Filtered_Incident')?['WorkloadDisplayName']} : @{items('Loop_through_Each_Filtered_Incident')['Title']} - @{items('Loop_through_Each_Filtered_Incident')?['Status']}
(@{items('Loop_through_Each_Filtered_Incident')?['Id']}) 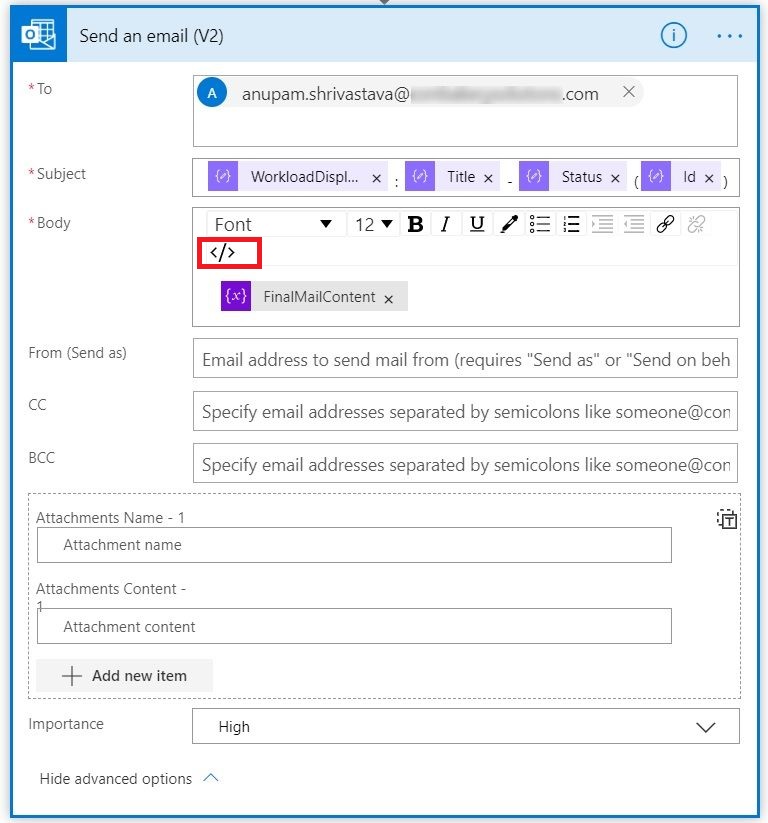
And select the FinalMailContent variable in the body. If you want you can change the Importance to “High” from under advanced options.
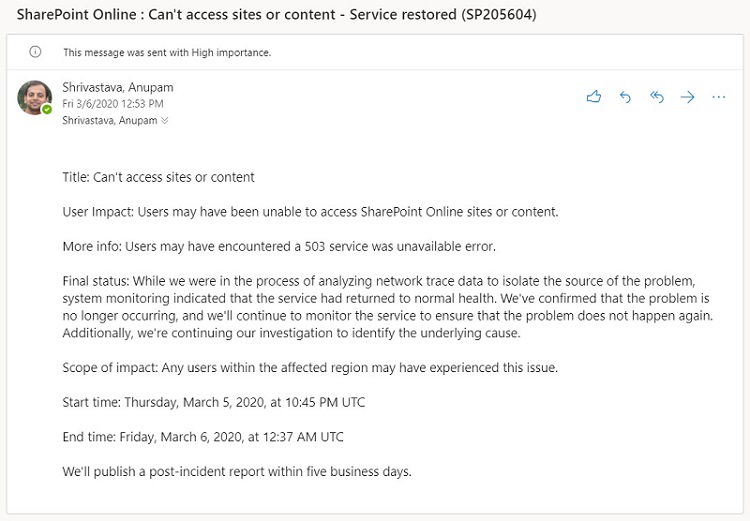
And finally we are done. Just schedule it to run for every 30 mins and enjoy the notifications like this.
Hope this helps.
Enjoy,
Anupam
24 comments
Hi there,
thank you for yout work.
Can you heko me?
I have the problem with die ClientSecret, everytime i get the invalid Client Secret failure.
I tried different secrets and everytime with URL Encode
Could you give me a tip?
Thank you
Regards
Sebastian
You can try a couple of things:
I tried the Powershellscript and get the AccessToken.
It seems this works.
In flow ist Stops@ Get Office 365 Inicdents with:
Sorry it is in german
BadRequest. Fehler bei HTTP-Anforderung aufgrund eines Fehlers beim Abrufen des AD-OAuth-Tokens: AADSTS7000215: Invalid client secret is provided. Trace ID: 7a824d69-24a5-4a33-985f-2796ccc90601 Correlation ID: 7adf8cfc-4671-4347-9361-5c6f0c903ebb Timestamp: 2020-05-22 10:04:10Z.
In Flow also, Extract Bearer token step is before “Get Office 365 Incidents”. Are you not able to get the bearer token in Flow with the step Get Bearer Token?
Yes the Extract Bearer works fine, I could send me the Accesstoken via Mail:
Is this right in Headers?
“Authorization”: “*sanitized*”,
“Content-Type”: “application/json”
Body:
{
“tenant”: “xxxxxxx-xxxx-4b29-xxxx-94b62xxxxxxxx”,
“audience”: “https://manage.office.com”,
“clientId”: “xxxxxxxxx-7de8-xxxxxx-98fa-xxxxxxxxxx”,
“secret”: “*sanitized*”,
“type”: “ActiveDirectoryOAuth”
}
Now it works, ich translated the client secret manually.
https://www.urlencoder.org/ does not work for me
Hi Anupam,
I’ve got question regarding Get Office 365 Incident action.
I type“@outputs(‘Get_Bearer_Token’).body.access_token” in the input.
Unfortunately I see it as plain text (not as part of Get Bearer action withing green HTTP field). Code view looks following:
{
“inputs”: ““@outputs(‘Get_Bearer_Token’).body.access_token””
}
Because of it I have:
Error
Action ‘Get_Office_365_Incidents’ failed
Could you advise if you only put input as in your article or perform some additional action
Best Regards
Artur
Hi Artur,
It will appear as a plain text initially, that’s fine. But seems like you are copying and pasting that from the article.
What I have seen, if you type in the same instead “@outputs(‘Get_Bearer_Token’).body.access_token” then you should see the code view will look like this
{"inputs": "@outputs('Get_Bearer_Token').body.access_token"
}
Hi,
I’ve tried all combinations and finally after exporting and importing flow and some small improvements it finally works.
I did some changes and I have to say: Thank you !
Monitoring flow works perfect and I believe it’ll simplify my team work.
Great Job 🙂
Artur
Hi now it runs.
Is it true, that if it runs every 30minutes, that every 30 minutes comes the same messages till the Messages were updated by Microsoft?
No, We are comparing with last published time of the message with last run time of this FLow. So, you will receive only new messages.
Too much information as to “How to” and “Step by Step” are needed. When providing valued information please try to rewrite this so that a novice person can do this. I’m not a developer but would like to get this in place however most of this is not making sense.
Hello ,
Thank you for this awesome article. I have question ,I am using this method to post incidents from Microsoft into a Teams channel , do you know a possibility to stylize the text (bold/highlight) text from this output ?
Teams channels support simple
for such text formatting. Take a look at this article – https://support.microsoft.com/en-us/office/use-markdown-formatting-in-teams-4d10bd65-55e2-4b2d-a1f3-2bebdcd2c772
Thank you , for your answer.
Do you know why even if Incident are added as Message Types I receive also advisory messages ?
@and(
or(
equals(item()?[‘Workload’],’SharePoint’),
equals(item()?[‘Workload’],’Lync’),
equals(item()?[‘Workload’],’Exchange’),
equals(item()?[‘Workload’],’OneDriveForBusiness’),
equals(item()?[‘Workload’],’microsoftteams’)
),
equals(item()?[‘MessageType’], ‘Incident’),
greaterOrEquals(item()?[‘LastUpdatedTime’], variables(‘LastRuntime’))
)
Also regarding the text formatting , how can we format text since there are just some variables in FLOW, and we don’t see the plain text of the mail ?
Thank you for your support.
There are lot of string operations happening before that goes to final variable. You can manipulate there. Like before the step Append to FinalMailContent Variable step, you can add another step to check some condition, like if the current item contains Title, add some more Markdown tags.
This you can better check and verify outside Flow. Maybe call the API from Postman and analyze the results to find out if you need to add any more filters.
Hello , after using Postman , I found the classification
@and(
or(
equals(item()?[‘Workload’],’SharePoint’),
equals(item()?[‘Workload’],’Lync’),
equals(item()?[‘Workload’],’Exchange’),
equals(item()?[‘Workload’],’OneDriveForBusiness’),
equals(item()?[‘Workload’],’microsoftteams’)
),
equals(item()?[‘MessageType’],’Incident’),
equals(item()?[‘Classification’],’Incident’),
greaterOrEquals(item()?[‘LastUpdatedTime’], variables(‘LastRuntime’))
)
Thanks for letting me know… I will update in the article.
No problem, i still have issues in making parts of the email (Title,UserImpact,StartTime , EndTime )bolded.
I have added a condition in the Apply to each line as a Single Mail Content , but i don’t know how to further proceed with the data operation… Do you have some ideas ? Thank you
Hello ,
Microsoft retired Service Communications API in December last year , how can we change this ?
he Microsoft Graph API replaces the Service Communications API that’s documented in this article. We’ll be retiring the legacy version of the Service Communications API beginning December 17, 2021
Since then we receive the error : Please use MS GRAPH API
Hello again ,
I managed to modify the flow to extract data from Microsoft Graph API , but we have a issue with the SPLIT TEXT in to Separate Lines.
The template language function ‘split’ expects its first parameter to be of type string. The provided value is of type ‘Null
Can you help me ?
I have posted a new article which achieves the same in Power Automate using Microsoft Graph API. The JSON structure is a bit different, so you need to change some bits, mainly instead of “Messages”, required info in now under posts-description-content.