License assignments has been one of the core governance concerns in Office 365 . With ever growing list of Office 365 Services and mix of license types (like E1, E3, E5 and a combination of those), this has created another world of processes (and PowerShell scripts) to keep up. So, what can we do to help reduce the amount of efforts spent on this?
Yes, you got it right, Automate!
Why bother about it?
Before we jump into the solution, let’s spend some time on understanding “why” it is required in the first place.
In most medium to large size organizations, their current Office 365 setup works similar to this:
- On-premise domain users are synced with Azure AD using AADSync
- A process is created and agreed that “what will be the default set of licenses” and “which services” will be available to the newly created accounts
- After the sync, an office 365 admin (or a PowerShell Script) assigns the Licenses and Services in Office 365 admin center
More often than not, as happens with most such manually managed process:
- Users will have all types of different licenses assigned
- There will be human errors in assigning licenses or Services
- Also, this become quite an effort if there are differences in type of users, like based on some metadata some users need to get E5 whether others get E3 and some need a combination of those
Wouldn’t it be nice, if following an existing process, you just create an account in on-premise AD and some automation magically assigns the required Office 365 licenses and services?
The solution explained below works also if you are not using on-premise AD and only using Microsoft Cloud accounts (like user@<tenant>.onmicrosoft.com).
Let’s see how to get there.
What do We Need
This solution depends on the following components/Changes
- Use of an Active Directory (AD) Attribute
- Changes in AADSync
- Changes in Azure AD
You can skip directly to the section “Changes in Azure AD”, if your office 365 users are only in Azure AD and not synced with On-premise AD.
How to Go about It
This is actually easier than it may sound. And the best part is the is no code or scripting required. Let’s see how this can be achieved.
AD Attribute
First step is to find out “How” to identify which users should get which license and services.
- One way is to use any existing unused AD attribute, lets say extensionAttribute10
- Another way is to use any of the existing attributes like Department, City or Job Title
For this article, I will use extensionAttribute10
- Let’s say we have 2 different types of users based on their Office 365 License and Services (like SharePoint Online, Microsoft Forms, Stream etc.) requirements – Users with E3 license (with all services) and Users with E3 license (with some pre-selected services)
- The idea is to assign some value to this attribute which will be used later to find out and assign licenses and services. Like, if the extensionAttribute10 value is “E3 All” then assign Office 365 E3 license and enable all applications for that account.
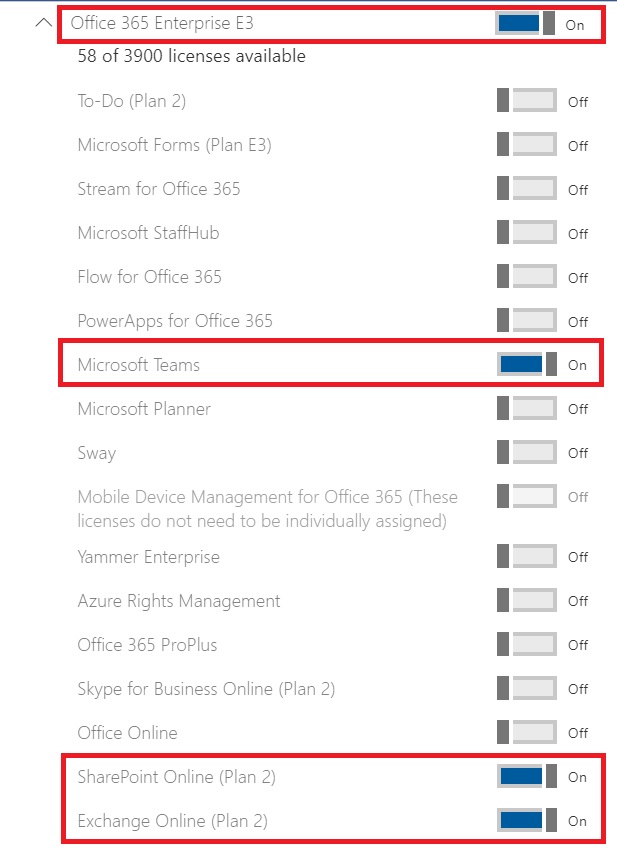
- Now, let’s agree of the values – say if the value of extensionAttribute10 is “E3 All”, then the account gets E3 license with all services enabled. If the value is “E3 with Selected Services”, the the account gets E3 license with “SharePoint Online”, “Exchange Online” and “Microsoft Teams”.
So essentially, when this new account is being created in on-premise AD, set the value of extensionAttribute10 to “E3 with Selected Services” or “E3 All” based on the license requirements.
Changes in AADSync
In most organizations, this step may not be required as mostly they configure all attributes to be synced anyway. The default and recommended approach is to keep the default attributes so a full GAL (Global Address List) can be constructed in the cloud and to get all features in Office 365 workloads. This step is required only if the AD attribute you have selected to categorize your users is not already included in the AADSync. Refer this article to see the default list of attributes which are included in AADSync.
After the sync completes, we’ll have the new users with their corresponding AD attributes available in Azure AD.
Changes in Azure AD
Now comes the most important part of the solution – Use of Dynamic Security Groups in Azure AD.
- Create Dynamic Security Groups in Azure AD – one for each type of user – two in our case – One for E3 with All Services enabled and Another for E3 with Selected Services enabled.
- Update the rules to include new users automatically
- Assign the required licenses and services to those Dynamic Groups and member users will automatically inherit all those licenses and services.
Let’s see these configurations step by step.
Create Azure AD Dynamic Group
- Go to Azure AD and click on Groups and then on New Group
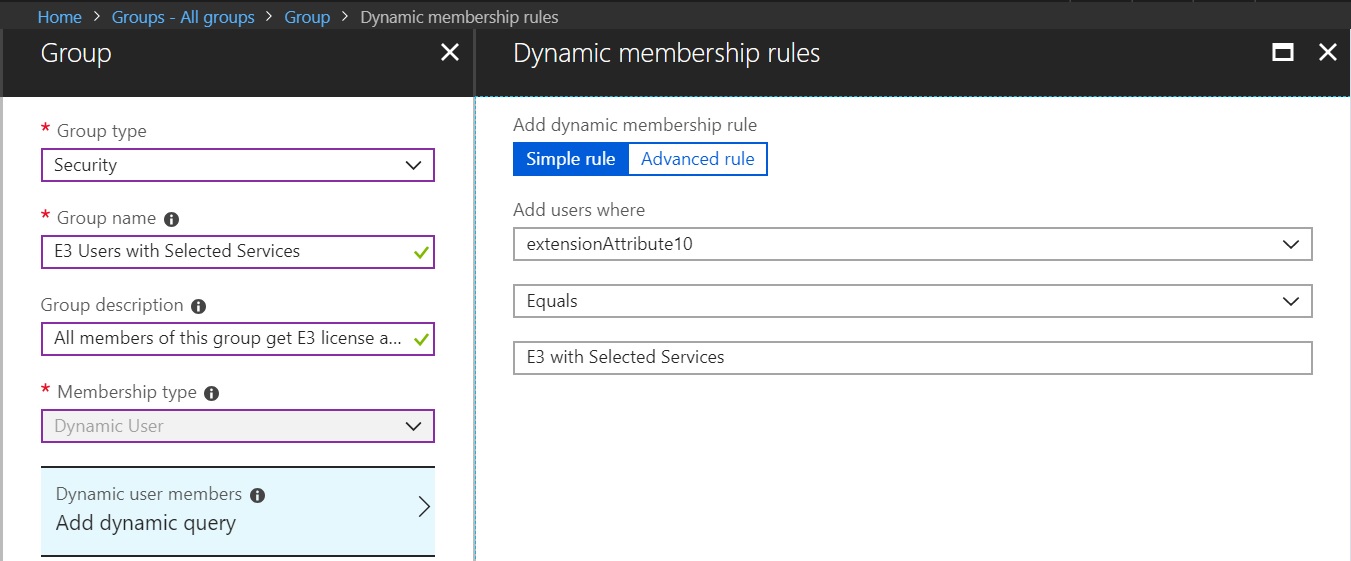
- Select Group Type as Security, provide group name and description and select Membership type as Dynamic User.
- Click on Add dynamic query and select your filter condition based on which members will be added to this group dynamically. You can refer this article to learn more about the syntax of Advanced rules.
- Click Create button to complete the Dynamic Group creation.
- Once, the group gets created, you will be redirected to a page showing all available groups.
Validate Dynamic Group
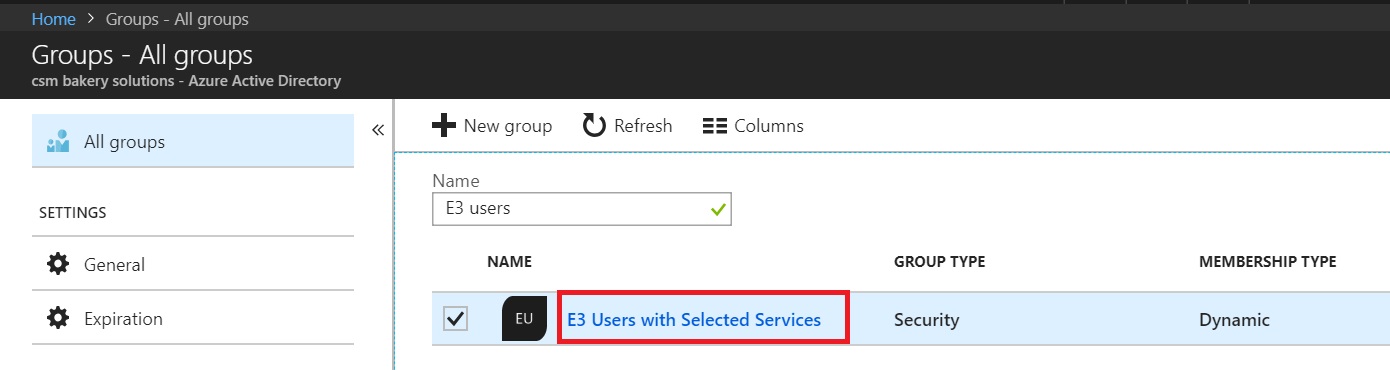
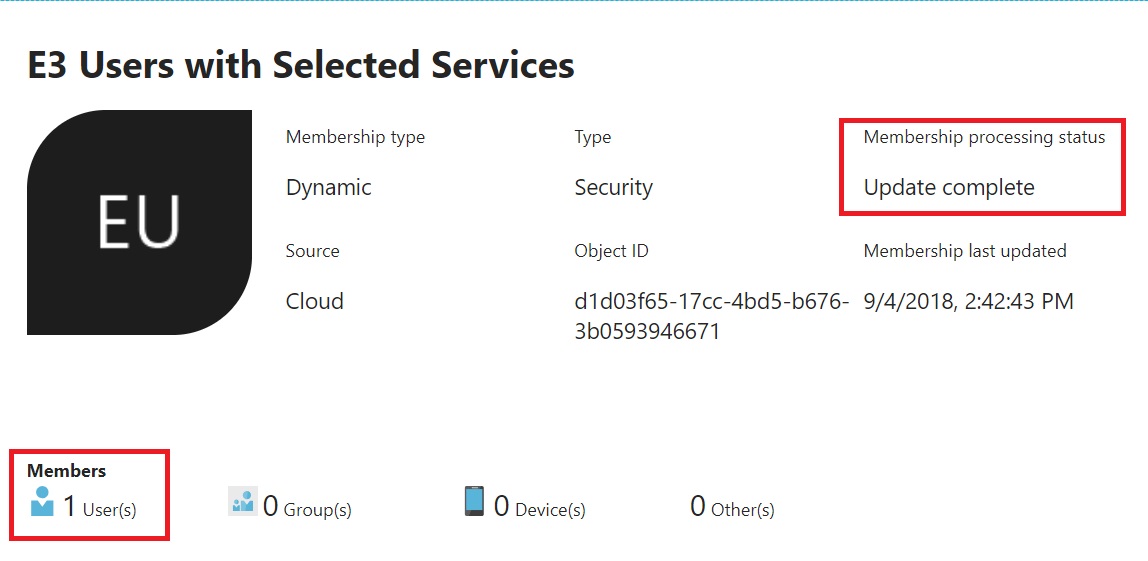
Next on the All Groups screen, search for the newly created group by typing first few characters and press enter. You would see the newly created dynamic group.
At this point of time, if you click on the group name, you could see it’s still in “evaluating” mode and Members count is still zero.
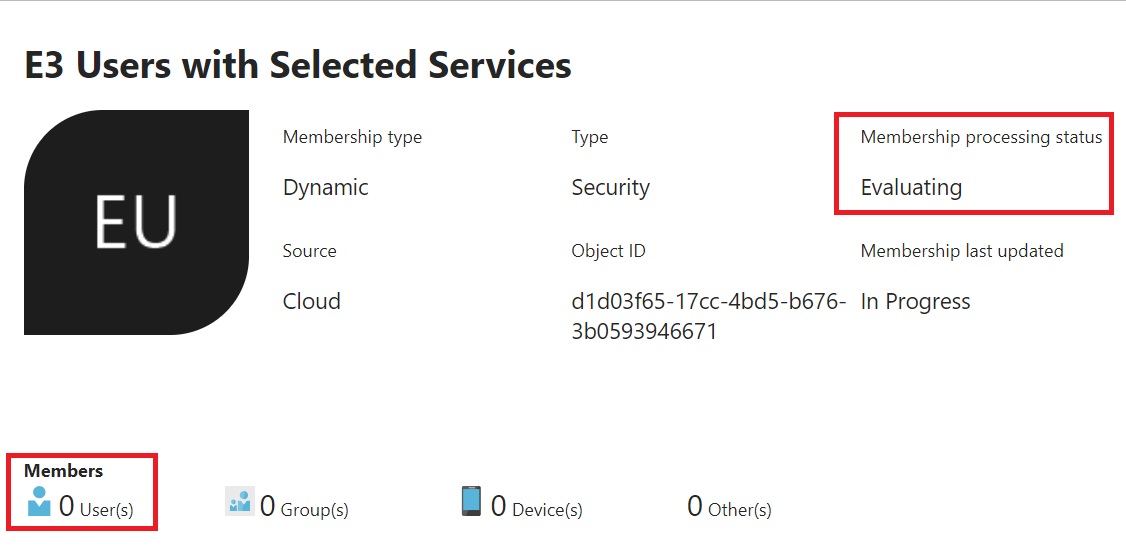
Give it a few minutes and you could see the updated status. In my case, since the rule matches only my test account, that’s why you see only 1 member.
Anyway, now that we have our dynamic group ready with the members, let’s move ahead and assign licenses and services to the group. Practically, you don’t need to wait for this update to complete to move to next step.
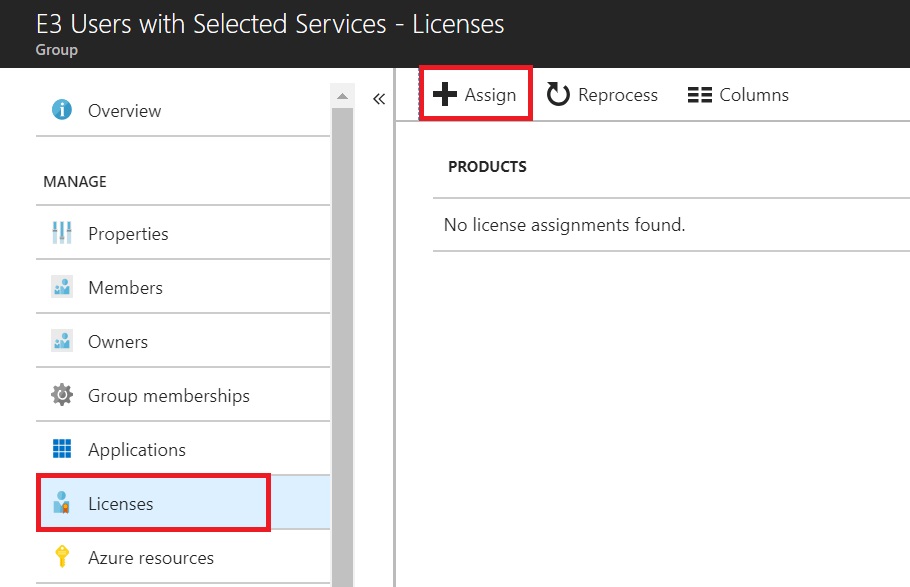
Assign Licenses and Services
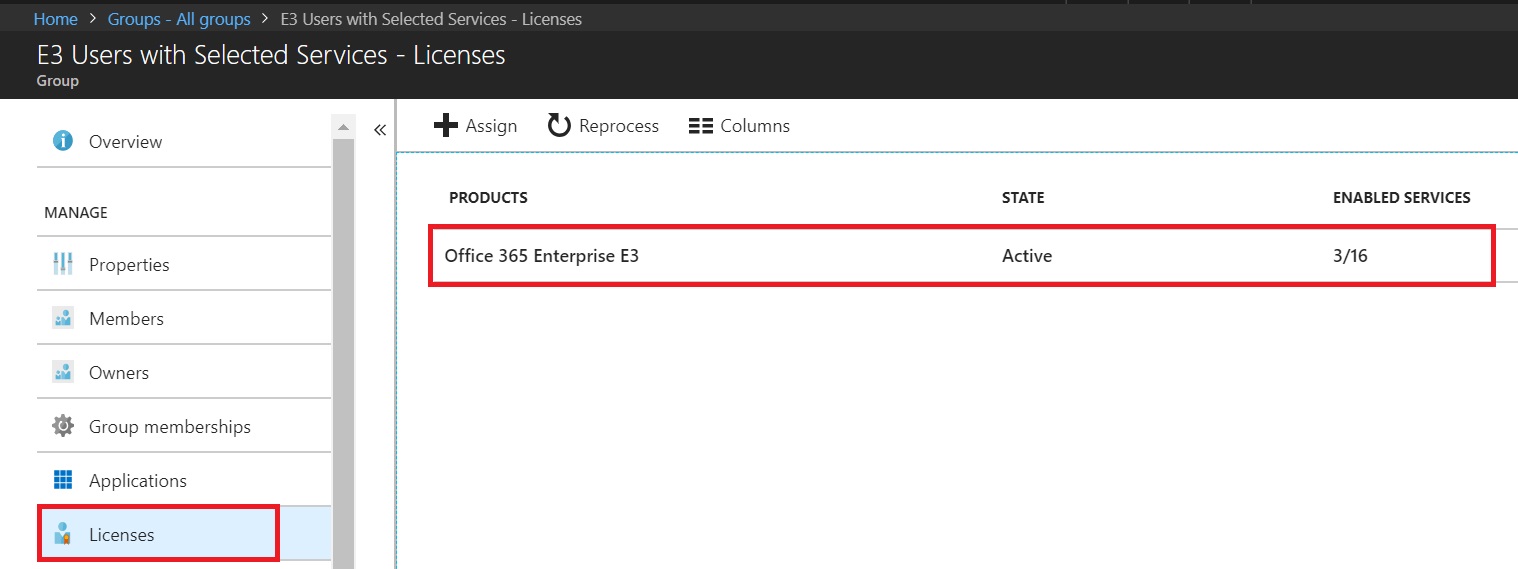
Go to the newly created group and click Licenses in the left navigation and then Assign from the top menu.
Click on “Configure required settings” in the left navigation. Select Office 365 Enterprise E3 (or any other license based on your requirement) and click Select.
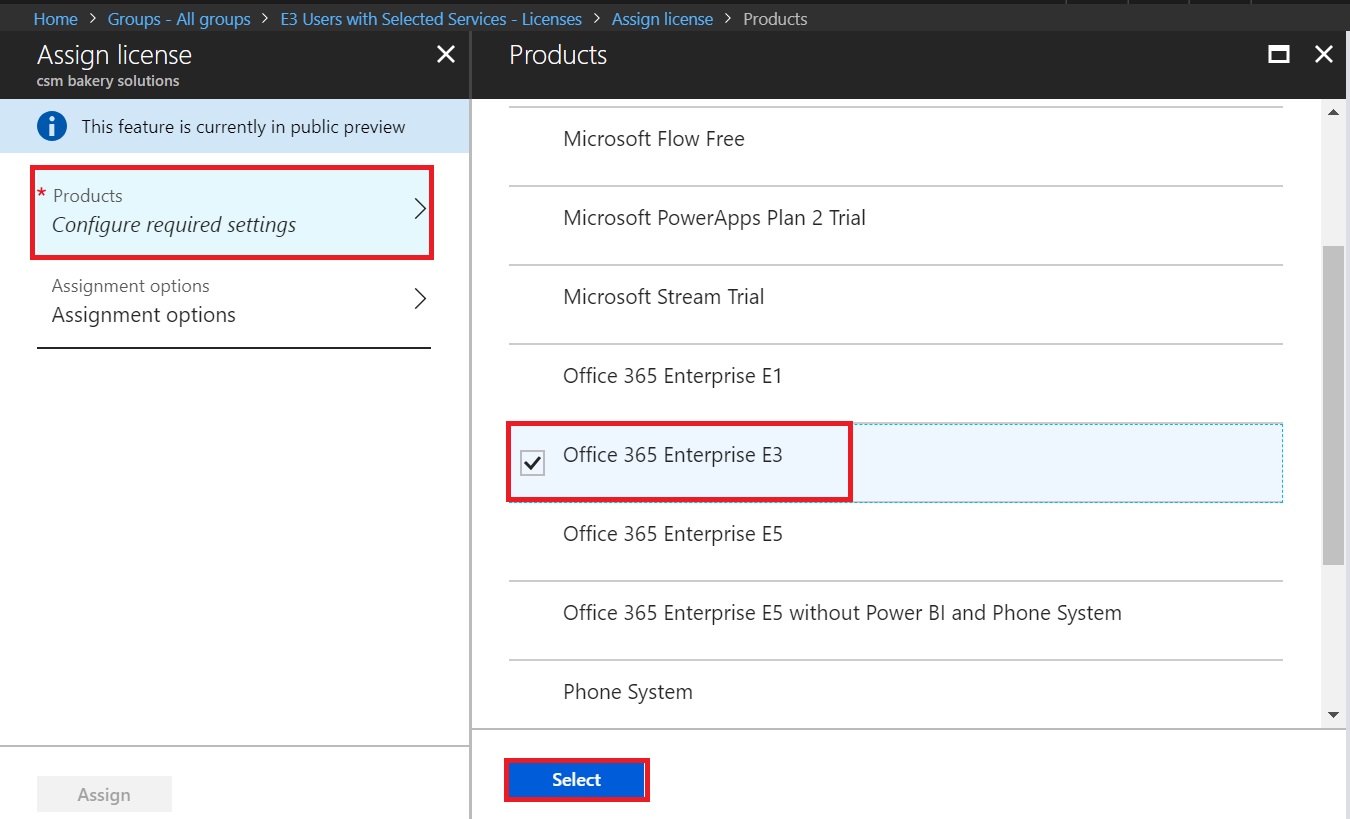
At this stage, we just configured that all the members of this group will automatically get Office 365 Enterprise E3 license assigned. Now, lets select specific services.
Click on Assignment options in left navigation and switch “Off” the services which you don’t want to be assigned to members of this group. By default, all services are in “On” status.
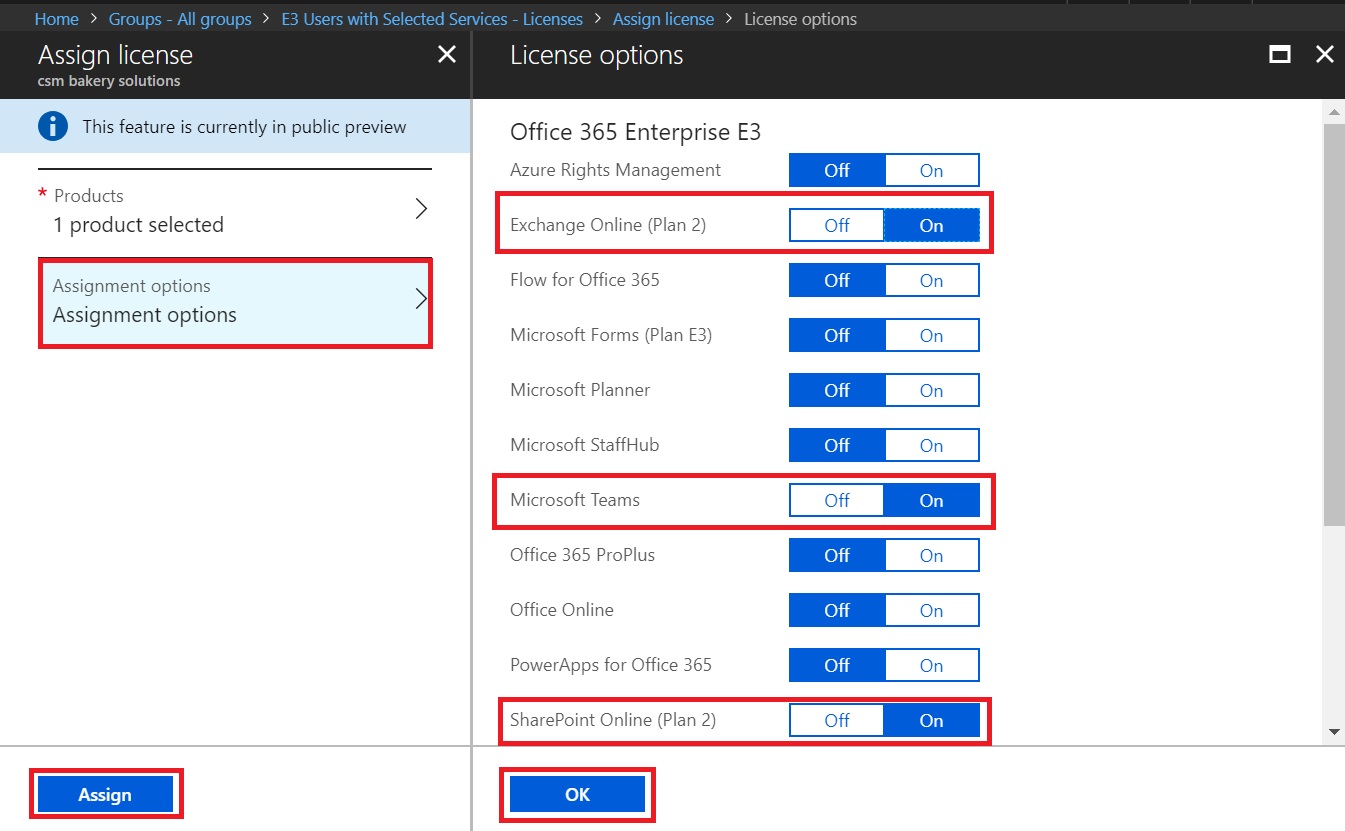
Click OK and then Assign.
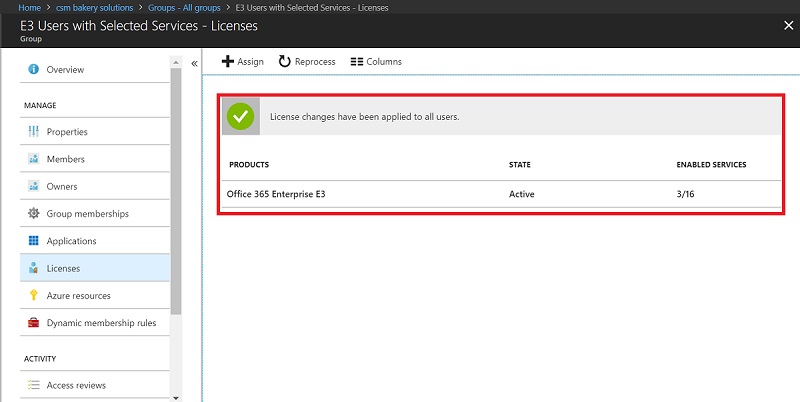
It will take a few seconds to perform the assignments and then you can see the status as below. You can see under Enabled Services, it says 3 out of 16 services are in enabled state.
And that’s it. As an when any new user get created with AD extensionattribute10 set as “E3 with Selected Services”, he/she will automatically be assigned these licenses.
Verification
You can verify in Office 365 Admin Center, that the required licenses and services are assigned to the members of our Dynamic Group.
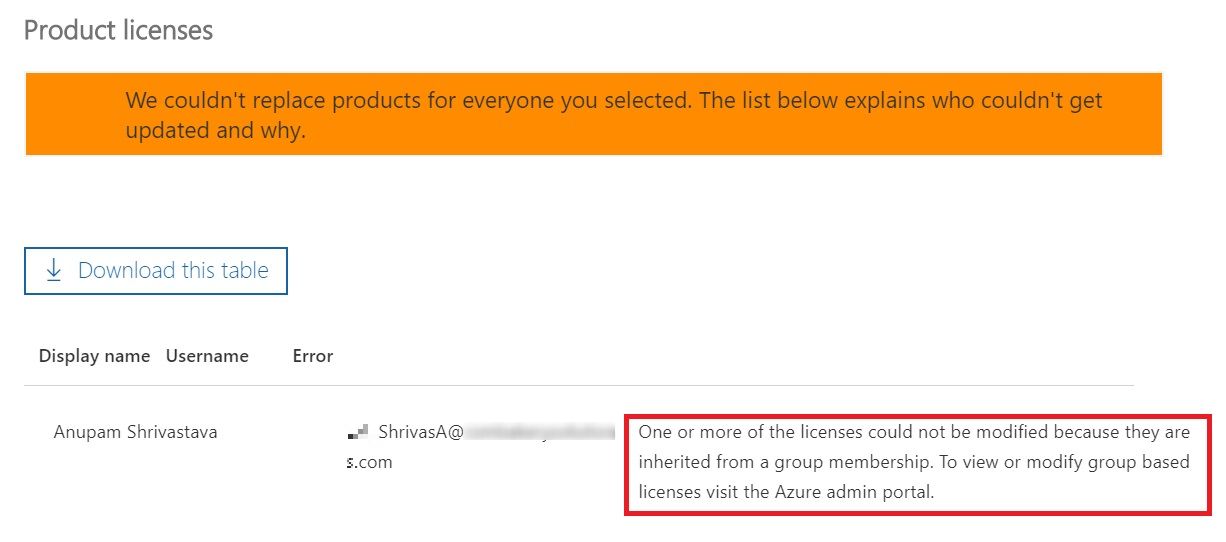
And if you plan to change the licenses manually from Office 365 Admin center, you would be greeted with this nice message 🙂
Important Observations
One very important point to note is that, currently, if licenses were assigned from Office 365 Admin center to any accounts initially, their license assignments behave differently when those accounts become member of such dynamic groups
- If there are any services which are assigned to the dynamic group and not assigned to those account directly, those services are added.
- If there are additional services enabled for those accounts, which are NOT assigned to the dynamic group, then those are NOT disabled by the group policy.
- Also, you can continue to make changes in licenses/services assignments for such accounts directly from Office 365 Admin center as well. even after they become member of any of such dynamic groups.
- If users become members of more than one such Dynamic Security Group, they get the unique sum of all services assigned to all those groups. This can be very useful, if you need to allow exceptions for some users.
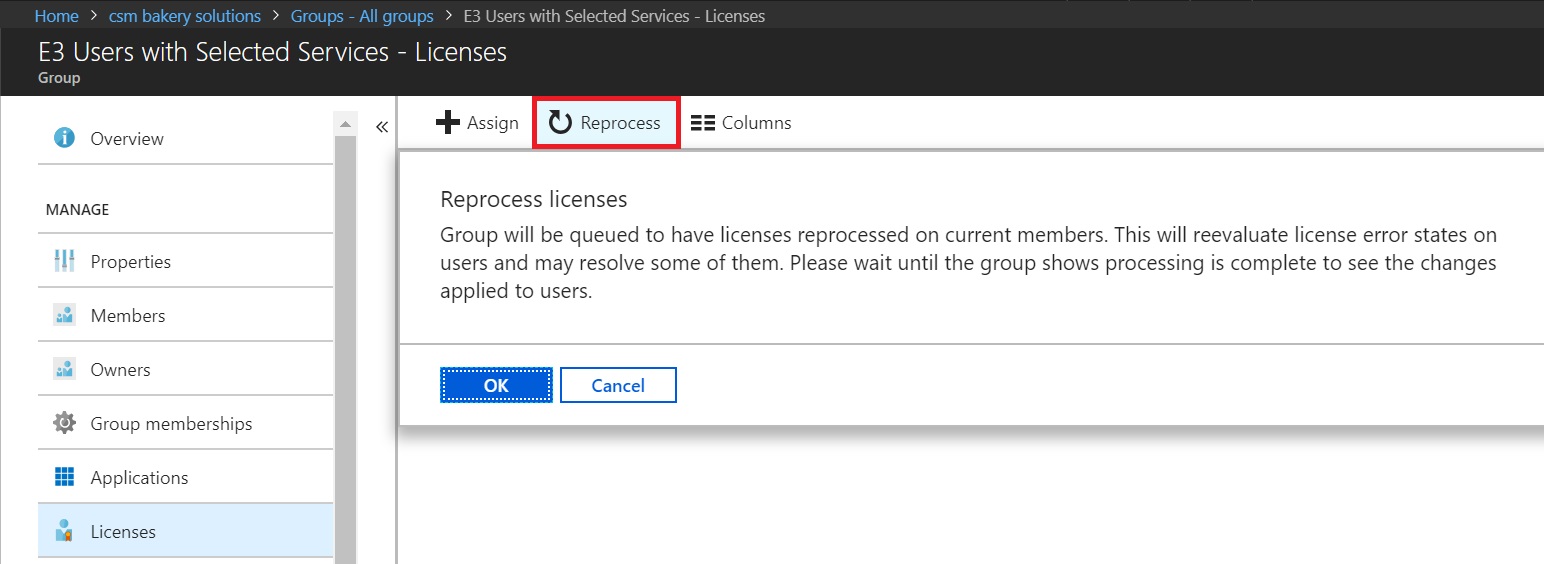
Issues in License Assignments?
What if there are some license/services assignments which did not go as expected? Well, we can “Reprocess”. Just go to the dynamic group and click “Reprocess”.
Next Steps
Now, you can repeat the steps to create other dynamic groups based on different rules like extensionAttrubute10 equals “E3 All” and can assign E3 license with all services to that group.
A similar logic can be used to reassign or even remove licenses.
- Change the value of attribute in AD from say “E3 with Selected Services” to “E3 All”. This attribute will be updated in Azure AD after the AADSync triggering the user to move out of the membership of “E3 Users with Selected Services” dynamic group to say another dynamic group “E3 users All Services”.
- This will result in reassignment of the licenses automatically. When any member moves out of a dynamic group configured with a set of licenses and doesn’t become member of any other such group, he/she will lose the assigned license.
- If you manually remove the license assignments for such accounts from Office 365 Admin Center, then the Dynamic Group membership license assignment kicks in and will not allow any changes from Admin changes afterwards.
Conclusion
Dynamic Groups in Azure AD provides a powerful functionality to Automatically assign office 365 licenses and services. If planned properly, this can help reduce some good amount of manual efforts and will ensure better compliance to organization’s guidelines related to licensing.
Hope this helps.
Enjoy,
Anupam
4 comments
“Also, you can continue to make changes in licenses/services assignments for such accounts directly from Office 365 Admin center as well. even after they become member of any of such dynamic groups.”
This doesn’t seem to work for me. It seems if I have licenses under a product assigned using a group, I can’t manually assign licenses through the Admin portal. Am I missing something?
Thanks,
Craig
Yes, It’s a specific scenario.
Say, there is a user to whom some applications are already assigned, and they got assigned to a Dynamic Group later. In this case, it allows manual changes. If the user didn’t have any applications assigned at the time of membership, then you can’t do manual changes.
Is there any way to automate the “reprocess” on a dynamic group? I am constantly moving new students into a group but they already have an A1Plus license so I have to remove that. Then there is an error in the group and I have to manually go in and hit the “reprocess” MULTIPLE TIMES A DAY! This is a waste. Would love to know if there is a powershell script to do this.
So what I understand by moving new students to a group is that those students already were part of some other group and hence were getting A1 license and you now need to assign them a different license (say A2). Is that correct? If that’s the case, you should just be able to update the rules of Azure AD dynamic groups, so that when you update the properties of some students accounts, they get removed from A1 group and get assigned to A2 group. You don’t even need to manually reprocess, it will happen automatically every 30 mins or so.