Extranet sites or Sites having access to external users in SharePoint have been in use for long, across various organizations. It provides great collaboration when working with multiple vendors/partners. There are various articles about external sharing capabilities of SharePoint Online. In this article I am just going to focus on migration scenarios only.
Extranet Sites in SharePoint On-Premise
There are various ways to implement external access in on-premise SharePoint farms like
- External Users created in Active Directory in a separate OU and/or account names starting something like ext_ or gst_ to easily identify external/guest users
- External Users in a separate trusted Active Directory
- Using separate Forms Authenticated web application with ASP.Net membership provider or even using 3rd party tools like Extranet Collaboration Manager.
Alternative in SharePoint Online
If you are using option #1 or #2 from the above list, then from SharePoint perspective those users are NOT external users at all. Those are just additional AD users who may have different permissions than regular users. These users can be imported in Azure AD using Azure AD Connect (either with password sync or federated with ADFS) and related sites can be migrated as is. Such external users can continue accessing the sites using their AD credentials.
I will focus on a scenario, where we don’t want to have external users in the AD anymore. Option #3 above is the closest match in this case.
You can decide to move external users from your AD to SharePoint online using this approach as well. However, users’ identities may change in this case.
External Sharing feature in SharePoint Online is based on Azure AD B2B collaboration, Well, almost 🙂 This article explains some subtle differences in invite experience when sending the invites from within SharePoint Online or OneDrive sites. But those are not relevant for migration scenarios as all such users need to be added already before migration starts.
This article explains various types of users and sources in Azure AD B2B collaboration scenarios. However, for SharePoint on-premise migration, there could be two types of users –
- Users who have registered in FBA using their organization email IDs, like Cognizant.com
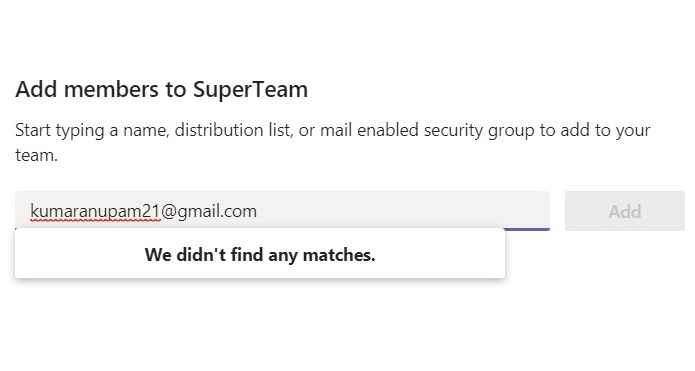
- Users who have registered in FBA using their personal/social email IDs, like Gmail.com
At the end of the day, the invited user will be added as a Guest in Azure AD. Once the guest user is added and invitation is “redeemed”, i.e. the guest user accepts the invite and registers his email ID as a microsoft account, he/she can be given permissions to SharePoint sites/lists/libraries like any other regular user.
How to Go About It
So now we know “what” needs to be done – essentially, we need to add all the existing external users as Guests in Azure AD and replicate permissions in the migrated sites, it’s time to look into “How” to go for it.
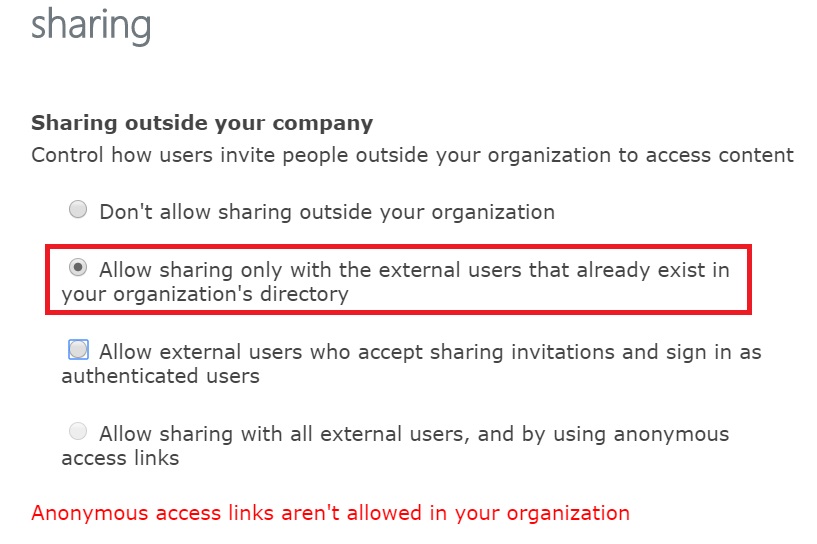
Enable External Sharing at SharePoint Online Tenant Level
This goes without saying, to enable external sharing in SharePoint Online sites, it must first be enabled at the tenant level. Since this article is about migration, I would enable this option “” at tenant level also.
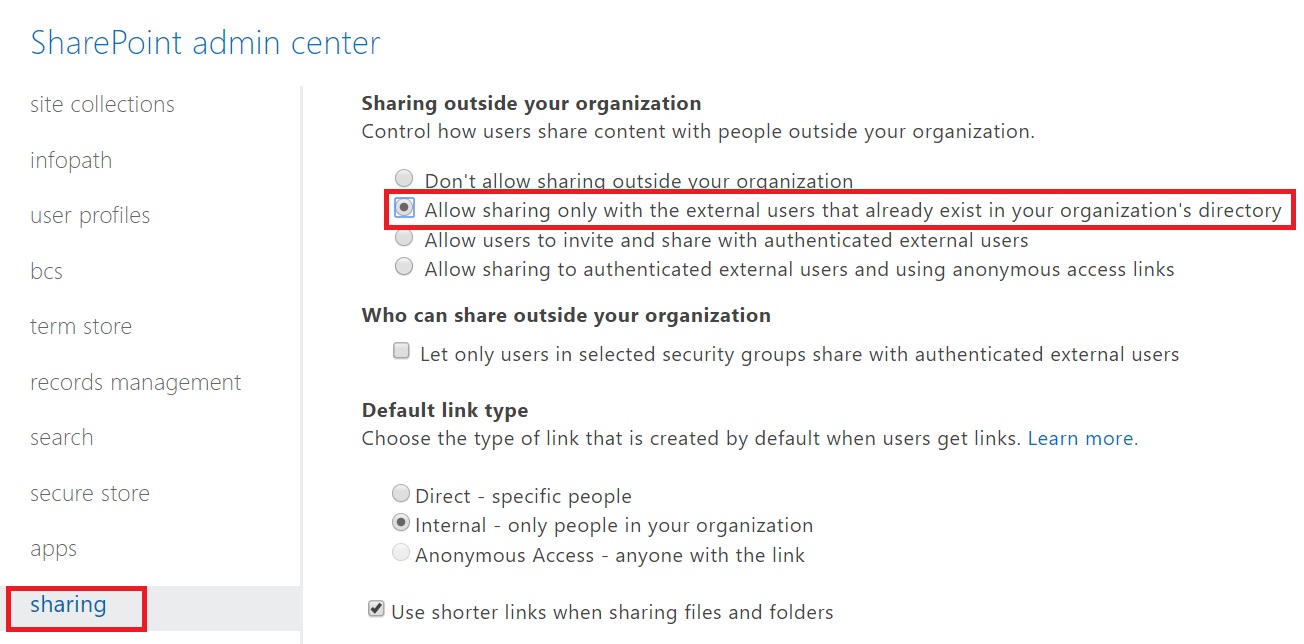
If you want new invited users to be added in Azure AD automatically, you can chose the option “Allow users to invite and share with authenticated external users”. If You do so, you can still chose a lower permission at individual site collection level.
Plan Extranet Sites in SharePoint Online
In most on-premise SharePoint farms, extranet sites are hosted in a separate Web Application to ensure external users don’t get access to other team sites which are not meant to be shared with them. It also helps in applying a different authentication (like FBA).
But in SharePoint Online, we don’t have Web Applications and even Managed Paths are limited to either /sites or /teams. So, we need to plan where to create Extranet sites for easier governance. I prefer to have a classification like this –
- All Internal Team Sites go under /sites: External Sharing Disabled at Site Collection Level
- All External Team Sites go under /teams: External Sharing Enabled at Site Collection Level
Obviously, you can decide to do this other way around. This helps in having a better way to easily identify which site collections have (or may have) external access enabled. So, as part of the governance policy, only sites under /teams will have external access enabled at site collection level.
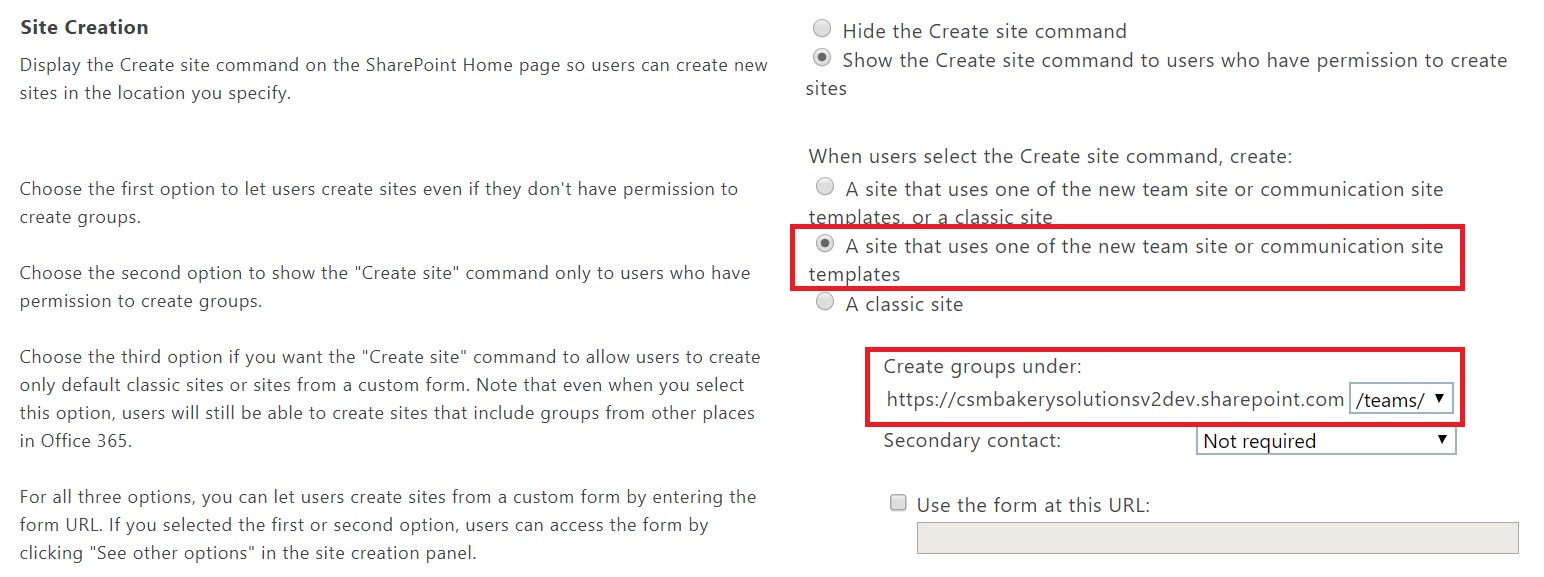
If you want to create modern sites (aka Office 365 Groups) as external site under /teams, you can change the site creation setting in SharePoint Central Admin and then create a site from https://<tenant.sharepoint.com>/_layouts/15/sharepoint.aspx, Create Site option.
Extract List of Existing External Users
Now we need to find out all the external user accounts which need to be migrated to SharePoint Online. Depending upon the approach used in on-premise SharePoint environment, that may come from different source.
External Users in Separate Trusted Active Directory
If for external users a separate active directory is created and you want to continue using the same approach in SharePoint Online, maybe this article is NOT what you should be referring. This is because such users are treated similar to normal users and SharePoint Online won’t classify those users as External Users (or Guest Users).
For migrating such users you can follow this article to sync that additional domain with Azure AD. After the accounts are synced with Azure AD, they can be used for giving permissions in migrated sites and existing users will get migrated with the site.
External Users in separate DB using Forms Based Authentication
This is where we will focus in this article. Most of the external access implementations that I have seen in on-premise SharePoint environments, use this approach either using ASP.Net membership provider or using some third party tool. Both of these store the users detail in a separate database and that list can be extracted easily from there using SQL queries. Extracting Users’ display name and email ID are the minimum that we would need in this scenario.
Prepare CSV File Containing External Users
Now that the preparations are done, lets get started about how to move users to Azure AD. The extracted users need to be put in specific CSV format.
Name, InvitedUserEmailAddress
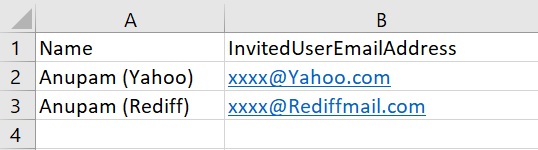
If you have users from various other partner organizations, you can prepare multiple such CSV files as well – one for each partner organization.
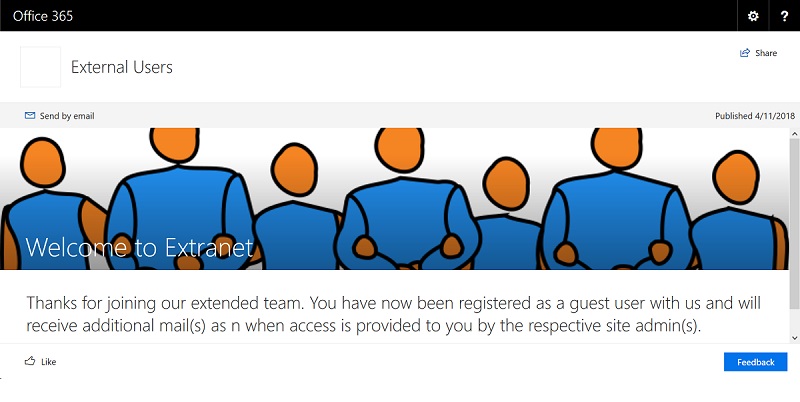
Configure Welcome Page for External Users
This is actually an optional step. This is required only for external users with consumer email IDs like Gmail.com.
For users from partner organizations having business email IDs , there is a way to suppress invitation acceptance with some additional steps.
I like to have a separate site collection created with the landing page showing some nice message for guests who accepts the invitation. Give “everyone” read access to this site and use this as the target page to show after guests accept invitation. We’ll use the url of this page in the invitation script in next section.
Send Invites to External Users
Now that we have the list of users prepared in a csv, let’s name that say “AllExternalUsers.csv”, we are ready to send the invitations.
In this approach, we need wait for invited users to accept the invite before those accounts can be used to give permissions. If you migrate the sites before those users have accepted the invitation, their accounts won’t be found in SharePoint online.
Use the PowerShell script below to add users using consumer email IDs in Azure AD as guests.
[code]
#Install the latest Azure AD PowerShell module from https://www.powershellgallery.com/packages/AzureADPreview
Install-Module -Name AzureADPreview
#Get credentials and connect with Azure AD
$cred = Get-Credential
Connect-AzureAD -Credential $cred
#Read the User name and email IDs from CSV file
$invitations = import-csv “D:\O365 Migration\External Access in O365\AllExternalUsers.csv”
$messageInfo = New-Object Microsoft.Open.MSGraph.Model.InvitedUserMessageInfo
#Customized message to be displayed in the email Invitation
$messageInfo.customizedMessageBody = “Please register your mail ID as a microsoft account (if it’s not already) by clicking Get Started button below. You will receive separate mail(s) when permissions are given to you in specific site(s)”
#Loop through each mail ID from the csv and send the invitations
foreach ($email in $invitations)
{
New-AzureADMSInvitation -InvitedUserEmailAddress $email.InvitedUserEmailAddress -InvitedUserDisplayName $email.Name -InviteRedirectUrl https://xxxx.sharepoint.com/teams/externalusers -InvitedUserMessageInfo $messageInfo -SendInvitationMessage $true
}
[code]
For users from partner organizations, you can follow steps mentioned in this article to add users and automatically redeem their invitations. Or you can use the script above but change the message accordingly.
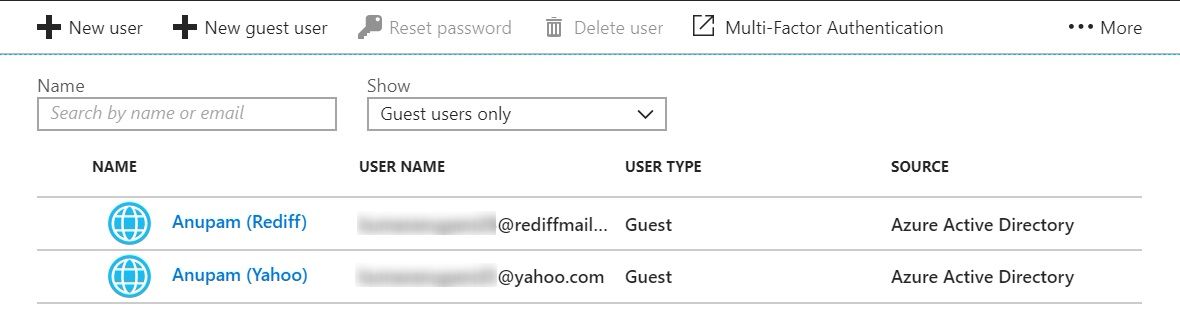
After the script gets completed successfully, you can verify that the users have got added in Azure AD as guest.
Invitation Acceptance by Users
When users get added to Azure AD as guests, they receive an email invitation on their mail ID which is being added. They need to accept that invitation by clicking the “Get Started” button in the mail.
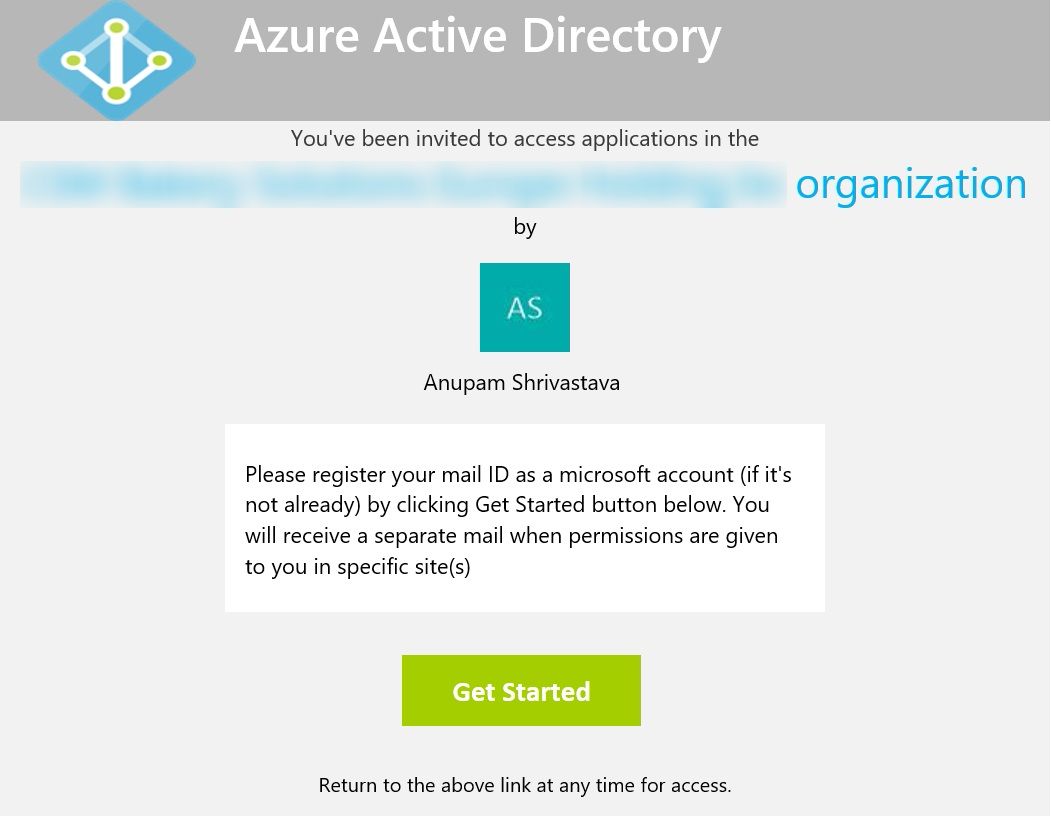
If the email ID is a consumer account and not registered as microsoft account, then users will be guided to register that. Normally this is just 2-3 clicks. Once done, they will be redirected to a page which would be configured as the target page to show with the invitation in the script above.
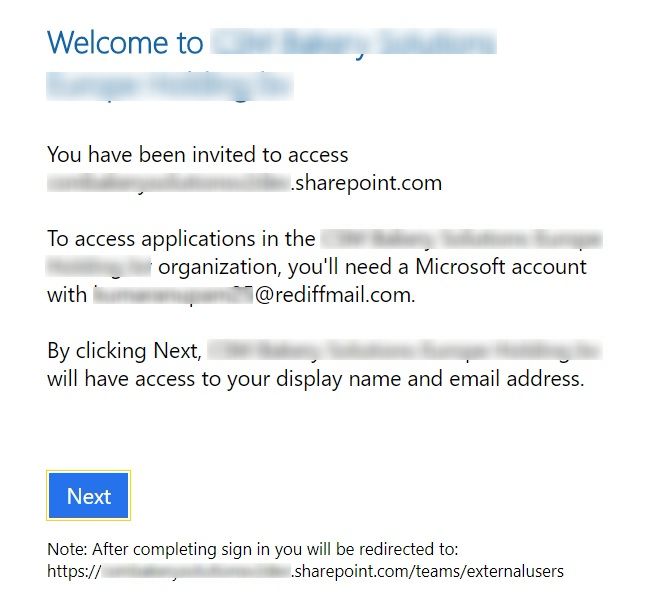
After accepting the invitation, users will be redirected to the welcome page we setup in one of the previous steps.
If the invited user is using an external instance of Azure AD and being added as a guest user in the inviting organization, in this case, the guest user signs in by using an Azure AD account that belongs to the his own tenant. If the partner organization doesn’t use Azure AD, the guest user in Azure AD is still created. The requirements are that they redeem their invitation and Azure AD verifies their email address. This arrangement is also called a just-in-time (JIT) tenancy or a “viral” tenancy.
Use Migration Tool to Migrate Site
Once users have accepted the invites or users have been added with suppressed acceptance, we are all set. All we need to do is to use your favorite migration tool to migrate sites from on-premise SharePoint to SharePoint online with permissions. This one is the latest and free from Microsoft.
Verify Migrated Sites
After migration gets completed, verify if sites having external access enabled, resolved the guest users from Azure AD correctly and permissions got assigned successfully.
Hope this helps.
Enjoy,
Anupam