Automatic content classification or metadata tagging has been one of the “wishes” for knowledge workers across organizations. SharePoint has provided a solution for Managed Metadata and manual tagging for long and some third party solutions exist which claim to provide automatic keywords extraction from the content of the uploaded documents.
In this article, we will explore how can we use Azure Text Analytics Service to Automatically Tag Documents stored in SharePoint from the keywords extracted from the content of those documents.
So, let’s’ get started.
Prerequisites
Before we can jump in to extract keywords from SharePoint documents, we need to setup a few things.
Term Store in SharePoint
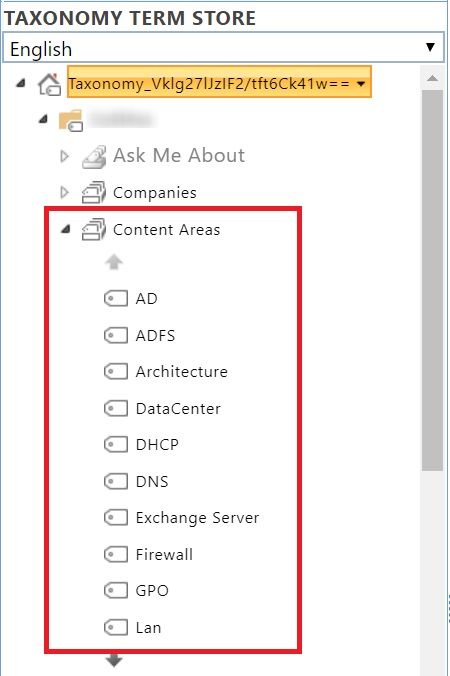
It’s a good practice and widely used already to have an organization wide taxonomy in SharePoint that can be used to tag documents. This helps is ensuring that documents are tagged with keywords already identified by the business. This is NOT about the values of specific metadata fields which needs to be filled by end users (like business unit or location) but about the keywords associated with the document which identifies it’s “content” better.
So, for this article, we’ll create a term store named “Content Areas” and use that as the main source to find and filter the extracted keywords from the document and then associate those keywords with it.
Document Library
We obviously need a document library which contains the documents which we are going to read, extract keywords and update the “Content Areas” column with those.
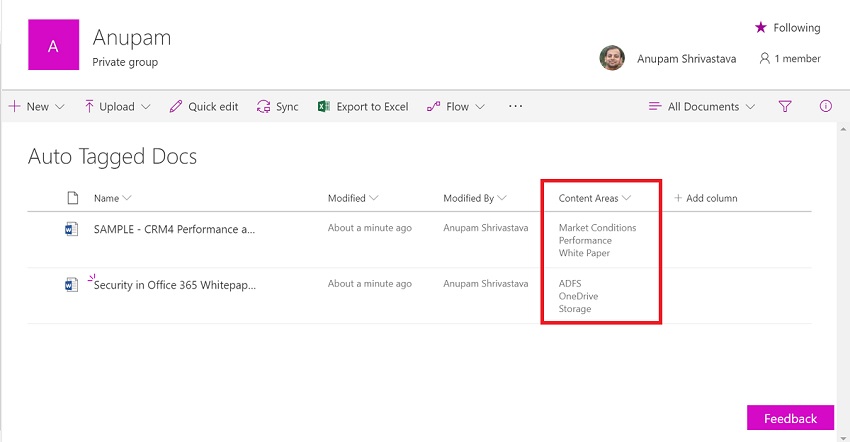
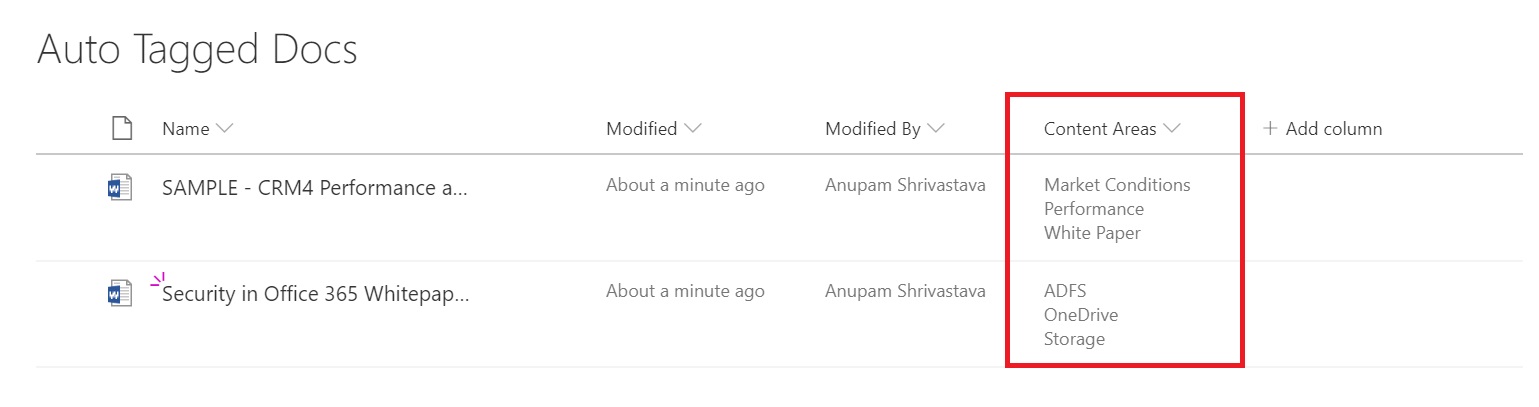
For this article, I created a document library named “Auto Tagged Docs” and added a managed metadata type column “Content Areas” to it. This column has multiple values allowed and is mapped to the “Content Areas” term set created earlier.
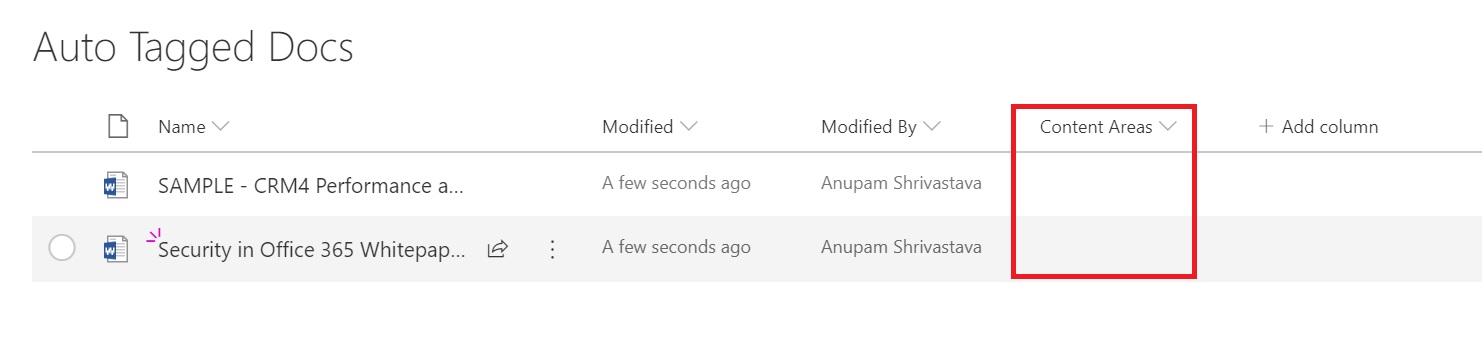
For this article, I have uploaded two documents for about 2-3 MBs each. As you can see the Content Areas field is empty to start with.
Azure Text Analytics Service
Now that we are all set from SharePoint source perspective, lets create the Azure Text Analytics Service API. We need an Azure subscription but we can use the “F0 Pricing Tier” which provides 5000 free transactions of Azure Text Analytics API per month.
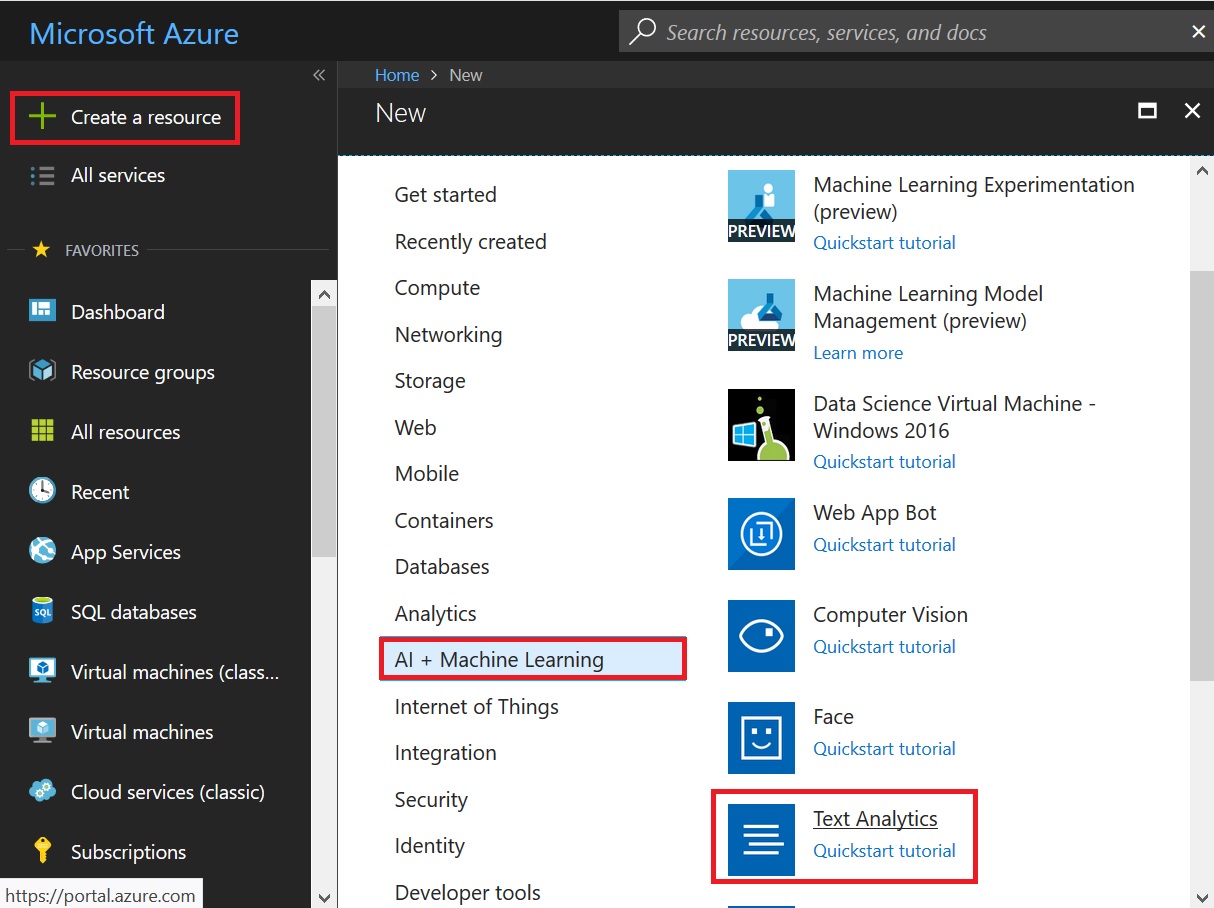
Fill in the form, note down the location being selected and click Create. The API URL to call is currently dependent on the location, so will need to use this later.
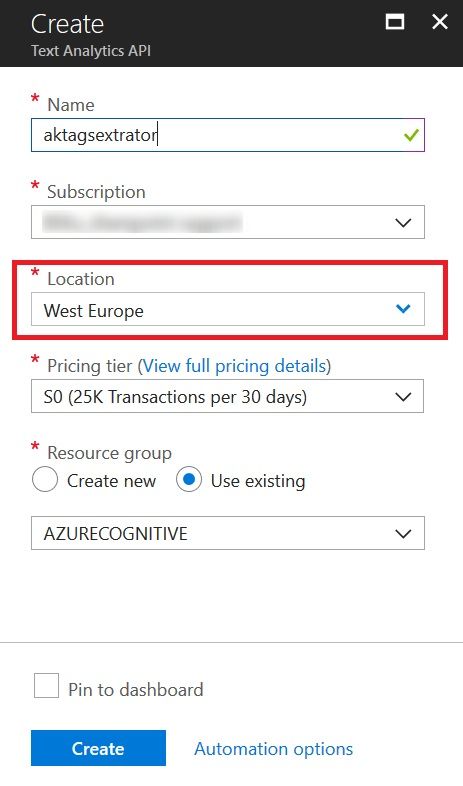
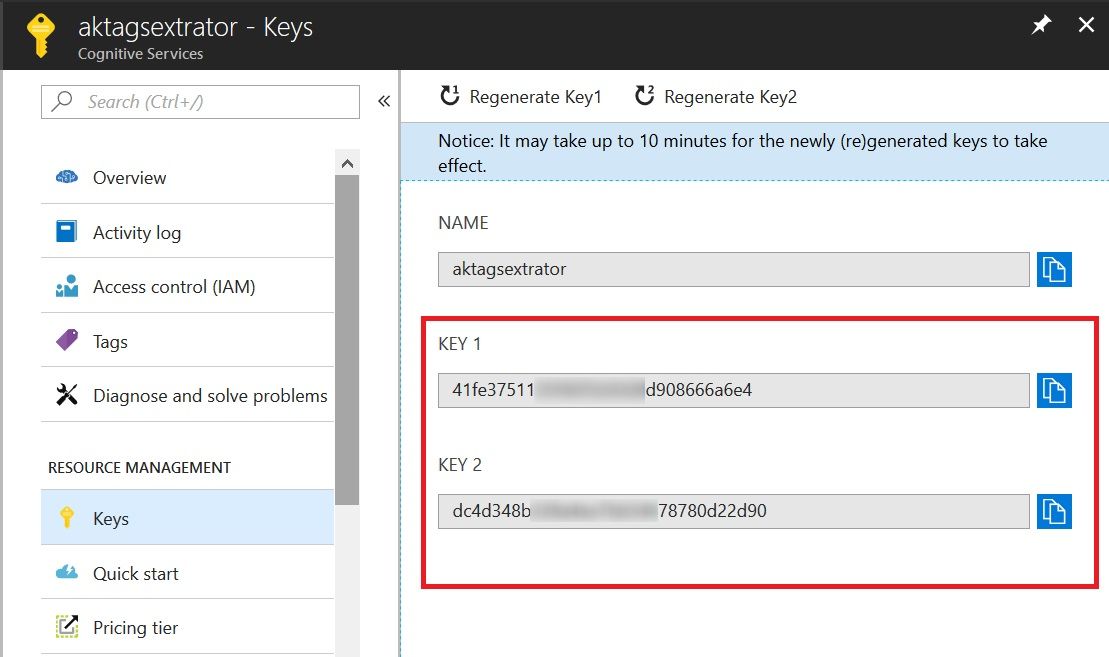
Once the Service gets created, browse to the resource and grab the keys. We’ll need these keys to call the API.
So, all set now.
Limitation
Before we jump into the solution, let’s take a quick look at a limitation of Azure Text Analytics Service.
Azure Text Analytics Service is meant for analyzing the text inputs like comments from users on articles/company’s products etc. and extract keywords, Language and sentiments (negative or positive). Currently one single document cannot have have more than 5000 characters. However, one single call to the API can have 1000 such sub-documents, so we need to split our documents in multiple subdocuments of less than 5000 characters each and later find out unique keywords after combining them.
Solution
For this article, I am going to explain the following which take care of generating the keywords from the uploaded documents and associating those keywords with corresponding documents as well. I will keep the scope to a single document library, but you can easily put a loop on top of it to update documents in all other document libraries as well.
So, what the solution looks like in a few points –
- Get a list of all Terms from the Term Set which we will use as master list of keywords
- Get list of all Files from the selected Document Library
- Loop through each document and
- Read the content
- Prepare sub document of less than 5000 characters each
- Extract Keywords using Azure Text Analytics Service
- Find Unique Keywords after combining the Subdocuments
- Compare these Unique keywords with Terms extracted from Identified Term Set (“Content Areas” in this case) and find common keywords
- Update the “Content Areas” column of the document with the identified common Keyword
Let’s take a look at each of these steps in detail.
Get a list of all Terms from the Term Set
All we need is a list of all Terms from the identified Term Set from SharePoint. This will be used to finally compare with the extracted keywords from documents and common terms will be added to the documents as metadata.
[code]
private static TermCollection GetTermsFromMMS(ClientContext clientContext, string guidOfTermSet)
{
TaxonomySession taxonomySession = TaxonomySession.GetTaxonomySession(clientContext);
taxonomySession.UpdateCache();
TermStore termStore = taxonomySession.GetDefaultSiteCollectionTermStore();
clientContext.Load(termStore,
termStoreArg => termStoreArg.WorkingLanguage,
termStoreArg => termStoreArg.Id,
termStoreArg => termStoreArg.Groups.Include(
groupArg => groupArg.Id,
groupArg => groupArg.Name
)
);
clientContext.ExecuteQuery();
//Requires you know the GUID of your Term Set, and the Name.
TermSet termSet = termStore.GetTermSet(new Guid(guidOfTermSet));
clientContext.Load(termSet);
clientContext.ExecuteQuery();
TermCollection terms = termSet.GetAllTerms();
clientContext.Load(terms);
clientContext.ExecuteQuery();
return terms;
}
[/code]
The above function accepts the ClientContext object and GUID of the TermSet and returns TermCollection containing all the Terms from that TermSet.
Get list of all Files from the selected Document Library
Let’s now just connect to the identified Document Library and get the list of all Files. I have not considered files inside Folders in this case, but you could easily include that too. It’s just SharePoint afterall 🙂
This is how this basic function looks like
[code]
private static ListItemCollection GetAllFilesFromDocLib(ClientContext clientContext, string docLibName)
{
Web web = clientContext.Web;
List DocLib = web.GetList(web.Url + "/" + docLibName);
CamlQuery query = CamlQuery.CreateAllItemsQuery(100);
ListItemCollection allListItems = DocLib.GetItems(query);
clientContext.Load(allListItems);
clientContext.ExecuteQuery();
return allListItems;
}
[/code]
Now that we have the list of all documents inside the document library, we can loop through it and take following actions for each document.
Read File from SharePoint
This one is going to be some work. There are various ways to read the documents but the content could be any type of office document (word, excel, ppt) and even with different extensions like doc, docx, ppt, pptx. So, you would need a function to read the content of all those types of documents to a string variable.
For this article, I will just show how that can be done for a word document. You can use other similar functions to read other document types.
This is actually a set of two functions – One to read the content from SharePoint file to memory stream and another to get the content in textual format from that memory stream using “WordProcessingDocument” object.
[code]
private static string ReadDocumentFromSPDocLib(ClientContext clientContext, string filePath)
{
string documentContent = null;
Web web = clientContext.Web;
Microsoft.SharePoint.Client.File file = web.GetFileByServerRelativeUrl(filePath);
ClientResult<System.IO.Stream> data = file.OpenBinaryStream();
clientContext.Load(file);
clientContext.ExecuteQuery();
using (System.IO.MemoryStream mStream = new System.IO.MemoryStream())
{
if (data != null)
{
data.Value.CopyTo(mStream);
mStream.Seek(0, SeekOrigin.Begin);
documentContent = GetTextFromWordprocessingDocument(mStream);
}
}
return documentContent;
}
[/code]
As you can see this function reads the file content into a memory stream and calls another function GetTextFromWordprocessingDocument with the memory stream as parameter.
[code]
public static string GetTextFromWordprocessingDocument(MemoryStream filePath)
{
const string wordmlNamespace = "http://schemas.openxmlformats.org/wordprocessingml/2006/main";
StringBuilder textBuilder = new StringBuilder();
using (WordprocessingDocument wdDoc = WordprocessingDocument.Open(filePath, false))
{
// Manage namespaces to perform XPath queries.
NameTable nt = new NameTable();
XmlNamespaceManager nsManager = new XmlNamespaceManager(nt);
nsManager.AddNamespace("w", wordmlNamespace);
// Get the document part from the package.
// Load the XML in the document part into an XmlDocument instance.
XmlDocument xdoc = new XmlDocument(nt);
xdoc.Load(wdDoc.MainDocumentPart.GetStream());
XmlNodeList paragraphNodes = xdoc.SelectNodes("//w:p", nsManager);
foreach (XmlNode paragraphNode in paragraphNodes)
{
XmlNodeList textNodes = paragraphNode.SelectNodes(".//w:t", nsManager);
foreach (System.Xml.XmlNode textNode in textNodes)
{
textBuilder.Append("" + textNode.InnerText);
}
textBuilder.Append(Environment.NewLine);
}
}
return textBuilder.ToString();
}
[/code]
GetTextFromWordprocessingDocument function returns a string which contains all the content from the file in a string variable.
Prepare Sub Document
Now that we have all the content from the file available in a string variable, we need to find a workaround for the current limitation of 5000 characters which Azure Text Analytics Service imposes.
Azure Text Analytics API call is charged per call and we can have upto 1000 documents (of less than 5000 characters each) per call. Also, there is a rate limit of 100 calls per minute. So, it is efficient and cost effective to combine multiple documents into one request.
To keep things simple, in this example, we’ll make one API call for each SharePoint document. What we’ll do in this case is to have a function which checks the content and puts them into a string array with each index containing max upto 4999 characters. Now, there is a possibility that a valid word might get truncated with this logic, so you can implement any other logic so that it doesn’t split any word. But for this article, I will just split when the string contains 4999 or more characters.
[code]
private static string[] SplitAndPrepareDocument(string textFromDocument)
{
var docCharSize = textFromDocument.Length;
int arrayLength = docCharSize / 5000;
string[] fileSection = new string[arrayLength + 1];
int arrayLoc = 0;
for (int i = 0; i < docCharSize; i = i + 4999) { if ((docCharSize – i) > 4999)
fileSection[arrayLoc] = textFromDocument.Substring(i, 4999);
else
fileSection[arrayLoc] = textFromDocument.Substring(i, docCharSize – i);
arrayLoc++;
}
return fileSection;
}
[/code]
Extract Keywords using Azure Text Analytics Service
Now we need to pass the string array containing all the content of the read file. Each index of the array contains max 4999 characters. We’ll make just one Azure Text Analytics Service API call to extract keywords from texts at all indexes combined.
[code]
private static KeyPhraseBatchResult ExtractKeywordsUsingAzureTextAnalytics(string[] fileSection)

{

var client = new TextAnalyticsClient();

client.AzureRegion = AzureRegions.Westeurope;

client.SubscriptionKey = "41fe375xxxxxxxxxxxx08666a6e4";

Console.OutputEncoding = System.Text.Encoding.UTF8;

// Getting key-phrases

Console.WriteLine("\n\n===== KEY-PHRASE EXTRACTION ======");

KeyPhraseBatchResult AllKeyPhrases = client.KeyPhrases(

new MultiLanguageBatchInput(

GetDocumentAsInpupt(fileSection)

));

return AllKeyPhrases;

}
[/code]
Take a note at the AzureRegion specified above. It must be the same location in which the Azure Text Analytics Service was created. Also, provide the subscription key recorded earlier from the Azure Text Analytics Service under SubscriptionKey.
In above function, we are batching the API call by sending a combined input. This means, we’ll create a list of MultiLanguageInput object, each of which contains the text from one index of the file content.
[code]
private static List<MultiLanguageInput> GetDocumentAsInpupt(string[] fileSection)
{
List<MultiLanguageInput> entireDocument = new List<MultiLanguageInput>();
for (int i = 0; i < fileSection.Length; i++)
{
entireDocument.Add(new MultiLanguageInput("en", (i + 1).ToString(), fileSection[i]));
}
return entireDocument;
}
[/code]
In this example, I am putting the content language as English and document ID as an incremental number. The function ExtractKeywordsUsingAzureTextAnalytics() reads all the content from each index and returns keywords for text at each index. So essentially, if the read file had 22000 characters, it would have been splitted into an array with 5 index. Index 0 to 3 containing 4999 characters each and index 4 containing remaining 2004 characters. The Azure Text Analytics API considers all these a different documents and returns an object of type KeyPhraseBatchResult which contains keywords for each such document (or content at an index in our case) separately.
Extract Unique Keywords
The above function gives a complete list of extracted keywords for content at each index assuming each index contains a different document. But since we have splitted a single document content, it may content duplicate keywords across content at different index. i.e. fileSection[0] and fileSection[2] may have some of the same keyword extracted.
But since we need a set of unique keywords for the entire document as a whole, all we’ll do is to remove duplicate keywords from the list of keywords returned by Azure Text Analytics API.
[code]
private static ArrayList GetUniqueKeywordsFromDocument(KeyPhraseBatchResult allKeyPhrases)
{
var keywordsCount = 0;
var uniqueKeywordsCount = 0;
ArrayList uniqueKeywords = new ArrayList();
foreach (var document in allKeyPhrases.Documents)
{
Console.WriteLine("Document ID: {0} ", document.Id);
Console.WriteLine("\t Key phrases:");
foreach (string keyphrase in document.KeyPhrases)
{
if (!uniqueKeywords.Contains(keyphrase))
{
Console.WriteLine("\t\t" + keyphrase);
uniqueKeywords.Add(keyphrase.ToLower());
uniqueKeywordsCount++;
}
keywordsCount++;
}
}
Console.WriteLine("Total Keywords Extracted: " + keywordsCount);
Console.WriteLine("Total Unique Keywords Extracted: " + uniqueKeywordsCount);
return uniqueKeywords;
}
[/code]
This function returns all the Unique Keywords found from the SharePoint Document read.
Compare with Term Store and Find Common Terms
Now that we have the list of keywords extracted from a whole document, one approach is that we can just associated all these keywords to the document as metadata. But I have seen that for a large document, the number of keywords could be in hundreds which will not be very useful.
A better approach might be to find out if any of those extracted keywords exist in the Organizational Taxonomy (Managed Metadata) store and associate only those keywords which match.
For this article, I would go for this approach.
At the start of this article, we had extracted the list of all Terms from the given termset. Now we also have the list of all extracted keywords from the document. So, let’s find if there are any common terms.
[code]
private static List<Term> GetMatchedKeywordsFromMMS(ArrayList uniqueKeywords, TermCollection allTermsFromTermSet)
{
List<Term> matchedKeyWordsFromMMS = new List<Term>();
Console.WriteLine("Comparing and Finding Terms from MMS…");
foreach (Term term in allTermsFromTermSet)
{
if (uniqueKeywords.Contains(term.Name.ToLower()))
{
Console.WriteLine("Match Found: " + term.Name);
matchedKeyWordsFromMMS.Add(term);
}
}
return matchedKeyWordsFromMMS;
}
[/code]
This function returns a list of all Terms which are found in the Term Set and also extracted by the Azure Text Analytics API.
Update Keywords in SharePoint
Almost there. Hang on…
Now that we have the final list of Terms for the document, we can go ahead and update that in the SharePoint document library.
[code]
private static void UpdateExtractedKeywordsInDocumentMetadata(ClientContext clientContext, string docLib, List<Term> matchedKeyWordsFromMMS, int DocumentID)
{
Web web = clientContext.Web;
List list = web.Lists.GetByTitle(docLib);
ListItem listItem = list.GetItemById(DocumentID);
Field field = list.Fields.GetByInternalNameOrTitle("ContentAreas");
TaxonomyField txField = clientContext.CastTo<TaxonomyField>(field);
string taxonomyFieldValue = "";
int termCount = 1;
foreach (Term term in matchedKeyWordsFromMMS)
{
if (termCount == 1)
taxonomyFieldValue += "-1;#" + term.Name + "|" + term.Id;
else
taxonomyFieldValue += ";#" + "-1;#" + term.Name + "|" + term.Id;
termCount++;
}
TaxonomyFieldValueCollection tx = new TaxonomyFieldValueCollection(clientContext, taxonomyFieldValue, field);
txField.SetFieldValueByValueCollection(listItem, tx);
listItem.Update();
clientContext.Load(listItem);
clientContext.ExecuteQuery();
}
[/code]
Putting all Together
This completes all the steps, lets just take a last look at how to put all these together.
[code]
static void Main(string[] args)
{
string siteURL = "Your SharePoint Site URL";
string docLibName = "Auto Tagged Docs";
string guidOfTermSet = "11170917-4e9e-478b-bb0e-4553f5594747";
//I have used a helper class SPOHeloer to get the Client Context, but you can use the normal way
ClientContext clientContext = SPOHelper.GetSPOContext(siteURL);
TermCollection allTermsFromTermSet = GetTermsFromMMS(clientContext, guidOfTermSet);
ListItemCollection allFilesFromDocLib = GetAllFilesFromDocLib(clientContext, docLibName);
foreach (ListItem file in allFilesFromDocLib)
{
clientContext.Load(file);
clientContext.ExecuteQuery();
string textFromDocument = ReadDocumentFromSPDocLib(clientContext, file["FileRef"].ToString());
string[] fileSection = SplitAndPrepareDocument(textFromDocument);
KeyPhraseBatchResult AllKeyPhrases = ExtractKeywordsUsingAzureTextAnalytics(fileSection);
ArrayList uniqueKeywords = GetUniqueKeywordsFromDocument(AllKeyPhrases);
List<Term> matchedKeyWordsFromMMS = GetMatchedKeywordsFromMMS(uniqueKeywords, allTermsFromTermSet);
UpdateExtractedKeywordsInDocumentMetadata(clientContext, docLibName, matchedKeyWordsFromMMS, file.Id);
}
Console.ReadKey();
}
[/code]
Some More Thoughts
Now that we put put together a nice piece of working example, some valid questions could be like how to practically use this or when to trigger this update.
Well, I will just add some thoughts and leave that up to your personal choice and SharePoint environment to decide.
- For existing documents, this can be run as a batch which iterates through all files and updates their metadata field with identified keywords one-by-one. This can be run either from windows scheduler (for on-premise environments) or as a web job (for SharePoint Online).
- For new files, you could use an Event Handler or a Web Hook attached to item added/updated events.
- You could also look into Office 365 Management APIs and read SharePoint related events and take action if you find any documents uploaded.
And that’s it for today. Hope this helps.
Enjoy,
Anupam
11 comments
This is awesome Anupam, and i struck with the limitation of 5000 characters and 1 MB maximum size. is it possible to share your code to implement on my tenant?
The entire code is there in the article itself. The function “SplitAndPrepareDocument” is there which actually splits the content in blocks of 5000 characters.
Any idea how to implement this in Flow (aka Power Automate)? I have key phrases extracted in a coma delimited list but I am unsure how to take that and compare it against the available term-sets and select them. Would be a great use of Flow
I don’t think you can do it 100% within Power Automate. How did you read the document to extract key phrases? I think you will have to write a couple of Azure Functions (like ReadDocument, GetTermsfromTermSet) and call those from within Power Automate to achieve this.
Hi Anupam,
I have generated my key 1 and key 2 after that how to test that my auto tagging is working for the documents. And I see there are some lines of codes above, where I need to copy and post them.
Also after generating the keys what is the next step.
Please reply.
Hi Vamshi,
The entire code is in article itself. Your key will be used when you call the Azure Text Analytics API in this function.
private static KeyPhraseBatchResult ExtractKeywordsUsingAzureTextAnalytics(string[] fileSection)
{
var client = new TextAnalyticsClient();
client.AzureRegion = AzureRegions.Westeurope;
client.SubscriptionKey = "41fe375xxxxxxxxxxxx08666a6e4";
Console.OutputEncoding = System.Text.Encoding.UTF8;
// Getting key-phrases
Console.WriteLine("\n\n===== KEY-PHRASE EXTRACTION ======");
KeyPhraseBatchResult AllKeyPhrases = client.KeyPhrases(
new MultiLanguageBatchInput(
GetDocumentAsInpupt(fileSection)
));
return AllKeyPhrases;
}
Hi Anupam,
Thanks for your reply.
I understand that keys can be used in the code above.
Can you please help me in where I have to copy the above code and how do I call Azure Text Analytics API.
Regards,
Vamshi.
This is a C# console application. You can start by creating a new project in Visual Studio.
Hello Anupam,
Thanks for your reply.
Do you recommend any specific version of Visual Studio or I can run in any version.
Regards,
Vamshi.
Visual Studio 2017 should be fine.
Alright Anupam! Thanks.
So once I copy this code into C# then I assume the process would execute as below:
1)copy the test documents into my documents library.
2)Calling API using C# console
3)Auto tagging should work.
Please confirm.
Regards,
Vamshi.