I was recently asked to work on Automating the on-premise Active Directory Account creation. The idea was simple – Hiring manager fills up a form with the required details about the new joinee and submits and then the account should get created in On-premise AD and eventually be synced with Azure AD with required licenses assigned.
The obvious expectation was to use available tools only which come as part of Office 365 E3 license suite.
Unfortunately Custom HTTP calls to Microsoft Graph became a Premium Connector in February 1, 2019 and now requires a P1 or P2 license.
Implicit Requirements
Even though the stated requirements seem quite straight forward, there were a few implicit ones which had to be taken care of:
- The Manager would fill the details like First Name, Last Name, Location, Type of account (normal/contractor) etc. but not the exact details required to create an account in AD like SamAccountName or Email ID. The solution should be able to find/process the required details before the account gets created
- There could be duplicate user names, i.e. multiple employees having same First Name and Last Name, so the solution should be able to generate the correct and available SamAccountName, email ID and so on
- In most AD structures, users are stored in various Organizational Units (OU), based on their location or Departments etc. So, the application needs to identify in which OU, this new account should be created
- The solution should maintain the status of where any given request is currently
You got the idea, the point is, if you are developing this solution for any production environment (not as a POC or an academic exercise), then you need to have some process in between which reads the data entered in the form, processes it and finds out the actual values to be used for Account Creation in On-premise AD.
Solution Approach
Now that we had established, what was required, it was time to look into How can we go about it. Unlike many of my previous articles, I would skip my journey about how I came up with this approach, but would just put a summary. Even though the title of the article says “Automate On-Premise AD Account Creation with MS Flow”, the solution includes a few more components with MS Flow being the heart of it.
We finally decided to use the following components:
- SharePoint Lists: We used SharePoint lists as kind of “backend” to store the data submitted by the Form and also to store processed information like SamAccountName, UPN, Email ID, etc.
- Microsoft PowerApps: To develop the form which will be filled by the managers. We could have used OOB SharePoint list, but PowerApps allows us to have much more control over what should be shown and how than the OOB list interface.
- Microsoft Flow: This is to take care of our data processing requirement and to find out final SamAccountName, UPN, Email ID etc. We used another Flow, just to check if the newly created got synced with Azure AD and to send notification to the request creator that account has been provisioned.
- PowerShell: And finally, since MS Flow currently can’t connect with On-Premise Active Directory, we used PowerShell to create the account.
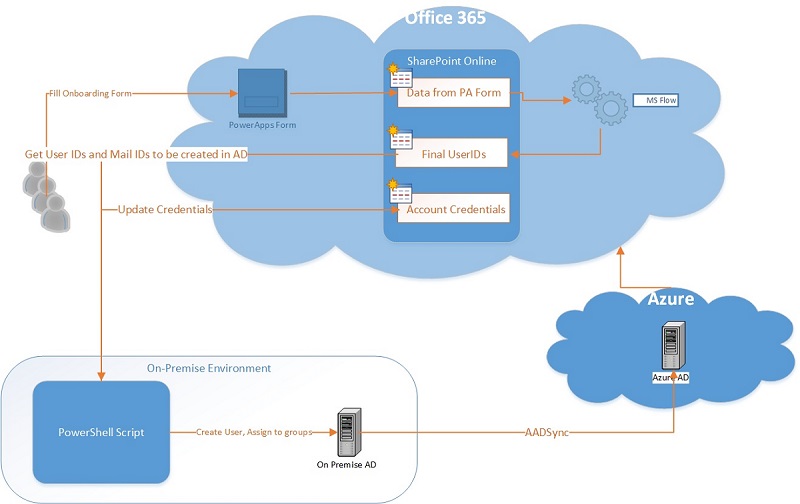
This is how our final solution looks like:

In First Look, this may look a bit overwhelming, but trust me once you go through it, you will find it really as a piece of cake 🙂
So, let’s break it down and take a look at each component in detail.
SharePoint Lists
First step is to create the data sources, i.e. SharePoint Lists. I created a new site collection and ended up creating 3 different lists to store different data, but that’s not required. You can just create two lists
- One with all the columns (like First name, Last Name, Location, Department etc.) to capture data from the Form, along with some additional fields like Final SamAccountName, UPN, Email ID etc.
- In my solution, I stored the data captured from the Form in List1 and processed data in List2
Everyone who can fill up and submit the Form, needs to have Add/Edit permission on this list
- And second to store the initial generated password of newly created account, which needs to be shared with the manager
Only a Service Account account under which the PowerShell runs and the account used by MS Flow – both described later in the article, need to have Read/Write access on this list.
PowerApps Form
Now that we had our so called “backend” data structure ready, it was time to develop a PowerApps Canvas application, to do the basic Add/Update operation on List 1. You can do wonders with PowerApps, but in the most basic form for this requirement, the form could look like this:
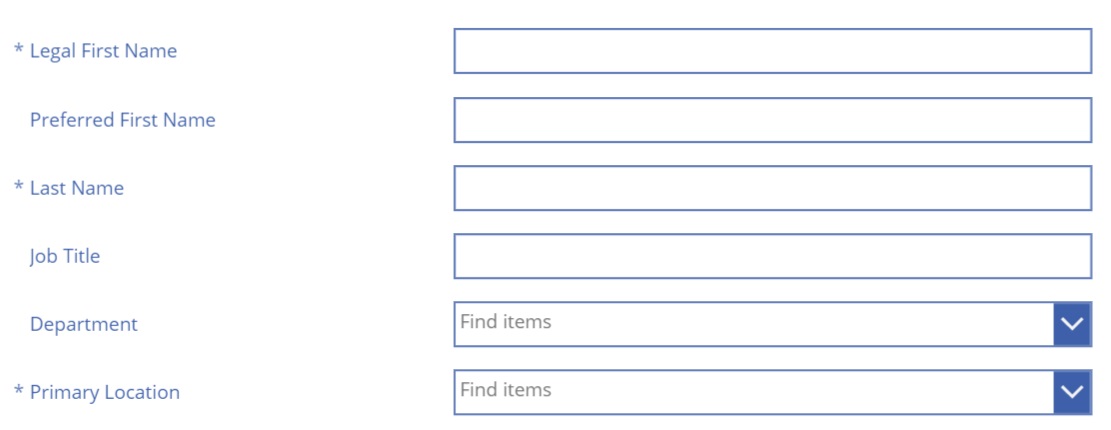
You may want to capture some additional details, if you want to automate Office 365 License assignment as well. This can be used to identify which licenses and Services should be enabled to this new account.

And that’s it. complete the form so that when submitted, the data gets stored in the SharePoint list. You can maintain a “Status” column in the list to track the same. When submitted, set the status as “Request Submitted”.
If you want to keep it really simple, you can either use OOB SharePoint list form or customize that New Item form in PowerApps. In my case, a created a new PowerApps Canvas Application.
Microsoft Flow
Since the idea of my solution was to minimize the line of code, so that it comes with less maintenance overhead in future, most of the logic processing part was handed over to flow.
- Create a Flow with trigger as Schedule – you can configure it to run based on your business requirement
- Use SharePoint “Get Items” Action to read the items from List 1 with filter query as “Status eq Request Submitted”
- Use you organization’s Account naming convention to generate SamAccountName, Email ID and UPN
- Check the generated names against Azure AD using Azure AD REST API. You can refer this article to find out how to make REST APIs calls to Azure AD.
- If the generated account already exists there, loop through and generate another account name. In most organizations, such naming conventions are based on incrementing last character with a digit like second user with name Anupam Shrivastava, gets Shriva02 as account name.
- Update the SharePoint list with Final generated and verified SamAccountName, UPN and Email IDs.
- Based on your organizational AD structure, find out the OU where the account needs to be created based on the Location or Department field’s values and store that OU in the SharePoint list.
- Update the Status as “Account Ready for Creation”, so that the same accounts are not picked up when the Flow runs again.
PowerShell
And finally, we needed PowerShell to actually create the accounts in On-Premise AD. Since, now we already have all the required details like SamAccountName, UPN, Email ID etc. along with the OU where the account needs to be created, we can just go ahead and create those accounts.
- Read the SharePoint List and get the items with Status “Account Ready for Creation”
- Loop through each item and use the New-ADUser cmdlet to get the account created.
[code]
Function CreateUserInAD([string]$SamAccountName,[string]$LegalFirstName, [string]$LastName, [string]$DisplayName, [string]$UPN, [string]$PrimarySMTP, [string]$Country, [string]$Office365License, [string]$OU)
{
#Generate a random password with 8 albhpabets, 1 special characters and 3 numbers
$global:DefaultPassword = (-join(65,66,67,68,69,70,71,72,73,74,75,76,77,78,79,80,81,82,83,84,85,86,87,88,89,90|%{[char]$_}|Get-Random -C 2)) + (-join(97,98,99,100,101,102,103,104,105,106,107,108,109,110,111,112,113,114,115,116,117,118,119,120,121,122|%{[char]$_}|Get-Random -C 2)) + (-join(65,66,67,68,69,70,71,72,73,74,75,76,77,78,79,80,81,82,83,84,85,86,87,88,89,90|%{[char]$_}|Get-Random -C 2)) + (-join(97,98,99,100,101,102,103,104,105,106,107,108,109,110,111,112,113,114,115,116,117,118,119,120,121,122|%{[char]$_}|Get-Random -C 2)) + (-join(64,33,35,36|%{[char]$_}|Get-Random -C 1)) + (-join(49,50,51,52,53,54,55,56,57|%{[char]$_}|Get-Random -C 3))
#Path where the account needs to be created
$OUPath = "OU=Users,"+$OU+$PathPostFix
#Create new account
New-ADUser -Name $SamAccountName -GivenName $LegalFirstName -Surname $LastName -DisplayName $DisplayName -UserPrincipalName $UPN -EmailAddress $PrimarySMTP -OtherAttributes @{‘extensionAttribute10’=$Office365License;’co’=$Country} -Path $OUPath -Credential $cred -Server $ADServer
#Set the account password
Set-ADAccountPassword -Identity $SamAccountName -Reset -NewPassword (ConvertTo-SecureString -AsPlainText $DefaultPassword -Force) -Credential $cred -Server $ADServer
#Activate the account
Set-ADUser -Identity $SamAccountName -Enabled $true -ChangePasswordAtLogon $true -Credential $cred -Server $ADServer
}
[/code]
-
- Update the Status as “Account Created”
- Store the Generated Password in another SharePoint list
At this stage the account gets successfully created in AD. If you want to Automate Office license assignment as well, you can follow the article “Automate License Assignments in Office 365“. You can see a parameter $Office365License in above script.
Bonus Step
In my case, just creating the account in On-Premise AD was not enough, since the newly created user needed to be able to access Office 365 Services like SharePoint Online sites. So, I decided to have another Flow created, which
- Checks if the user became available in Azure AD and marks the status in SharePoint list as “Account Provisioned”
- Sends Email Notifications to the manager along with the generated password
And that’s it. The entire Account Provisioning Process now taken about 2 hours compared with 2 days based on earlier process.
Happy Users, Happy Me 🙂
Enjoy,
Anupam
32 comments
Hi, nice post but I wonder how you trigger PowerShell? Is this also an scheduled task?
Yes, scheduled to run every hour.
Great post, I am working something exactly like this. Can you clarify the columns you used in list 2 and list 3?
In 2nd list, you need to keep all the columns you want to use while creating the AD account like – SamAccountName, First Name, Last Name, Email ID, UPN etc.
In 3rd List, it could be just SamAccountName and Password.
I have kept a RequestID field in all 3 lists, to make cross queries easy.
Thank you for the response. One more question on the logic. Did you generate the samaccountname and email in this flow logic or in the logic you linked too, that illustrates how to use the Azure REST api?
All logic implementation are within Flow only. The Flow uses the Azure REST API to connect to Azure AD and find out if a user account already exists.
I couldn’t get HTTP action in Flow as it was also a premium feature. I used Get Group Members (Azure AD) action to check the “All Users” distribution group to see if the UPN already exists there. I skipped the entire process saving me a huge amount of time. All because HTTP action is paid for me 🙁
But, how do you get the password from the PS script back to Flow so that I can send it via email? I am currently using a generic password for all, with “must change password at next login”.
Yes, unfortunately If you need to construct custom HTTP calls to Microsoft Graph, you are typically using the built-in HTTP connector. This connector became a Premium Connector in February 1, 2019 and now requires a P1 or P2 license.
Regd. Passwords, I mentioned in the article – Store the Generated Password in another SharePoint list.
Good article, I am working on a similar project. I am working the other way round. Use Flow HTTP connector to call the on-prem API to trigger user creation.
Yours better security as no need to expose API to public.
Just what to know why you not put all the logic to the Powershell? e.g. the AAD duplicate checking logic. Thanks!
It’s to keep and maintain as less “code” as possible.
Thanks so much for this article, I was wondering if this can be in my case that I have s SharePoint online list which takes user information, and there is a flow running to just create tickets and notify each group, Can I somehow trigger on-prem user creation with the submitting the form?
Could not understand your concern here… You can always use the trigger item created/updated in Flow to get started and use the steps mentioned in the article to create the account in On-premise AD.
Hi Anupam,
Nice article !!.
I’m working on a similar use case: Workday & on-prem AD; auto-update/synch with on-prem AD when a new employee been created in the Workday. We are using Auzur Logic app and Azure function (instead of MS Flow). We are getting data in JSON format and we are also validating first name/last name/email etc from Azure AD using Azure function.
Question: Can you please help me to understand your Powershell integration? Is your PS is running on-prem with a scheduler? How your PS will pick up any change happened in the backend DB ( SharePoint in your case). Can you suggest, how we could trigger PS script and store data in on-prem AD automatically when there is a new data been created in the backend??
Hi, in my case, I have just scheduled it to run every hour. Since account creation is NOT required to be done in real time. Yes, it’s running on an on-premise server. It simply “Polls” the SharePoint list every hour and checks for the requests which are in “Account Ready for Creation” state.
You may think of “some tricks” to trigger the PowerShell hosted on-premise, but I would not suggest that, as essentially you would be implementing a solution that can execute a Full trust solution from a cloud location (Azure in this case), Big security concern!
do you have captured images (step by step) can you please share? Thank you very much
This solution includes combining various tools like SharePoint, PowerApp, Flow and PowerShell. I have provided all details that should be required to get it working. If you are stuck or have any specific question, let me know.
Hi, great blog post and got it working. I’m also interested to automate modifications on users data on-premise. Example users title changes or phone number so that HR can populate that change into Sharepoint list and that will populate then on-premise. You have any experience or tips for anything like that?
You can follow the same approach explained in this article. It would be even easier as you not creating new users in AD, just updating the existing ones. Very simplistically, you can just write a few lines of PowerShell script which will read the SharePoint list, search for the user in On-prem AD and update the corresponding attributes.
Hi,
is your Powershell Script to create new Users also used in Flow, or do you loop in the Powershell Script itself through the SP List? If not, can you give me a hint, how I can use the PS script in Flow and hand over the parameters? I didnt find any good solution yet.
Hi,
Yes, PowerShell is running on an on-premise Server, looping through SP List. Flow is used to process all business logic to generate User IDs, Email IDs, SAMAccountName etc. and PowerShell just creates it in AD. There is no easy (or secure) way yet to trigger PowerShell to access on-premise AD.
There is a workaround though as mentioned here – https://sergeluca.wordpress.com/2017/12/01/upload-and-run-a-remote-powershell-script-from-microsoft-flow/.
Thanks,
Anupam
Do you have an examples that include real time “look-ups” to pull data from AD (or AAD) to help populating the form (e.g. for change requests or terminations of existing user objects)?
I don’t know if I understood your question correctly. But if you want to pull data from AAD/Office 365 Profiles in a PowerApps Form, you can very well create a lookup or filter like this –
If(Not IsBlank(TxtSearchbox.Text), Sort(Filter(Office365Users.SearchUser({searchTerm:TxtSearchbox.Text}),AccountEnabled ,EndsWith(UserPrincipalName,"tenantname.onmicrosoft.com")),Surname,Descending))Would you be able to share more detail on how you connected to Sharepoint from your on-prem powershell and iterated over the list items? We are using Sharepoint online and I’m struggling to find some answers there.
SO I understand, you want more details about this step – “Read the SharePoint List and get the items with Status “Account Ready for Creation””!
This is actually very easy –
I have also added some code for your reference, but you can easily google for more clarity, if required.
Add-Type -Path "C:\Program Files\Common Files\microsoft shared\Web Server Extensions\16\ISAPI\Microsoft.SharePoint.Client.dll"

Add-Type -Path "C:\Program Files\Common Files\microsoft shared\Web Server Extensions\16\ISAPI\Microsoft.SharePoint.Client.Runtime.dll"
#Get SPO Content
Function Get-SPOContext([string]$Url,[string]$UserName,[string]$Password)
{
$SecurePassword = $Password | ConvertTo-SecureString -AsPlainText -Force
$context = New-Object Microsoft.SharePoint.Client.ClientContext($Url)
$context.Credentials = New-Object Microsoft.SharePoint.Client.SharePointOnlineCredentials($UserName, $SecurePassword)
return $context
}
#Read SPList and Return All Items
Function Get-ListItems([Microsoft.SharePoint.Client.ClientContext]$Context, [String]$ListTitle) {
$list = $Context.Web.Lists.GetByTitle($listTitle)
$Context.Load($list)
$cquery = New-Object Microsoft.SharePoint.Client.CamlQuery
$cquery.ViewXml = 'Request Submitted
$items = $list.GetItems($cquery)
$Context.Load($items)
$Context.ExecuteQuery()
return $items
}
Hope this helps.
so if I understand you correctly, you did the on-premise part like this:
– submit powershell script to the filesystem (using on-premise data gateway?)
– run a scheduler on the server to run the ps script
is that correct?
if using SharePoint Online, how would you change the process? especially writing back to the list seems not straight forward after running the script on prem.
The solution mentioned in the article has lists in SharePoint online environment only.
You need to update the SPO Lists from within PowerShell, after the account(s) get created in AD. Why is that not straightforward?
Can you just do a step-by-step to help us out. so we can understand the actual process?
It’s a simple solution, Flow just reads from the SP list, finds out the UPN, Email ID etc and stores them in another List. Then an On-premise PowerShell reads those final generated details and creates those in AD. You can contact me over email for any additional details.
I have a doubt regarding running of the powershell scripts. Does it need to be hosted in the same server as the On premise AD ? Or can we connect to the server from an external server using any connection specs of the AD server ?
You can run the script on any on-premise server connected to AD.
Do you have a more detailed instruction set or screenshots of the MS Flow section. I am working on using this structure to streamline the new user process with our HR department but I am stuck on how the SamAccountName , Email ID and UPN are being generated. Is this within the Flow?
It’s mentioned in the article. You can use REST API calls to Azure AD.
“Use you organization’s Account naming convention to generate SamAccountName, Email ID and UPN.
Check the generated names against Azure AD using Azure AD REST API. You can refer this article (https://anupams.net/extended-attributes-azure-ad-ms-flow/) to find out how to make REST APIs calls to Azure AD.
If the generated account already exists there, loop through and generate another account name. In most organizations, such naming conventions are based on incrementing last character with a digit like second user with name Anupam Shrivastava, gets Shriva02 as account name.”