
This article is outdated now since Microsoft retired the Service Communication API in Dec 2021. Please look at this article instead, which uses Microsoft Graph API to achieve the same.
I wrote an article on how to Automate Office 365 Health Status Monitoring using PowerShell a couple of years ago, which was found very useful for many Office 365 Admins. It was based on the API “shdtenantcommunications”, which has now been discontinued by Microsoft. I have put an update on that article about this, so that you can save your time by NOT attempting to try n make that work anymore.
Instead Microsoft released Office 365 Service Communications API, which not only provides the features covered by the retired API, but can also provide real time monitoring, if required.
Problem Statement
So, what exactly we are trying to solve here? Well very basic actually. If you are facing any issues with your office 365 environment (i.e. SharePoint pages not loading correctly, unable to sign-in to MS Teams etc.), make sure to check the Office 365 Admin Portal and look into the Service Health, where MS Publishes all Office 365 Health related details, including the updates about troubleshooting.
Manual Health Monitoring
So, now that we know where to look, lets just quickly take a tour about how and what to look for. Even though this is very basic, but could be useful for users who are getting started with Office 365 Administration.
Just login to the Office 365 Admin portal, and go to the Service Health under Health Category. Then click on Incidents tab on the page. It will list down all the ongoing incidents in office 365 environment across various applications.

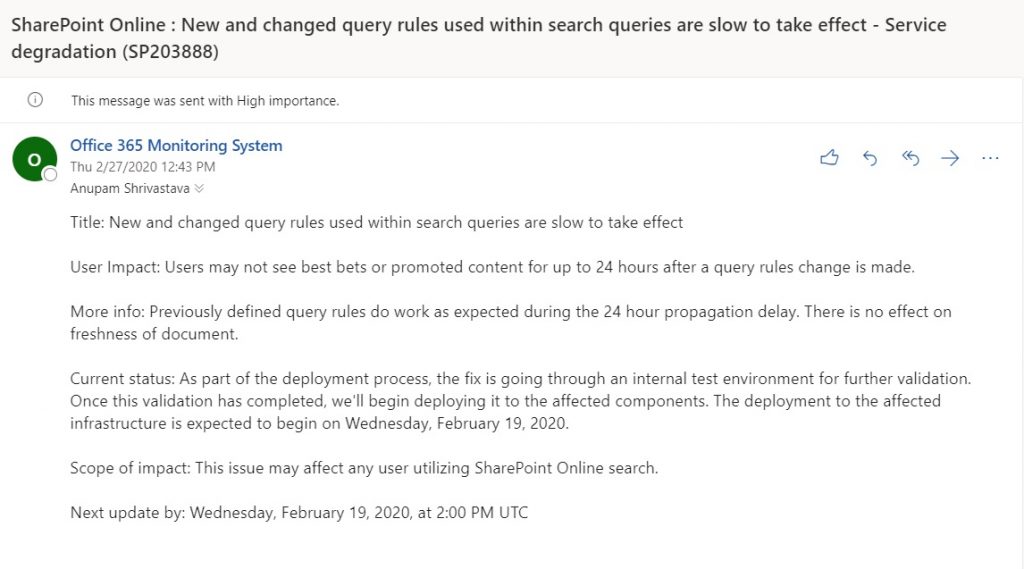
If you click on the Title of any of the messages, it will show detailed history of all the status, troubleshooting and current status.
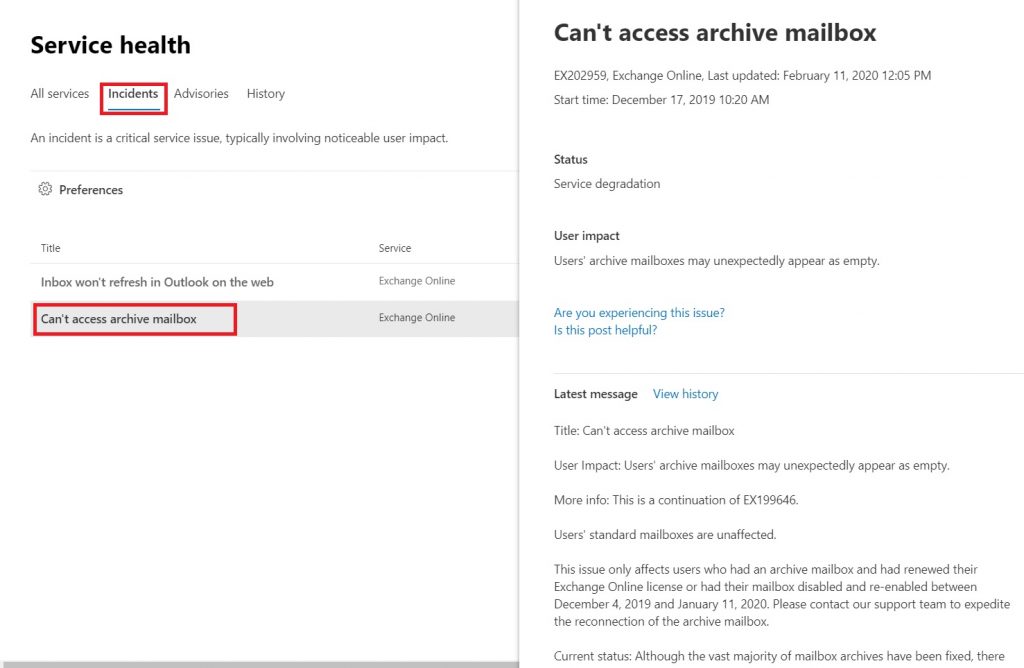
And there you have it. In the above example, if your users are facing issues in accessing the mailbox archive, you now know why and chose to send a local/global communication to your end users based on the updates in the portal.
But essentially, it’s quite a reactive approach. In this scenario, if the Office 365 Admins are not proactive enough (hard to be in such cases!), and checking the Health status very frequently, chances are they will know only after users start complaining!
So, what can we do about it?
Configure Notifications
Now, we are back to the topic of this article. In such scenario, obviously, Office 365 Admins will prefer to get some kind of notification (like over email), which tell them about the issue as soon as Microsoft posts something in the Health Center.
Good thing, it’s really easy to setup now. Now, you can just setup to receive mail notifications from with the Health Center configurations. What more, you can pick and choose which type of events you want to monitor (Incidents or Advisory) and also, events related to which Application(s). Just click on “Preferences” and select the check box “Send me service health notifications in email”. You can the type in upto 2 email addresses, select type of events and applications and click Save.
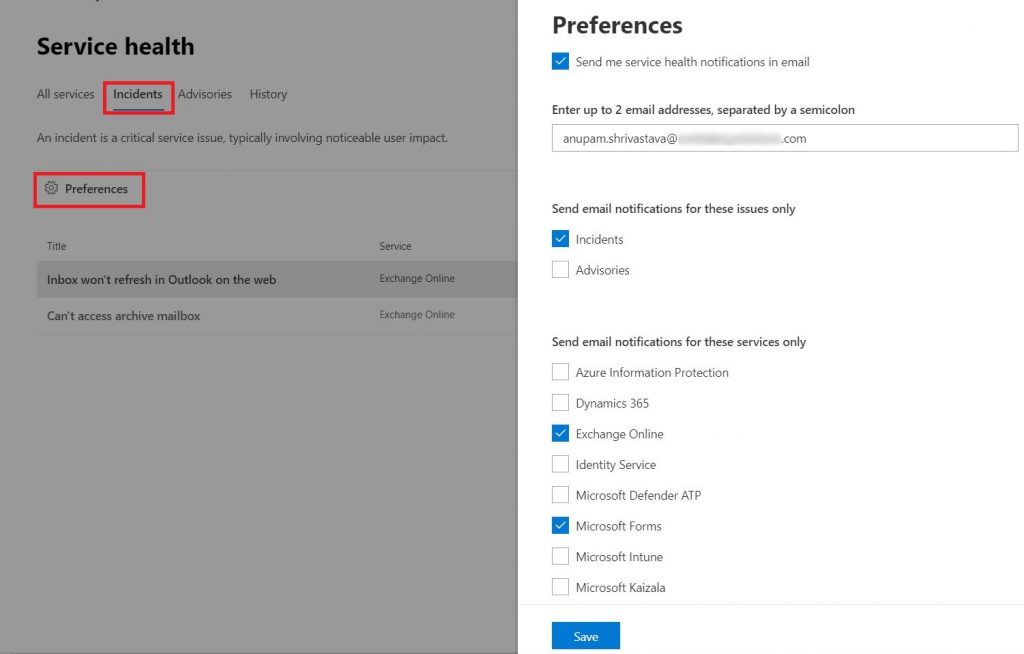
And it’s Done. Next time, MS publishes any new update, you will receive emails in the mailbox.
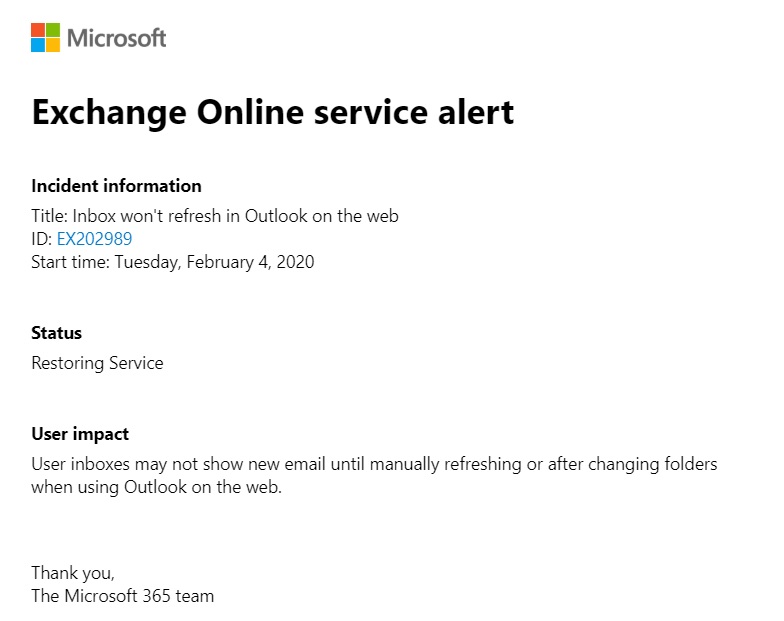
At the time of writing this article, you can’t customize the mail format and add/remove any details from it. But it’s quick and easy and provides basic necessary details.
So, that’s done, then why do we even need to use the Office 365 Communication APIs, the main topic of this article?
Office 365 Communication API
I know I am being lengthy, but the idea is that you should know that there are other alternatives available which can serve good enough depending upon your scenario.
As we saw in previous sections, even the OOB notifications seem good enough to work with then why even bother about dealing with this Communication APIs.
- If you want to set up notifications for various users based on different applications
- If you want to get more details about the incident in the notification mail itself
- If you want to change the mail format to include/remove details about the event
- If you want to feed the information to some other system
- XXX other reasons, you are a techie, you will find reasons 🙂
So, now we have a few reasons to invest our efforts in it. Let’s get started.
Register App in Azure AD
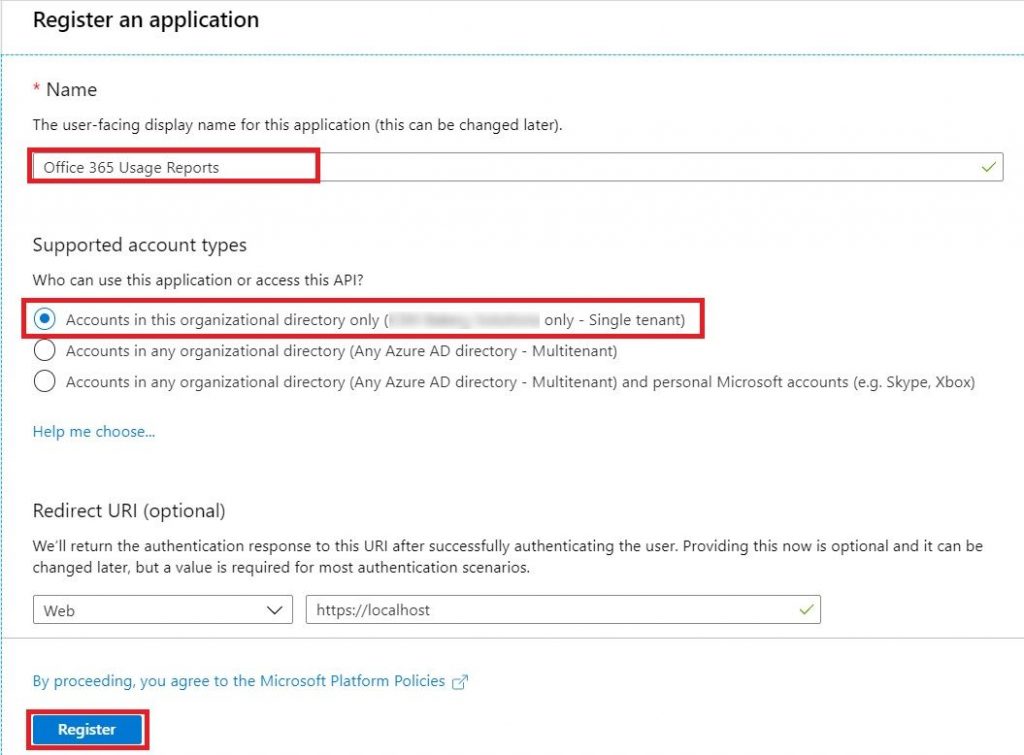
To use the Office 365 Communication API, we first need to register an app in Azure AD and grant it permissions to be able to read reports. Just go to Azure AD – App Registrations and Click on New registration.
Fill in the Application Name and account type. Redirect URI is optional, but you can fill in any url like https://localhost.
I am using name as Office 365 Usage Reports, but If you are using your application only for Health Status monitoring, just use a relevant name.
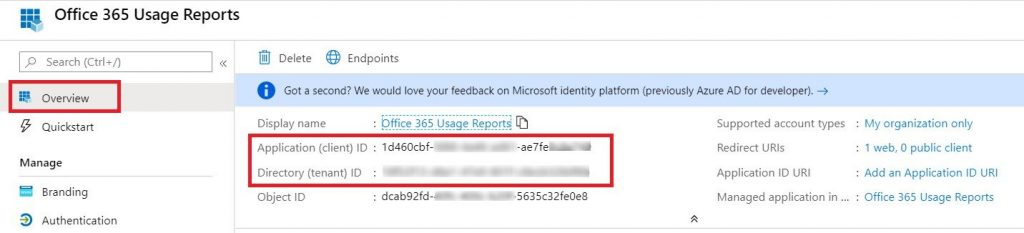
Once registered, go to the Overview and copy the Application (client) ID and Tenant ID to a notepad. We’ll need those later.
Now, we need to assign appropriate permission to this app to be able to read Office 365 Usage Reports. Click on API Permissions in the left navigation and Click Add Permission. In the new window, click on Office 365 Management APIs and search for “ServiceHealth.Read” under Application Permissions. Click on Add Permission after selecting ServiceHealth.Read.
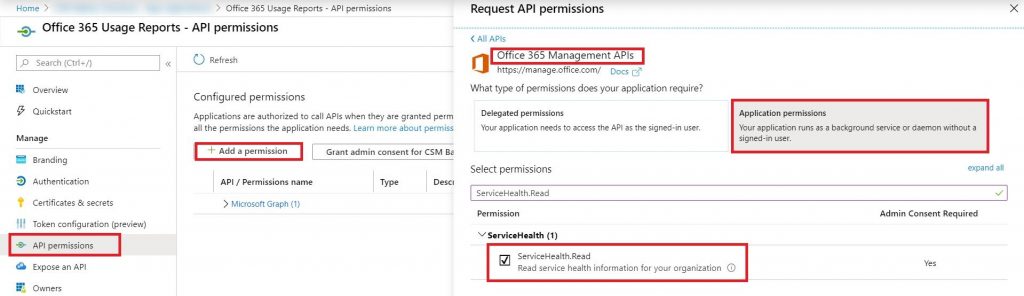
You need to Grant Admin Consent to add this permission. If you have tenant admin credentials, you can just click on the button “Grant Admin Consent for xxx”, otherwise send the link of the app to your tenant admin to do so.
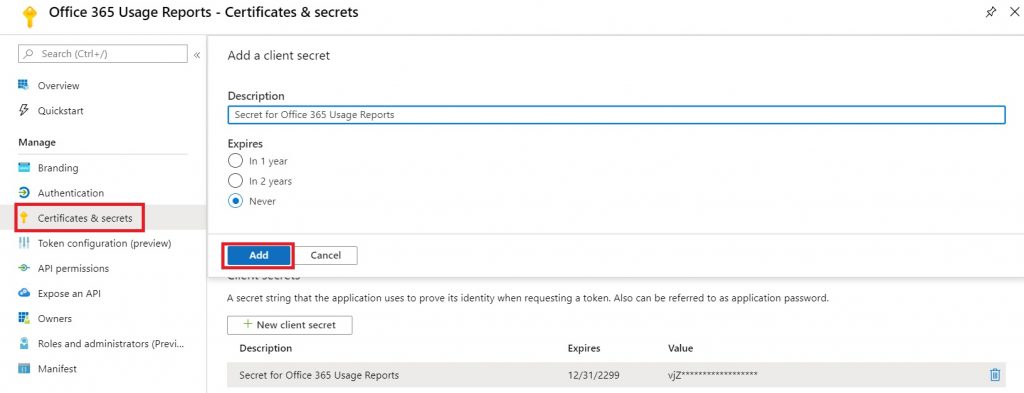
Last step is to generate the Client Secret. Click on Certificates and secrets in the left navigation and then click on New client secret. Type in a Description, select Expires as Never and Click Add. Copy the generated Client Secret to a notepad.
Now, our app is ready to read the Office 365 Health Status using the Communication API. We can call the API either through PowerShell or through Flow (called Power Automate now!)
PowerShell
So, now that we have an app registered and configured as required, lets jump into the nice stuffs.
I will keep it simple. What are we looking to achieve here is that we should be able to query the Health status incrementally. So essentially, we want to say that send me a notification if something happened in Office 365 Health status after my script ran last time.
So, you got the idea. We need to keep the last run time of the script somewhere. For this script, assuming it will be run on a VM, I decided to keep that last run time in a Registry key. You can always keep it in a separate text file, if you prefer.
Let’s write a separate function which will return the last run time and update the current time of the script at the same time.
#Keep Last Run Time of the Script in Registry
Function GetLastRunTimeFromReg($LastRunTime)
{
$ExistingDateTime = $LastRunTime
if((Get-ItemProperty HKCU:\Software\O365ServiceMonitor -Name LastRunTime -ea 0).LastRunTime)
{
$ExistingDateTime = (Get-ItemProperty HKCU:\Software\O365ServiceMonitor -Name LastRunTime).LastRunTime
Set-ItemProperty -Path HKCU:\Software\O365ServiceMonitor -Name LastRunTime -Value $LastRunTime
}
else
{
New-Item -Path HKCU:\Software\O365ServiceMonitor -Force
Set-ItemProperty -Path HKCU:\Software\O365ServiceMonitor -Name LastRunTime -Value $LastRunTime
}
return $ExistingDateTime
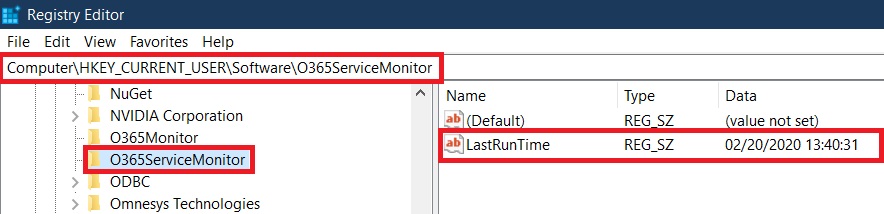
}When this script gets executed (details later), it will make an entry in the windows registry like this.
Next, we know to call the Office 365 APIs, we need to get the Access Token using the Client Id and Secret from the Application we registered earlier.
Let’s add another function which will accept the required parameters and return is the Access token.
Function GetBearerToken($TenantId, $ClientId, $ClientSecret)
{
    #No need to change these
    $Scope = "https://graph.microsoft.com/.default"
    $TokenURI = "https://login.microsoft.com/$TenantId/oauth2/token?api-version=1.0"
    $Resource = "https://manage.office.com"
    $TokenHeader = @{
    'Content-Type' = 'application/x-www-form-urlencoded'
    }
    #Notice, body should NOT be converted to JSON format
    $TokenBody = @{
    'client_id'=$ClientId
    'scope'=$Scope
    'resource' = $Resource
    'client_secret'= $ClientSecret
    'grant_type'='client_credentials'
    }

    #Call the API to get the beaerer token in response
    $Response = Invoke-RestMethod -Uri $TokenURI -Headers $TokenHeader -Body $TokenBody -Method Post

    #Extract the bearer token from response
    $AccessToken = $Response.access_token

  return $AccessToken
}
Now, we need the another function which will do the trick. This will call the Office 365 communication API, get the results and send the mails.
Function GetOffice365ServiceCommunicationMessages($TenantId, $AccessToken, [string[]]$Workloads, [string[]]$SendMailTo, $SendMailFromUserName, $SendMailFromUserPassword)
{
    #Prepare header for Graph API call
    $Headers = @{
    'Content-Type' = 'application/json'
    'Authorization' = 'Bearer ' + $AccessToken
    }
    #Endpoint URI to get Service Communication Messages
    $Uri = "https://manage.office.com/api/v1.0/$TenantId/ServiceComms/Messages"

    #Get the last run time of this script from the registry and query for incidents happened or updates posted after that time only
    $CurrentDateTime = (Get-Date).ToUniversalTime()
    $CurrentDateTime = $CurrentDateTime.ToString("MM/dd/yyyy HH:mm:ss")
    $LastRunTimeOfThisScript = GetLastRunTimeFromReg $CurrentDateTime
    $Culture = Get-Culture

    #Call the API to Update the property, look for incidents only
    $Responses = (Invoke-RestMethod -Uri $uri -Headers $Headers -Method Get).Value | Where {$_.MessageType -eq "Incident" -and $_.Workload -in ($Workloads) -and (($_.LastUpdatedTime).ToDateTime($Culture)).ToUniversalTime() -gt $LastRunTimeOfThisScript } #

    #Name of the SMTP Server to send mails, this is default for Office 365, no need to change
    $Smtp = "smtp.office365.com"

    #Get the credentials to send mails
    $SendMailFromUserPassword = ConvertTo-SecureString  $SendMailFromUserPassword -AsPlainText -Force
    $PsCred = New-Object System.Management.Automation.PSCredential -ArgumentList ($SendMailFromUserName, $SendMailFromUserPassword)

    #Loop through each response and send a mail for each message
    foreach($Response in $Responses)
    {
        $MessageID = $Response.Id
        $WorkloadDisplayName = $Response.WorkloadDisplayName
        $Status = $Response.Status
        $MessageTitle = $Response.Title

        #One response may contain multiple messages, only send the latest message over email
        $MessageDetails = $Response.Messages[$response.Messages.Count-1].MessageText

        #Subject of the mail to contain the workload name, incident title, current status and ID of the event
        $Subject = "$WorkloadDisplayName : $MessageTitle - $Status ($MessageID)"
        send-MailMessage -SmtpServer $Smtp -From $MailSendFromUserName -To $SendMailTo  -Subject $Subject -Body $MessageDetails -Priority high -UseSsl -Credential $PsCred -Port 587
    }
}
Let’s put all these things together and execute
#Declate the varibales, update these for your tenant and app
$TenantId = "xxxx-62f4-xxxx-ad9c-xxxx"
$ClientId = "xxxxx-8671-xxxx-8347-xxxxx"
$ClientSecret = "xxx-84GkNB.xxxxe5qwp"

#Put the workloads you want to receive mails for (values are like Exchange, Planner, microsoftteams, Form, OneDriveForBusiness, yammer, OSDPPlatform)
[string[]]$Workloads = "Lync", "SharePoint", "OSDPPlatform"

#List of users’ valid mail IDs to send mails to
[string[]]$SendMailTo = "[email protected]"

#Any valid account with Exchange online license assigned to appear under from. This is because we are using smtp.office365.com as SMTP.
$SendMailFromUserName = "[email protected]"
$SendMailFromUserPassword = "xxxx"

#Get the access token
$AccessToken = GetBearerToken $TenantId $ClientId $ClientSecret

#Call the API to look into message center for Incidences and send mails
GetOffice365ServiceCommunicationMessages $TenantId $AccessToken $Workloads $SendMailTo $SendMailFromUserName $SendMailFromUserPassword
And we are done!
Our script is now ready to be added to the task scheduler. Put all these in a single .ps1 file and Add that to the task scheduler and schedule it to run every 30 mins!
Microsoft normally publishes incident updates every 30 mins, so that should cover most updates
It will run twice every hour and if there are any Incidents posted in Office 365 portal since it ran last, it will send the details over an email. Obviously, you can also trigger this manually.
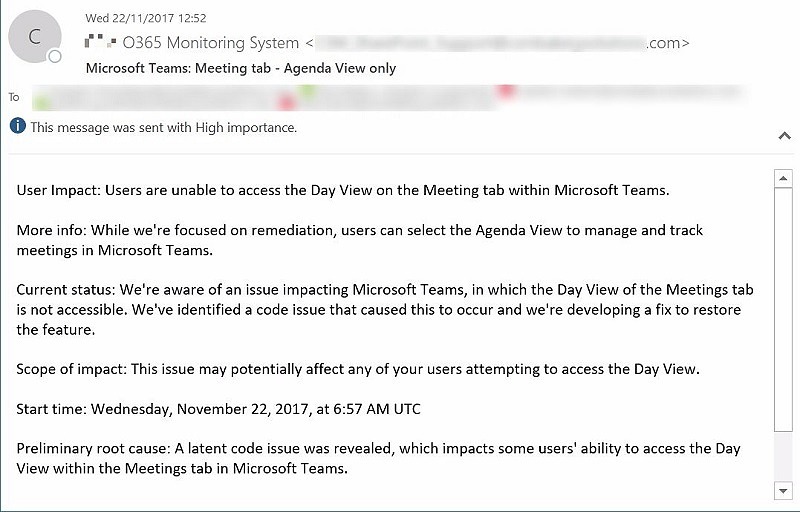
If everything went as expected, you should receive nice mails with all the required details like this.
Looks better than default notifications with all the required details in one go, isn’t it. I will leave it upto you to give it try.
I have covered, how to get this done using MS Flow as well in this article.
Enjoy,
Anupam
14 comments
Does this have any reoccurring costs?
No, You can even use Power Automate to achieve the same, which I have explained in this article – AUTOMATE OFFICE 365 HEALTH STATUS MONITORING WITH POWER AUTOMATE/FLOW USING SERVICE COMMUNICATIONS API
Great information. Thanks for sharing. Is there a way to output this in html format that can be published on an intranet website for end users to review ? Please advise.
You can refer to this article – AUTOMATE OFFICE 365 HEALTH STATUS MONITORING WITH POWER AUTOMATE/FLOW USING SERVICE COMMUNICATIONS API, which uses Power Automate to do the same. And this article – AUTOMATE NEWSLETTER GENERATION USING POWER AUTOMATE explains how you can generate nice looking emails using Power Automate.
If you combine the solutions explained in these articles, you can achieve the nicely formatted HTML output.
thanks for this – I get these errors once I run the script. Any idea ?
At C:\temp\MessageCenter\ms.ps1:32 char:6
+ ‘resource’ = $Resource
+ ~
Missing ‘=’ operator after key in hash literal.
At C:\temp\MessageCenter\ms.ps1:34 char:37
+ ‘grant_type’=’client_credentials’
+ ~
The string is missing the terminator: ‘.
At C:\temp\MessageCenter\ms.ps1:32 char:6
+ ‘resource’ = $Resource
+ ~
The hash literal was incomplete.
At C:\temp\MessageCenter\ms.ps1:20 char:1
+ {
+ ~
Missing closing ‘}’ in statement block or type definition.
+ CategoryInfo : ParserError: (:) [], ParseException
+ FullyQualifiedErrorId : MissingEqualsInHashLiteral
Just try to type in the special characters (like single quotes) in the script… I have seen this issue if you copy the entire script from the post, sometimes the editors change the single quotes to some other character, throwing such issues.
What is the difference between Client Secret value and ID in Azure? Which one should be used in the above case? Sorry, I know it’s a noob question!
It’s like username and password. Client ID is the application ID and secret is like the password which you can change later, if required.
No, I see two different fields next to the Secret. The columns I have are: Description, Expires, Value and ID. Now, value and ID are very similar in terms of the combination of letters and characters and their combination. I was just confused if I should use the Value or ID. I’m thinking Value.
Yes correct, use value.
Does this still work . i am running the script and no email gets triggered. No error either.
It’s a PowerShell script, so you can debug if you are able to get the data or at which step it’s failing.
There is a link to MS Flow version also – https://anupams.net/automate-office-365-status-monitoring-flow/
Hello ,
Microsoft retired Service Communications API in December last year , how can we change this ?
he Microsoft Graph API replaces the Service Communications API that’s documented in this article. We’ll be retiring the legacy version of the Service Communications API beginning December 17, 2021
I have posted a new article which achieves the same using Microsoft Graph API.